ACCU-CHECK Aviva Reference Manual
Blood glucose meter
Hide thumbs
Also See for Aviva:
- Getting started manual (80 pages) ,
- User manual (46 pages) ,
- User manual (196 pages)
Table of Contents
Advertisement
Advertisement
Table of Contents
Troubleshooting

Related Manuals for ACCU-CHECK Aviva


Summary of Contents for ACCU-CHECK Aviva
- Page 1 BLOOD GLUCOSE METER Reference Manual...
- Page 3 Whether the Accu-Chek Aviva Meter is your first blood glucose meter or you have used a meter for some time; please take the time to read this booklet carefully before you use your new meter. To use it correctly and dependably, you need to understand its operation, screen displays, and all individual features.
- Page 4 Your new Accu-Chek Aviva Meter is for quantitative blood glucose testing using Accu-Chek Aviva Test Strips. The Accu-Chek Aviva Meter may be used by patients who test their own blood glucose as well as by healthcare professionals for monitoring patients’ blood glucose values.
- Page 5 Need Help? If you have any questions, please call the Accu-Chek Customer Careline on 0800 701000 (UK) or 1 800 709600 (Ireland). Please remember to complete the warranty card and send it by post to Roche Diagnostics, so you receive the best customer service possible and news on product updates.
- Page 6 It should not be used to diagnose diabetes. • Only use Accu-Chek Aviva Test Strips. Other test strips will give inaccurate results. • The meter comes with a preset time and date. However, you may need to change the time to your time zone.
-
Page 7: Table Of Contents
............8 The Accu-Chek Aviva Meter ................8 Coding the Meter ....................10 Adjusting the Time and Date – First Time Use..........12 Using the Accu-Chek Aviva System ..............14 Chapter 2: Testing Your Blood Glucose ..............15 Performing a Blood Glucose Test ..............15 Flagging Test Results ..................20 Alternative Site Testing (AST) ................21... - Page 8 Chapter 4: Control Testing ..................47 Why Perform Control Tests ................47 About the Control Solutions ................48 Performing a Control Test ................49 Understanding Control Test Results ..............53 Chapter 5: Testing Blood Glucose in Multiple Patients ........56 Testing Blood Glucose ..................58 Disinfecting the Meter ..................62 What to Disinfect .....................62 How to Disinfect ....................62 When to Disinfect ....................63...
- Page 9 Chapter 7: Technical Information ...............75 Product Limitations ..................75 Specifications ....................75 Product Safety Information ................77 Disposing of the Meter ..................77 Warranty and Service Instructions ..............80 Additional Supplies ..................81 Information for Healthcare Professionals – Alternative Site Testing (AST) ..82 Chapter 8: The Accu-Chek Multiclix Finger Pricker ...........83 Loading a Lancet Drum ...................85 Taking a Fingertip Blood Sample ..............88...
-
Page 10: Chapter 1: Understanding Your New System
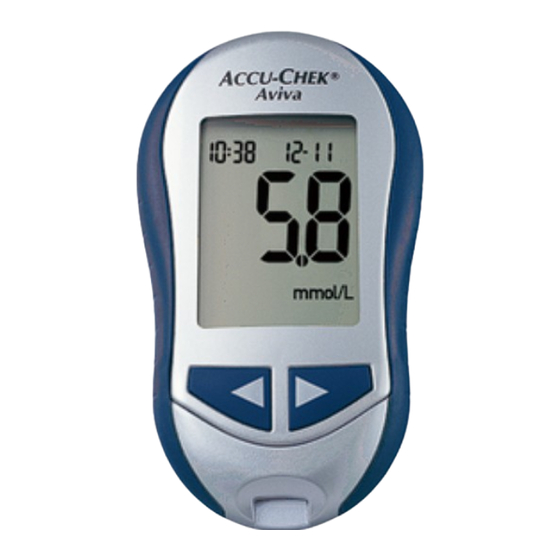
Chapter 1: Understanding Your New System The Accu-Chek Aviva Meter Infrared (IR) Window – Display – Transfers data from the Shows results, meter to a computer messages, and or PDA. results stored in On/Off/Set Button – memory. Turns the meter on or Right and Left off and sets options. - Page 11 Golden End – Insert this end of the test strip into the meter. Yellow Window – Touch blood drop or control solution here. Test Strip Test Strip Container Control Solution Bottle Code Chip Battery – Insert with On/Off/Set Infrared (IR) (for example) (+) symbol facing up.
-
Page 12: Coding The Meter
Coding the Meter 1. Make sure the meter 2. Turn the meter over. 3. Remove the old code is off. chip (if there is one in the meter) and discard it. ▲ Inserting the code chip sets the meter to match the test strips. This “codes”... - Page 13 4. Turn the code chip over so the code 5. Leave the code chip in the meter number faces away from you. Push until you open a new box of test it into the code chip slot until it strips. stops.
-
Page 14: Adjusting The Time And Date - First Time Use
Adjusting the Time and Date – First Time Use Setting the correct time and date in the meter is important if you use the meter memory or if you want to download your results to a computer. decrease increase 2. Press and release 1. - Page 15 Note: When you install a new battery, the meter automatically prompts you to check the time and date when you turn it on. decrease increase 4. Press and release 5. Repeat to set the day, symbol appears. The time to adjust the month, and year.
-
Page 16: Using The Accu-Chek Aviva System
Using the Accu-Chek Aviva System • Only use Accu-Chek Aviva Test Strips. • Be sure to check the expiry date on the test strip container. Do not use the test • Change the code chip every time you open strips after that date. -
Page 17: Chapter 2: Testing Your Blood Glucose
Chapter 2: Testing Your Blood Glucose Performing a Blood Glucose Test Before you perform your first blood test, set up the meter correctly. You will need the meter, a test strip, a finger pricker, and a lancet. ▲ The Accu-Chek Multiclix Finger Pricker is intended for patient self-monitoring by a single person only. - Page 18 Performing a Blood Glucose Test (continued) 1. Wash and dry your hands thoroughly. 4. Make sure the code number on the display matches the code number on the test strip 2. Prepare the finger pricker according to the container. If you miss the code number manufacturer’s instructions.
- Page 19 5. A test strip and flashing blood drop 7. Obtain a blood sample with the aid of symbol appear on the display. the finger pricker. Blood samples taken from the palm are equivalent to blood 6. Let your arm hang down at your side taken from the fingertip.
- Page 20 Performing a Blood Glucose Test (continued) 8. With your hand facing downwards, gently 9. Touch the blood drop to the front edge of squeeze your finger to assist the flow of the yellow window of the test strip. Do not blood.
- Page 21 Note: After a successful test, the meter turns itself off five seconds after the test strip is removed. Refer to Chapter 8 “Getting a Good Drop of Blood” for helpful tips on getting a drop of blood. To reduce the risk of infection, change the lancet after each test.
-
Page 22: Flagging Test Results
Flagging Test Results If you wish, you can “flag” your test result with an asterisk ( ) to mark a special result. You might want to flag an event such as an AST result or after performing exercise. When you review the results in the meter memory, this “flag” can help you remember what was different about the result. -
Page 23: Alternative Site Testing (Ast)
Alternative Site Testing (AST) You have the option of obtaining a blood sample from other sites on your body besides the fingertip. Blood obtained from a fingertip or palm, fleshy part of the hand under the thumb (thenar) and the little finger (hypothenar), can be used at any time to measure blood glucose. If blood from an alternative site, forearm, upper arm, thigh, or calf, is used, there are certain times when testing is not appropriate (see next page). - Page 24 IMPORTANT • Talk to your healthcare professional about Alternative Site Testing. ▲ Do not change your treatment because of just one result. NEVER ignore symptoms of high or low blood glucose. If your blood glucose result does not match how you feel, perform a fingertip/palm test to confirm your result.
- Page 25 To perform AST, you will need the meter, a test strip, a finger pricker designed for AST, and a lancet. 1. Prepare the finger pricker by attaching 3. Make sure the code number on the the converter cap and following the display matches the code number on the standard procedure.
- Page 26 Alternative Site Testing (AST) (continued) 4. A test strip and flashing blood drop 5. Press the finger pricker firmly against a symbol appear on the display. fleshy area on the alternative site. Press the finger pricker up and down in a slow pumping motion to assist the flow of blood.
- Page 27 Note: If the blood drop is too small, reapply pressure to get a sufficient drop. 6. Trigger the finger pricker while keeping 7. Touch the blood drop to the front edge of steady pressure on the site. Apply the yellow window of the test strip. When pressure to the site with the finger you see flash, you have enough blood...
- Page 28 Normal Blood Glucose Values These test strips are calibrated to deliver whole blood results. The normal fasting blood glucose range for an adult without diabetes is 3.5-5.3 mmol/L. For people with diabetes: Please consult your diabetes team for the blood glucose range appropriate for you. You should treat your low or high blood glucose as recommended by your healthcare professional.
- Page 29 Troubleshooting Checks Action 5. Check if you followed the testing Read Chapter 2 “Testing Your Blood steps. Glucose” and test again. If you still have problems, call the Accu-Chek Customer Careline on 0800 701000 (UK) or 1 800 709600 (Ireland). If they do not match, insert the correct 6.
- Page 30 Symptoms of High or Low Blood Glucose Being aware of the symptoms of high or low blood glucose can help you understand your test results and decide what to do if they seem unusual. Here are the most common symptoms: High blood glucose (hyperglycemia): fatigue, increased appetite or thirst, frequent urination, blurred vision, headache, or general aching.
-
Page 31: Chapter 3: Meter Memory, Setup, And Downloading
Chapter 3: Meter Memory, Setup, and Downloading Memory Storing Test Results The meter automatically stores up to 500 blood glucose test results with the time and date of the test. You can review them at any time. Test results are stored from the newest to the oldest. - Page 32 Viewing Test Results Press either to enter memory. The most recent result appears. Press to view previous results in order. Press to look at the 7, 14, or 30 day averages, in that order.
-
Page 33: Meter Setup
Meter Setup Using the Set-up Mode By using the set-up mode, you can personalize the meter to suit your lifestyle. Here are the features you can customize – Time and Date – set the time and date Beeper – select on or off Alarm clock –... -
Page 34: Setting The Time And Date
You are here TIME / DATE BEEPER ALARM CLOCK HYPO ALARM (hrs, min, day, (on/off) (A-1, A-2, A-3, A-4) (off, on, level) month, year) Setting the Time and Date decrease increase 1. Press to turn the meter 3. Press and release 2. - Page 35 Note: Press and hold down to scroll faster. decrease increase 5. Press and release to adjust 4. Press and release to set the hour. the minutes. Press to set the The minutes flash. minutes.
- Page 36 Setting the Time and Date (continued) 6. Repeat to set the day, month, and year. 7. If you want to set up more options, press and release . If you want to exit, press and hold until you see the flashing test strip symbol.
-
Page 37: Setting The Beeper On/Off
You are here TIME / DATE BEEPER ALARM CLOCK HYPO ALARM (hrs, min, day, (on/off) (A-1, A-2, A-3, A-4) (off, on, level) month, year) Setting the Beeper On/Off Your new meter has the beeper preset to “On.” You can set the beeper to “OFF,” if you prefer –... - Page 38 Setting the Beeper On/Off (continued) 1. Press to turn the meter 3. Press and release 2. Enter the set-up mode on. The flashing test strip repeatedly until you (press and hold symbol appears. reach the display with the about four seconds). flashing beeper symbol “Set-up”...
- Page 39 5. If you want to set up more options, 4. Press to switch between press and release . If you want to “On” or “OFF.” exit, press and hold until you see the flashing test strip symbol.
-
Page 40: Setting The Alarm Clock Function
You are here TIME / DATE BEEPER ALARM CLOCK HYPO ALARM (hrs, min, day, (on/off) (A-1, A-2, A-3, A-4) (off, on, level) month, year) Setting the Alarm Clock Function The alarm clock function is a handy way to remind you to test. You can set up to four alarms per day. - Page 41 When you are setting the time for the alarm clock function, the bell symbol remains on the display and “set-up” flashes continuously. 3. Press and release 1. Press to turn the meter 2. Enter the set-up mode (press and hold repeatedly until you reach on.
- Page 42 Setting the Alarm Clock Function (continued) 4. Press and release 5. If you select “On,” the 6. Press and release to switch hour flashes. “A-1” and to select the between “On” or “OFF.” the bell symbol remain on hour. Press and release Press and release the display.
- Page 43 8. Press and release 7. The minutes flash. Press 9. The next alarm “A-2” and set the minutes. and release “set-up” flash on the display select 00, 15, 30, or 45. with “OFF” and the bell These are the only choices. symbol.
-
Page 44: Setting The Hypoglycemic (Hypo) Alarm Function
You are here TIME / DATE BEEPER ALARM CLOCK HYPO ALARM (hrs, min, day, (on/off) (A-1, A-2, A-3, A-4) (off, on, level) month, year) Setting the Hypoglycemic (Hypo) Alarm Function You can set the meter to let you know when your blood glucose is possibly too low. - Page 45 3. Press and release 2. Enter the set-up mode 4. Press and release repeatedly until you reach (press and hold to switch the display with “OFF” about four seconds). between “On” and “OFF.” and the flashing “set-up” “Set-up” and the hour Press and release flash on the display.
- Page 46 Setting the Hypoglycemic (Hypo) Alarm Function (continued) ▲ This function is no substitute for hypoglycemia training by your healthcare professional. 7. Press and hold until 5. If you select “On,” 6. Press and release you see the flashing test “set-up” and flash.
-
Page 47: Downloading Your Results To A Computer Or Pda
Downloading Your Results to a Computer or PDA You can transfer your stored results to a computer to track, Infrared (IR) identify patterns, and print. Window Transferring Data Directly to a Computer or PDA Using Specialized Software and Infrared Cable 1. - Page 48 Downloading Your Results to a Computer or PDA (continued) 6. Put the meter on a flat surface. Point the two IR windows toward each other. They should be 3 to 10 cm apart. 7. Do not move the infrared cable (computer), PDA, or meter during the transfer. 8.
-
Page 49: Chapter 4: Control Testing
Chapter 4: Control Testing Why Perform Control Tests Performing a control test lets you know that the meter and test strips are working correctly to give reliable results. You should perform a control test when: • You open a new box of test strips •... -
Page 50: About The Control Solutions
About the Control Solutions • Only use Accu-Chek Aviva Control Solutions. • The meter automatically recognizes the Accu-Chek Aviva Control Solution. • The control solution results are not displayed in memory. • Write the date you opened the bottle on the bottle label. The solution can be used for three months from that date or until the expiry date on the bottle label, whichever comes first. -
Page 51: Performing A Control Test
Performing a Control Test You will need the meter, a test strip, and control solution Level 1 and Level 2. The control level is printed on the bottle label. 1. Insert the test strip into the meter in the 2. Make sure the code number on the direction of the arrows. - Page 52 Performing a Control Test (continued) 3. Select the control solution 4. Put the meter on a flat 5. Remove the control bottle you want to test. You will surface, like a table. cap. Wipe the tip of the enter the level later in the bottle with a tissue.
- Page 53 6. Squeeze the bottle until a tiny drop forms 7. The result appears on the display, along at the tip. Touch the drop to the front with the control bottle symbol and flashing edge of the yellow window of the test “L.”...
- Page 54 Performing a Control Test (continued) 8. Press to set the control level in the 9. “OK” and the control result alternate on meter. the display if the result is in range. The range is printed on the test strip container label.
-
Page 55: Understanding Control Test Results
Understanding Control Test Results Range (mmol/L) Level 1 1.4–3.1 Level 2 14.2–19.1 Example Example The label on the test strip container shows When the control result is inside the range the acceptable ranges for both the Level 1 on the test strip container, the test strips and Level 2 control solutions. - Page 56 If the control result is not inside the acceptable range, here are some things you can do to resolve the problem: Troubleshooting Checks Action 1. Check if the test strip or control Discard the test strips or control solutions solutions were expired. if either is past the expiry date.
- Page 57 Troubleshooting Checks Action 6. Check if you followed the testing Read Chapter 4 “Control Testing” and steps. test again. If you still have problems, call the Accu-Chek Customer Careline on 0800 701000 (UK) or 1 800 709600 (Ireland). If you chose the wrong control solution 7.
-
Page 58: Chapter 5: Testing Blood Glucose In Multiple Patients
Chapter 5: Testing Blood Glucose in Multiple Patients Only healthcare professionals are allowed to perform blood glucose tests in a multiple-patient testing facility. When using the meter always follow the recognised procedures for handling objects that are potentially contaminated with human material. Practice the health and safety policy of your laboratory or institution. - Page 59 Patients and healthcare workers are potentially at risk of becoming infected when the same blood glucose meter is used to test blood glucose in more than one patient. Any patient with an infection or suffering from an infectious disease and any patient who is a carrier of a multi-resistant organism must be assigned his/her own meter.
-
Page 60: Testing Blood Glucose
Testing Blood Glucose 1. Wear protective gloves. 2. Wash or disinfect the patient’s finger and allow it to dry thoroughly. The drop of blood does not spread as easily over dry skin. 3. Use only a finger pricker that is approved for use by healthcare professionals. - Page 61 7. Make sure the code number on the meter 10. Immediately after the drop of blood has display matches the code number on the formed, touch the drop to the front edge test strip container. of the yellow window of the test strip (do not put blood on top of the test strip).
- Page 62 Testing blood glucose (continued) 13. The result appears on the display. 12. When you see flash, you have enough blood in the test strip. If you applied 14. Remove and discard the used test strip. blood but do not see the flashing you may reapply more blood, if applied IMMEDIATELY.
- Page 63 Notes: • To test blood glucose approximately 0.6 µL of blood is required. Avoid producing large drops of blood on the patient’s finger. Where the drops of blood are too large, the meter may come into contact with the blood. Wipe off any large drops of blood. Test using the drop of blood that forms again at the puncture site.
-
Page 64: Disinfecting The Meter
Disinfecting the Meter The Accu-Chek Aviva meter may be disinfected. Disinfection is performed according to the degree of soiling (see “When to Disinfect”). What to Disinfect In the unlikely event that the meter becomes contaminated, the following parts of the meter may be disinfected: •... -
Page 65: When To Disinfect
Notes: • Make sure that no liquid enters the meter. Do not spray anything onto the meter and do not immerse it in liquid. Doing so may damage the meter’s internal components and stop it from working properly. When to Disinfect Each time after you have tested a patient’s blood glucose: wipe the area around the test strip slot. -
Page 66: Chapter 6: Maintenance And Troubleshooting
Chapter 6: Maintenance and Troubleshooting Changing the Battery 1. Open the battery door on the back of the 2. Insert the new battery with the + side up. meter by pushing the tab in the direction 3. Put the battery door back in place and of the arrow and pulling the door up. - Page 67 Notes: • The meter uses one 3-volt lithium battery, type 2032. This type of battery can be found in many stores. It is a good idea to have a spare battery available. • Be sure the battery goes in + side up or facing you. •...
-
Page 68: Cleaning The Meter
Cleaning the Meter Caring for the Accu-Chek Aviva Meter is easy – just keep it free of dust. If you need to clean it, follow these guidelines carefully to help you get the best performance possible: Do Not • Make sure the meter is off •... -
Page 69: Maintenance And Troubleshooting
Maintenance and Troubleshooting The meter needs little or no maintenance with normal use. It automatically tests its own systems every time you turn it on and lets you know if something is wrong. (See Chapter 6 on “Screen Messages and Troubleshooting.”) If you drop the meter or think it is not giving accurate results, call the Accu-Chek Customer Careline on 0800 701000 (UK) or 1 800 709600 (Ireland). -
Page 70: Screen Messages And Troubleshooting
Screen Messages and Troubleshooting ▲ Never make treatment decisions based on an error message. If you have any concerns, call the Accu-Chek Customer Careline on 0800 701000 (UK) or 1 800 709600 (Ireland). The meter will not turn on or the display is blank. •... - Page 71 Battery power is low. The meter is ready for Change the battery soon. you to insert a test strip. See Chapter 6 “Changing the Battery.” The meter is in set-up The meter is ready for a mode, waiting for you drop of blood or control to change or confirm solution.
- Page 72 Blood glucose may be higher than the measuring range of the The test result was system. flagged. See Chapter 2 “Flagging Test Results”. Blood glucose is below Blood glucose may the defined hypo (low be lower than the blood glucose) level. measuring range of the system.
- Page 73 The meter is not coded The test strips expire at the end of the current or the code chip is not month. Before the end of inserted. Turn off the the month, insert a new meter and recode it. See code chip from a new Chapter 1 “Coding the box of test strips and...
- Page 74 Your blood glucose may The code chip is incorrect. Turn the meter be extremely low, or off and insert a new the test strip may be code chip. If this does damaged or not properly not fix the problem, call inserted.
- Page 75 Blood or control solution Not enough blood or was applied to the test control solution was strip before the flashing drawn into the test strip blood drop symbol for measurement or was appeared on the display. applied after the test had Discard the test strip and started.
- Page 76 The temperature is above The time and date or below the proper range settings may be for the meter (6°C to 44°C). incorrect. Make sure the Move to an area between 6°C time and date are correct and 44°C, wait five minutes and adjust, if necessary.
-
Page 77: Chapter 7: Technical Information
Chapter 7: Technical Information Product Limitations Please read the literature packaged with your test strips to find the latest information on product specifications and limitations. Specifications Blood volume 0.6 µL Sample type Fresh capillary whole blood Measuring time 5 seconds Measuring range 0.6 to 33.3 mmol/L Test strip storage conditions... - Page 78 Performance Analysis The performance data for the Accu-Chek Aviva System (Accu-Chek Aviva Meter with Accu-Chek Aviva Test Strips) were obtained using capillary blood from diabetic patients (method comparison, accuracy), venous blood (repeatability) and control solution (reproducibility). The system is calibrated with venous blood containing various levels of glucose.
-
Page 79: Product Safety Information
Product Safety Information ▲ Strong electromagnetic fields may interfere with the proper operation of the meter. Do not use this meter close to sources of strong electromagnetic radiation. ▲ To avoid electrostatic discharge, do not use the meter in a very dry environment, especially one in which synthetic materials are present. - Page 80 Explanation of Symbols On packaging, on the type plate, and in the instructions for your Accu-Chek Aviva Meter, you may encounter the following symbols, shown here with their meaning. Consult the instructions for use Caution (refer to accompanying documents). Please refer to safety-related notes in the manual accompanying this instrument.
- Page 81 The Accu-Chek Multiclix Finger Pricker On the finger pricker itself and on the packaging of the Accu-Chek Multiclix Finger Pricker, you will encounter the following symbols, shown here with their meaning. For single use only Use by / Expiry Date Lot number Sterilized using irradiation (with at least 25 kGy) STERILE R...
-
Page 82: Warranty And Service Instructions
Warranty and Service Instructions Roche Diagnostics warrants the meter against any material and manufacturing defects that may arise during proper use of the meter. For precise terms and conditions, please see the warranty card in the box. This warranty does not affect any statutory or other rights. The warranty ceases to apply if the meter has been misused or tampered with. -
Page 83: Additional Supplies
Additional Supplies Test strips are available from your local Pharmacist only and the control solutions can be obtained via the Accu-Chek Customer Careline only. Test Strips Accu-Chek Aviva Test Strips Control Solutions Accu-Chek Aviva Control Solutions Lancet Drums Accu-Chek Multiclix Lancet Drums... -
Page 84: Information For Healthcare Professionals - Alternative Site Testing (Ast)
Information for Healthcare Professionals – Alternative Site Testing (AST) ▲ Healthcare Professionals: Follow the infection control procedures appropriate for your facility. Decisions about whether to recommend alternative site testing (AST) should take into account the motivation and knowledge level of the patient and his or her ability to understand the considerations relative to diabetes and AST. -
Page 85: Chapter 8: The Accu-Chek Multiclix Finger Pricker
Chapter 8: The Accu-Chek Multiclix Finger Pricker Comfort Dial with Depth Selection Lancet Counter Release Button Depth Indicator Finger Pricker Priming Button New Lancet AST Converter Cap Drum (for alternative site testing) - Page 86 The Accu-Chek Multiclix Finger Pricker (continued) Notes: • Testing with blood from approved alternative sites requires the AST converter cap. This is explained later in the chapter. • The best depth setting is the lowest number that lets you get enough blood for a test. Try different settings to find the best one.
-
Page 87: Loading A Lancet Drum
Loading a Lancet Drum You must first load the drum into the finger pricker to get it ready for use. A new drum has a blue ring that does not move. 1. Place your thumb to the side of the A used drum has two visible red stripes notch and remove the cap by pulling and the blue ring can rotate on the... - Page 88 Loading a Lancet Drum (continued) 2. Make sure the release 3. Align the notch on the 4. You are now ready to button is not yellow. Insert cap with the notch on the use the first lancet. The a new drum, blue ring device and slide the cap lancet counter shows five first, until it clicks into...
- Page 89 5. The depth indicator shows the current 6. Press the priming button like a pen until depth selection. The higher the number, it clicks. The release button turns yellow. the deeper the penetration. Twist the Do not press the release button while comfort dial to adjust the setting.
-
Page 90: Taking A Fingertip Blood Sample
Taking a Fingertip Blood Sample 1. Wash and dry your hands. 3. Load the next lancet by twisting the plunger one-quarter turn forward (until 2. Press the finger pricker firmly against the it stops), then back again. The lancet side of your fingertip and press the yellow counter decreases by one white bar. -
Page 91: Taking An Alternative Site Blood Sample
Taking an Alternative Site Blood Sample 1. Place your thumb to the 2. Align the notch on the 3. Dial the depth setting to side of the notch and converter cap with the 5 1/2 for forearm, upper remove the cap by pulling notch on the finger pricker arm, thigh, or calf testing. - Page 92 Taking an Alternative Site Blood Sample (continued) 4. Press the priming button like a pen until 5. Press the finger pricker firmly against a it clicks. The release button turns yellow. fleshy site and press the yellow release Do not press the release button while button.
- Page 93 Note: Once you run a successful test, you may want to find the lowest depth setting that provided enough blood with the least amount of pain. 6. Return the converter cap to the same 7. Load the next lancet by twisting the position over the puncture site.
-
Page 94: Getting A Good Drop Of Blood
Getting a Good Drop of Blood Fingertip Wash your hands and dry them well. It helps to massage the fingertip to stimulate blood flow. Gently squeeze your finger at the knuckle, then release, squeeze, then release. This helps to increase the blood flow. You can let your hand hang by your side to increase blood flow. Alternative Site Testing (AST) You have the option of obtaining a blood sample from other sites on your body besides the fingertip. - Page 95 IMPORTANT • Talk to your healthcare professional about Alternative Site Testing. Treatment of the Puncture Site Wipe the puncture site with a clean, dry tissue. If it continues to bleed, apply gentle pressure to the site with a plaster to protect it from dirt or infection.
- Page 96 ▲ Do not change your treatment because of just one result. NEVER ignore symptoms of high or low blood glucose. If your blood glucose does not match how you feel, perform a fingertip test to confirm your result. If the fingertip result still does not match how you feel, call your healthcare professional.
-
Page 97: Changing The Lancet Drum
Changing the Lancet Drum When you have used the sixth and last lancet, you should change the drum. Notes: • A used drum cannot be reinserted into the finger pricker. • In rare instances, if a used drum is dropped on a hard surface the lancets may protrude slightly from the drum. -
Page 98: Caring For Your Finger Pricker
Caring for Your Finger Pricker • Wipe off any blood immediately • Clean the finger pricker and cap regularly • At least once a week, clean the finger pricker and inside of the cap with a cloth or cotton bud moistened with: •... -
Page 99: Index
20 symbols, 78–79 code chip, 9, 10 frequent urination, 28 technical information, 75 computer, connecting the high blood glucose, 28 test results, unusual, 26 meter to, 45 hyperglycemia, 28 test strips, control solution, 48 hypoglycemia, 28 Accu-Chek Aviva, 9, 14... - Page 100 thirst, increased, 28 time and date, setting, 32 tingling, 28 trembling, 28 troubleshooting, 68–74 warranty, 80...
- Page 101 Review your test procedure and make sure that you are performing the steps correctly. If you still have questions, please call the Accu-Chek Customer Careline on 0800 701000 (UK) or 1 800 709600 (Ireland). Please have your Accu-Chek Aviva Meter, Accu-Chek Aviva Test Strips, and Accu-Chek Aviva Control Solutions available when you call.
- Page 102 The Accu-Chek Aviva System, including the meter, code chip, and test strips, is covered by the following patents: British Patent Nos. 0 505 504 and 2187191, and European Patent No. 0 505 504. British Patent No. 2187191 is licensed from Quadrant Holdings Cambridge Limited.
- Page 104 ACCU-CHEK Aviva ® ©2008 Roche Diagnostics. All rights reserved. 04886046001(02)-0907 Roche Diagnostics GmbH, 68298 Mannheim, Germany www.accu-chek.com ACCU-CHEK, ACCU-CHEK MULTICLIX, and ACCU-CHEK AVIVA are trademarks of Roche. All other product names and trademarks are the property of their respective owners.
Need help?
Do you have a question about the Aviva and is the answer not in the manual?
Questions and answers