Advertisement
Advertisement
Table of Contents

Related Manuals for Cook's Companion CCFD19


Summary of Contents for Cook's Companion CCFD19
- Page 1 1550W DIGITAL FRENCH DOOR OVEN Instruction Manual MODEL CCFD19...
-
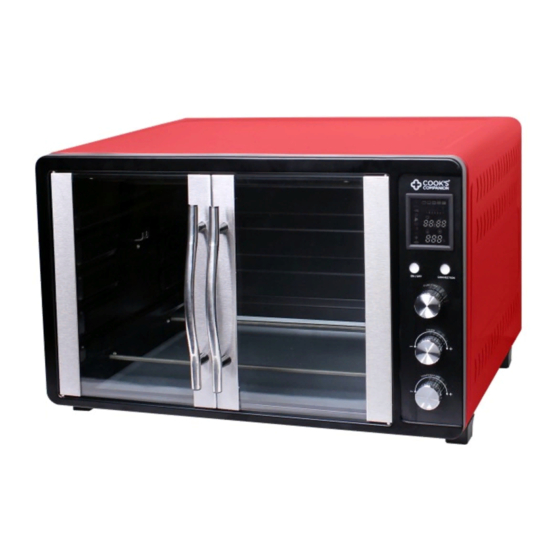
Page 2: What's Included
WHAT’S INCLUDED French Door Oven Two Wire Racks & Instruction Manual Rotisserie Handle Baking Pan Rotisserie Tray Handle Crumb Tray... -
Page 3: Important Safeguards
IMPORTANT SAFEGUARDS When using electrical appliances, basic safety precautions should be followed as follows: • Read all the instructions. • Not intended for commercial use. • The exterior of the oven will become very hot during use. Do not touch hot surfaces. Use handles or knobs. - Page 4 • Do not clean with metal scouring pads. Pieces can break off the pad and touch electrical parts, creating a risk of electric shock. • The risk of fire may occur if the oven is covered or near flammable materials (ex. Curtains, drapes, walls).
- Page 5 • Always wear protective, insulated oven mitts when inserting or removing items from the hot oven. • This appliance has a tempered safety glass door. The glass is stronger than ordinary glass and more resistant to breakage. Tempered glass can break, but the pieces will not have sharp edges.
-
Page 6: Control Panel
CONTROL PANEL Preset functions Toast Functions The toast functions Preset functions have preset times and temperatures that can not be adjusted. When using the function dial, 1 will be the lightest toast setting and 7 will be Power Button the darkest toast setting. -
Page 7: Before First Use
BEFORE FIRST USE 1. Remove all packaging materials. Place the oven on a flat surface. 2. Clean pans, racks and accessories with hot water, dishwashing liquid, and a non-abrasive sponge. 3. Wipe the inside and outside of the appliance with a cloth. - Page 8 Then the time can be adjusted on the unit. To adjust the time, rotate the time dial to increase or decrease the time. After the time and temperature have been confirmed, press the power button to start the oven. Once the cooking time has elapsed, the unit will beep four times and the screen will display 0:00, press the power button to stop the beeping.
- Page 9 How to Prepare Your Rotisserie for Chicken Remove chicken from packaging. Make sure if previously frozen it is completely thawed. Check cavity and remove neck and giblets. Check at the tail and make sure the kidneys have been removed. The kidneys are the dark reddish colored objects located on back side of cavity near the tail.
- Page 10 Tie the twine securely, making sure the opening to the cavity is closed so that the ingredients inside will not drop out as the chicken rotates on the rotisserie spit. Wrap another piece of twine around the fatty part of the legs a couple of times and tie securely.
- Page 11 How to Prepare Your Rotisserie for other Fowl and Roasts The meat needs to be placed on a spit so that it is centered and evenly balanced. It must also be held in place so it does not move around as it is cooking. Slide the spit rod through the middle of the protein and out the bottom end.
-
Page 12: Cooking Chart
COOKING CHART Heating Default Time Default Temp. Function Description Element Temp. Range Convection Rotisserie Time Range Position (°F) (Min) 0:02 / 0:04 / Upper 0:05 Toast 0:06 / Lower 0:07 / 0:08 0:11 Upper 0:01 - Fish 0:20 150-450 Optional 3:00 Lower Upper... - Page 13 Upper 0:01 - Bake 0:30 150-450 Optional 3:00 Lower Upper 0:01 - Meat 0:20 150-450 Optional 2:00 Lower 0:01 - Potato Lower 0:50 150-450 2:00 Upper 0:01 - Chicken 1:00 150-450 Optional 3:00 Lower 0:01 - Dehydrate Lower 6:00 86-130 24:00 Upper 0:01 -...
- Page 14 Upper Keep 0:01 - 0:25 95 - 180 Optional Warm 12:00 Lower Upper 0:01 - Upper 0:30 150-450 Optional Heating 2:00 Lower 0:01 - Lower 0:30 150-450 Optional Heating 2:00 Upper Upper 0:01 - 0:30 150-450 Optional Lower 2:00 Lower Heating Upper Upper...
-
Page 15: Troubleshooting
CLEANING Clean after every use. 1. Turn the oven off, unplug and allow to cool completely. 2. Wash pans and tools in hot water with dish liquid. Rinse and dry thoroughly. 3. Wipe the external surface of the oven with a soft damp cloth and dry surfaces with soft dry cloth. -
Page 16: Limited One-Year Warranty
When returning product for repair please include your full name, return address, and daytime phone number. Also include a brief description of the problem you are experiencing and a copy of your sales receipt or other proof of purchase in order to validate warranty status. MODEL CCFD19...
Need help?
Do you have a question about the CCFD19 and is the answer not in the manual?
Questions and answers