
Related Manuals for Coviden Kangaroo


Summary of Contents for Coviden Kangaroo
- Page 1 User Manual Kangaroo Feeding Tube with IRIS Technology, Console and Accessories...
-
Page 2: Table Of Contents
Annotating Images ..............31 Initial Use ................10 Operator and Reviewer Settings ........... 32 Administrator Settings ............33 Section III: Setting Up and Using the Kangaroo Changing Date, Time, Formatting, Language, Feeding Tube with IRIS Technology for Placement and Device Settings ..............34 Set Up and Use .............. -
Page 3: Section I: System Overview
Section I: System Overview... -
Page 4: Safety And Cautions
• Maintaining the patient in a High-Fowlers or Semi- Fowlers position may reduce regurgitation or aspiration. The Kangaroo™ feeding tube with IRIS technology is a single use device with a camera d) each time the feeding set is disconnected If using this position, do not lean patient forward. -
Page 5: System Components
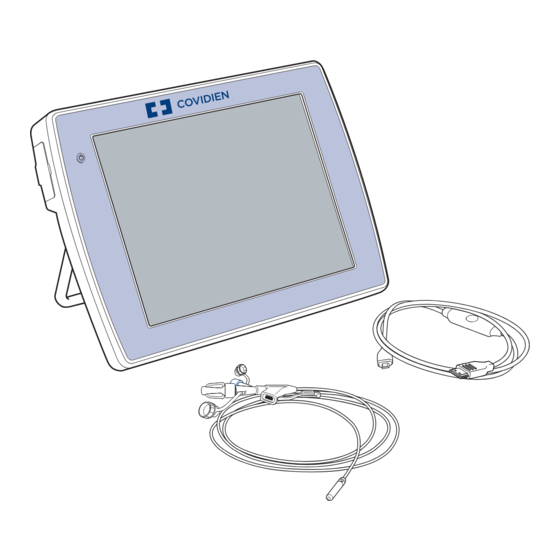
Section I: System Overview System Components The Kangaroo feeding tube with IRIS technology is supplied in a semi-ready-to-use state. Console with touch screen interface Rechargeable battery Mounting clamp Interface cable Kangaroo feeding tube with IRIS technology and stylet Insufflation device (packaged separately) - Page 6 Kangaroo Feeding Tube with IRIS Technology and Stylet (single use devices): The Kangaroo feeding tube with IRIS technology and stylet is a single use device with a camera embedded in the distal end to aid in placement. The tube is made of radiopaque polyurethane material and features a Hydromer coated tip.
- Page 7 The mounting clamp is used to attach the console to a pole, if desired. adapter into the console to charge the battery. For detailed instructions, refer to the assembly section. It is important to choose the appropriate AC power cord for your region. Kangaroo™ Console | 5...
- Page 8 Power cord USB ports connector Mounting clamp: The mounting clamp can be attached to the back of the console and is easily removable. For information on attaching, using, and removing the mounting clamp, see section regarding assembly. Kangaroo™ Console | 6...
- Page 9 When finished typing, press the check mark icon to save or the to cancel and language, date/time, file formats, passwords, return to the previous screen. device options, and user settings. Log out: Clicking the log out icon ends the session. Kangaroo™ Console | 7...
-
Page 10: Section Ii: Assembly And Initial Administrator Use
Section II: Assembly and Initial Administrator Use... -
Page 11: Assembling System Parts
Attach the clamp to the console by aligning the hole on the pole clamp with the mounting hole on the back of the console. Use a 3/8” - 16 bolt to fasten together. Attach the mounting clamp to a pole by fitting it in between. Then, tighten the knob so that the clamp and console are securely attached. Kangaroo™ Console | 9... -
Page 12: Initial Use
If another language is selected, see table below. Language Administrator Login Language Administrator Login English ADMINISTRATOR Dansk ADMINISTRATOR Français ADMINISTRATEUR Suomi PÄÄKÄYTTÄJÄ Español ADMINISTRADOR Norsk ADMINISTRATOR Português ADMINISTRADOR Polski ADMINISTRATOR Nederlands BEHEERDER Русский АДМИНИСТРАТОР Deutsch ADMINISTRATOR Svenska ADMINISTRATÖR 日本語 カンリシャ Italiano AMMINISTRATORE Kangaroo™ Console | 10... - Page 13 Change the login password. Passwords must be reset after 90 days. User groups: Create logins and passwords for operators and reviewers. Change login names and/or passwords for other users. Encryption password: Create password to decrypt and open exported files. Kangaroo™ Console | 11...
-
Page 14: Section Iii: Setting Up And Using The Kangaroo
Section III: Setting Up and Using the Kangaroo Feeding Tube with IRIS Technology for Placement... -
Page 15: Set Up And Use
Section III: Setting Up and Using the Kangaroo Feeding Tube with IRIS Technology for Placement Set Up and Use 5. Enter login, password, and patient information. 1. Read all warnings and precautions prior to tube insertion. The system will request a login name and password. After 2. - Page 16 Section III: Setting Up and Using the Kangaroo Feeding Tube with IRIS Technology for Placement 6. Position patient and estimate feeding tube length. 8. Connect interface cable to console. Position patient in accordance with facility protocol for feeding tube placement. After entering patient information, the console will request a feeding tube to be attached.
- Page 17 Section III: Setting Up and Using the Kangaroo Feeding Tube with IRIS Technology for Placement 10. Choose the most patent nare. WARNING Choose the most patent nare and insert the feeding tube with the stylet. Images of anatomical markers are for reference only. Refer to Kangaroo feeding tube Direct the feeding tube posteriorly, aiming the tip parallel to the nasal with IRIS technology system training.
- Page 18 Section III: Setting Up and Using the Kangaroo Feeding Tube with IRIS Technology for Placement 13. Capture images. 16. Confirm placement. Confirm feeding tube position per institutional protocol. Supportive The system offers two ways to capture confirmation includes auscultation of the upper left quadrant during an image: using the interface cable or injection of air using a syringe and aspiration of gastric contents.
-
Page 19: Reconnecting
Section III: Setting Up and Using the Kangaroo Feeding Tube with IRIS Technology for Placement Reconnecting Reconnecting the console and interface cable to the Kangaroo Feeding Tube with IRIS Technology: A console used to place a feeding tube will retain the memory of which patient is associated to that tube. -
Page 20: Section Iv: Cleaning, Charging, And Storage
Section IV: Cleaning, Charging, and Storage... -
Page 21: General Console, Interface Cable And Power Cord Cleaning Directions
• Do not allow cleaning solution to enter the vertical vents in the housing, underneath the handle. CAUTION Avoid exposing power cord to excess moisture, as this can lead to an electrical shock or fire hazard. Kangaroo™ Console | 19... -
Page 22: Battery And Storage
If the battery is very low, a warning screen will appear and the console will shut off. Plug the console in to charge the battery. Storage requirements: Store in environments of 0°C to +50°C and relative humidity of 15% to 85% (non-condensing). Kangaroo™ Console | 20... -
Page 23: Section V: User Interface Features
Section V: User Interface Features... -
Page 24: On Screen Keyboard
Moves cursor left Moves cursor to next Deletes previously Cancels any changes Accepts changes symbol, or number keys. or right. text field. written text, letter made and returns to made and advances to by letter. previous screen. next screen. Kangaroo™ Console | 22... -
Page 25: Logging In And Automatic Log-Out
After a certain period of inactivity (where there is no user input to the console), the console will automatically log the user out. This inactivity time period is 5 minutes for operators and reviewers, and 10 minutes for administrators. The automatic log-out will not occur during the procedure. Kangaroo™ Console | 23... -
Page 26: Main Menu
Folders menu: The folders menu launches the data browser of patient folders. Each folder contains images captured during the procedure. Log out: Clicking the log out icon ends the session. Kangaroo™ Console | 24... -
Page 27: Procedure
Pan the screen by touching with one finger and dragging along the screen. Show icon tray: To zoom out, touch the screen with two fingers and slide them towards each other. Show icon tray on screen. Kangaroo™ Console | 25... -
Page 28: Options For Viewing Patient Folders And Files
Images can be viewed, exported, annotated, or deleted. Note: Screens shown below show sample data as an example. Rename image: Rename a portion of the image. Delete image(s): Delete one or more images from the patient folder. View image: View image in full screen. Kangaroo™ Console | 26... -
Page 29: Exporting Images To Usb Flash Drive
Then, tap the box on the left of the image(s) to be exported. Tapping the box at the left of the folder selects all images. Images can only be exported from one patient folder at a time. Kangaroo™ Console | 27... -
Page 30: Opening Images From Usb Flash Drive
Select the file, then click the “Extract” icon. Next, choose the directory for the extracted folder. Then, click the “Extract” button. Enter the password, making sure to only use uppercase letters. The images should then be decrypted and able to be opened. Kangaroo™ Console | 28... -
Page 31: Rename Images
A screen will pop up. Using the text field, enter the new name for the image. Press the check mark when finished. Note: Images can only have letters or numbers in the name; symbols will not work. Only one image can be renamed at a time. Kangaroo™ Console | 29... -
Page 32: Viewing Captured Images
Pan the screen by touching with one finger and dragging along the screen. Panning is only active when zoomed in. To zoom out, touch the screen with two fingers and slide them towards each other. Full screen view: To switch to full screen view, tap this icon. Kangaroo™ Console | 30... -
Page 33: Annotating Images
Tap on the icon. Then, touch the screen where the line should start. Touch the screen again at the point where the line should end. Undo: Undo up to twenty previous actions. You can “undo” a review in order to continue making annotations. Kangaroo™ Console | 31... -
Page 34: Operator And Reviewer Settings
Change password: To change the account password, tap on the key icon. Use the keyboard to enter a new password, then repeat the password in the second text field. Tapping the check mark saves the changes. Kangaroo™ Console | 32... -
Page 35: Administrator Settings
12 hours), then tap the check mark to save changes. User groups: Add or change user passwords. Encryption password: Change password used to decrypt/open patient images on a computer. Passwords will be in all uppercase letters and are case sensitive. Kangaroo™ Console | 33... -
Page 36: Changing Date, Time, Formatting, Language, And Device Settings
Choose between exporting images as a .bmp or .jpg. Change the for maintenance). The “Software Update” upgrades the device to the date format to the preferred order. Edit the way time is displayed latest version. Tapping “Master Reset” removes all data and restores to during placement. factory settings. Kangaroo™ Console | 34... -
Page 37: Adding And Editing Users
Can access any part of the system, perform procedures, annotate, remove Note: Login names “ADMINISTRATOR” and “MAINTAINER” are in use, those user patient information, add or edit users, update the software, and reset the names cannot be duplicated. device to factory settings. Kangaroo™ Console | 35... -
Page 38: Creating And Editing Encryption Password
Tap on the first text field to enter the desired password. Then, re-enter the password in the text field below. When satisfied, touch the check mark to save the changes. Note: The password is case-sensitive and will be in all upper-case. Kangaroo™ Console | 36... -
Page 39: Icon Glossary
Show icon tray Procedure Split view Add text Reset console View image Annotate image Review image Erase patient data Return to previous screen Save to USB flash drive Folders Delete Set time Format Device Settings Rename Encryption password Kangaroo™ Console | 37... -
Page 40: Section Vi: Additional Kangaroo Feeding Tube With Iris Technology Information
Section VI: Additional Kangaroo Feeding Tube with IRIS Technology Information... -
Page 41: Order Information
Order information - To purchase any of these accessories, contact your Covidien customer service representative. Accessories for Kangaroo Feeding Tube with IRIS Technology Kangaroo Console: Kangaroo™ System Accessories for use with Kangaroo Feeding Tube with IRIS Technology: Item Code Order Information... -
Page 42: Troubleshooting
Section VI: Additional Kangaroo Feeding Tube with IRIS Technology Information Troubleshooting Issue Actions Unable to see images. 1. Read all warnings and precautions prior to tube insertion. 2. Explain procedure to the conscious patient. Prepare supplies —ENFit syringe, feeding tube water, wipes, and stethoscope. -
Page 43: Definition Of Symbols
Section VI: Additional Kangaroo Feeding Tube with IRIS Technology Information Definition of Symbols Symbol Definition Symbol Definition Non-sterile Keep away from sunlight Not made with natural rubber latex Keep Dry Not made with Di(2-ethylhexyl)phthalate Dispose of as Electrical and Electronic Waste... -
Page 44: Warranty
Section VI: Additional Kangaroo Feeding Tube with IRIS Technology Information Warranty Limited warranty: Covidien llc, warrants to the original purchaser (“Customer”) that this product will be free of defects in materials and workmanship, under normal use, for one (1) year from the date of original purchase from Covidien or its authorized distributor. -
Page 45: Specifications
Applied part definition: Input Frequency: 50-60 Hz Per IEC 60601-1 Ed. 3.1, the applied part of this system is the Kangaroo feeding Console battery: Kangaroo feeding tube with tube with IRIS technology. The feeding tube with IRIS technology is detachable ME... -
Page 46: Maintenance And Safety
Section VI: Additional Kangaroo Feeding Tube with IRIS Technology Information Pulse Sequence T1-SE T1-SE Signal Void Size 14,108-mm 1,095-mm 12,655-mm 1,916-mm Plane Orientation Parallel Perpendicular Parallel Perpendicular USB ports: The USB ports will support only USB flash drive and USB hard drives. Do not plug any other device into the USB ports. -
Page 47: Electronic Specification Tables
60601-1-2 Ed. 3.1:2015 Standards. The Kangaroo feeding tube with IRIS technology, when used with the console as a system is intended for use in the electromagnetic environment specified below. The user should assure that it is used in such an environment. - Page 48 Guidance and manufacturer’s declaration – electromagnetic emission The Kangaroo feeding tube with IRIS technology, when used with the console as a system is intended for use in the electromagnetic environment specified below. The customer or the user should assure that it is used in such an environment.
- Page 49 Guidance and manufacturer’s declaration – electromagnetic immunity The Kangaroo feeding tube with IRIS technology, when used with the console as a system is intended for use in the electromagnetic environment specified below. The customer or the user should assure that it is used in such an environment.
- Page 50 To assess the electromagnetic environment due to fixed RF transmitters, an electromagnetic site survey should be considered. If the measured field strength in the location in which the Kangaroo feeding tube with IRIS technology, when used with the console as a system is used exceeds the applicable RF compliance level above, the Kangaroo feeding tube with IRIS technology, when used with the console as a system should be observed to verify normal operation.
- Page 51 IRIS technology, when used with the console as a system The Kangaroo feeding tube with IRIS technology, when used with the console as a system is intended for use in an electromagnetic environment in which radiated RF disturbances are controlled. The customer or user can help prevent electromagnetic interference by maintaining a minimum distance between portable and mobile RF communications equipment (transmitters) and the Kangaroo feeding tube with IRIS technology, when used with the console as a system as recommended below, according to the maximum output power of the communications equipment.
- Page 52 Manual No. HP109758 The following symbols are applicable to the Kangaroo console. COVIDIEN, COVIDIEN with logo, and Covidien logo are U.S. and internationally registered trademarks of Covidien AG. ENFit is a federally registered trademark in multiple jurisdictions throughout the world. Used with Follow instructions for use.
Need help?
Do you have a question about the Kangaroo and is the answer not in the manual?
Questions and answers