
Related Manuals for Seuic AUTOID 6L W Series


Summary of Contents for Seuic AUTOID 6L W Series
- Page 1 SEUIC User Manual AUTOID 6L W Series Mobile Computer ® Standard WINDOWS CE Product User Manual Version 1.1 JiangSu SEUIC Technology Company Co., Ltd.
- Page 2 All Copyrights Reserved. No part of this manual may be photocopied, republished, adapted or translated without the prior written permission of SEUIC, except for being allowed by copyright law. The copyright of this manual and related application software are owned by the company, and are protected under the People’s Republic of China and international...
- Page 3 Jiangsu SEUIC Technology Co., Ltd. Company address: NO.15 XinghuoRoad,Nanjing New & High Technology Industry Development Zone,210061,Nanjing City,JiangsuProvince,China. Tel: 86-25-52261298 Fax:86-25-52268995 Company official website:www.seuic.com Product website:www.chinaautoid.net Mailbox:AUTOID@seuic.com Service Hotline :400-777-0876 JiangSu SEUIC Technology Company Co., Ltd.
-
Page 4: Usage Note
Laser radiation; users do not stare into beam. Class II laser product. Safety notes Please use the Seuic-approved battery or charger (including the transformer). Due to the different circuit designs, use of incompatible battery or charger may present a risk of fire or explosion. - Page 5 low temperature. Please refer to temperature and humidity standards in the product specifications. Do not press the screen hard. When working with the AUTOID ® device, use the supplied stylus to avoid the scratch or damage to the screen. Please use a soft cloth moistened with a small amount of the commercial LCD cleaner instead of spraying cleaner directly onto the screen.
- Page 6 Document issue record Version Issue date description V1.0 Dec.05,2014 Complete CE6.0 English version V1.1 Dec.23,2015 Complete CE6.0 English version...
-
Page 7: Table Of Contents
Contents Usage Note............................1 Caution for Laser scan engines....................1 Safety notes..........................1 Maintenance notes........................1 Preface..............................6 A6L series layout......................... 8 Keyboard............................. 8 Quick Start Guide..........................11 About charging........................13 Charging time..........................14 Battery power supply........................ 15 LED indicators..........................16 Reboot the system........................17 WINDOWS CE basic operations....................18 First use............................. - Page 8 3.2.1 Dial-up Connection....................61 3.2.2 Dial-up Setting......................61 3.3 Wi-Fi........................... 62 3.3.1 Wi-Fi Connection.....................62 3.3.2 WirelessManager..................... 64 3.4 Bluetooth(BT)........................66 Data Capture............................68 4.1 1D Scan..........................68 4.2 2D Scan..........................73 4.3 RFID Automatic Recognition..................... 82 4.4 Camera..........................86 4.5 GPS............................. 88 Accessories............................89...
-
Page 9: Preface
Preface You are welcome to purchase the AUTOID® 6L W seriesmobile computers developed by Jiangsu SEUIC Technology Co., Ltd. The AUTOID® 6L W series Mobile Computer is a handhelddata capture terminalusing the Texas Instruments, Cortex-A8-DM3710(TI) application processor. Compared with the previous generation PXA255 /270 processor products, our new generation of TI products have the lower power consumption and faster, stronger capability to work continuously.It... - Page 10 Tip: A description or explanation of the subject; Related information: Extended information about the subject; Note: Notice or warning about the subject. Please be sure to follow the information to operate, otherwise it will have a devastating impact. Thank you for purchasing the SEUIC product!
-
Page 11: A6L Series Layout
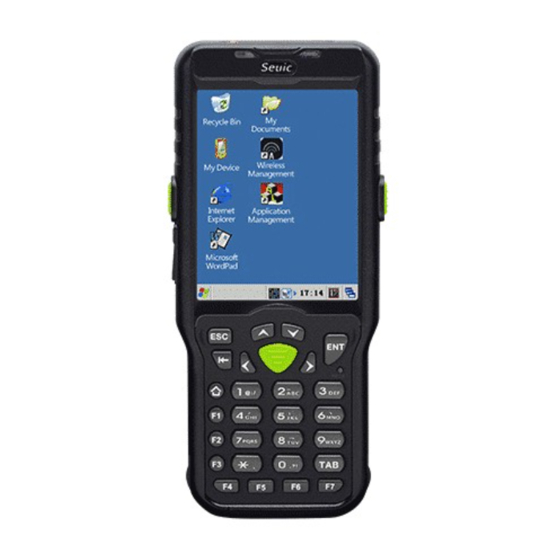
A6L series layout Charging indicator Sleep breathing light Low battery indicator Power button Hall detection indicator Scan notification indicator 3.5’transparent screen Side-mounted scan button USB charge port Scan button Reset key Microphone Figure 1-1 Keyboard The keyboard on the device includes 27 keys in total. The keyboard has... - Page 12 white, blue and orange color words and letter symbols. White words represent main function, and blue and orange words represent as a secondary function. Press the blue function key to achieve the blue functions, and then press the corresponding keyboard.Press the orange function key to achieve the orange functions, and then press the corresponding keyboard.
- Page 13 Side-mounted Scan bar code Scan key Home Hard keyboard input method switch reset Reset the device Enter Confirm Delete Return or Exit 0 key and symbols * Key for . in English and 。In Chinese Number 1 key and symbols Number 2 key, A.
-
Page 14: Quick Start Guide
Number 6 key, M. N. O in English keyboard Stroke input method: right-falling stroke Number 7 key, P.Q.R.S in English keyboard Number 8 key, T.U.V in English keyboard Stroke input method: horizontal hook Number 9 key, W.X.Y.Z in English keyboard Quick Start Guide First use Install the battery and switch the battery lock to the left side. - Page 15 the device to re-initialize it.). Power off When the device is turned on, the device will automatically turn off after it stays idle for a preset time period. You can set the Scheduled power off in the Power in the Control Panel. Reasonable settings will save battery power and extend the use of time.
-
Page 16: About Charging
3) Use your finger to pull down the memory card holder; 4) Insert the memory card (microSD or microSDHC); 5) Use your finger to pull up the memory card holder to lock it up; 6) Install the SIM card as instructed; 7) Insert the battery into the battery compartment at an appropriate angle and make sure the battery contacts are aligned with the battery compartment;... -
Page 17: Charging Time
compatiblewith any charge cradle you purchase. Charging the main battery The device can be charged via a power adapter or a standard USB cable. The charge indicator is red while charging, then turns green when fully charged. Charging the battery Place the battery on the single charge cradle and connect it to the power source. -
Page 18: Battery Power Supply
Spare battery: Since the spare battery power is supplied by the main battery, it fully charges at least 24 hours for the first time and is not necessary to be fully charged before use. Charging temperature The best operating temperature is room temperature 18~250 The battery will not be charged if the temperature lower than-0 C or higher than 40... -
Page 19: Led Indicators
LED indicators The LED lighton the top left of device is the scanning notification light. When the red light is on, it indicates that the scan is successful. The scan notification light is disabled in the factory default settings, and if you want to switch it on,you can enable it in the settings of scan application. -
Page 20: Reboot The System
Reboot the system If the A6L series does not respond to your input or operation, you may need to restart the software of the A6L series. Hot start: Use the stylus to gently click the Reset button on the device keyboard. -
Page 21: Windows Ce Basic Operations
Figure 1-4 Restore the factory settings: Tap Start menu -> Run. Enter restoresetting and then tap OK to enter the Restore Factory Settings screen. Select Restore factory settings. Figure 1-5 Note: After restoring the factory settings, the device will re-enter the calibration interface and re-calibration is needed beforeentering the desktop. -
Page 22: First Use
very easy for you to use the AUTOID 6L series products. ® Double-tap the screen with the stylus to open items. Tap and hold the stylus on the selected icon to see a list of actions available for that item, equivalent to the mouse right click, you can perform the action you want to perform. -
Page 23: Work State
Work state Work mode 1) You can hold and press for 1s to turn on the AUTOID 6L product ® and enter the work mode. 2) In the sleep mode, you canhold and press the Power button for 1s to wake up the system. If AUTOID 6L product is powered by the ®... -
Page 24: Desktop
Desktop Press the Power button to enter the work mode and wait a few seconds for the WINDOWS CE desktop. Figure 2-1 Tap on the blank of the screen, and you can select the property in the subsequent menuto set self-defined desktop or other features. -
Page 25: Taskbar
Figure 2-2 If you want to return to the desktop while performing other applications, tapon window switch button in the Taskbar on the right side and select the desktop. Taskbar Some icons often appear at the bottom of the Taskbar; Start Menu Input method Window switch button... -
Page 26: Start Menu
Start Menu Tap on this icon, at the bottom of the Taskbar to open the Start Menu. Programs: Tap on it to view the applications; Favorites: Show the contents of the Favorites; Documents: Show recently opened documents; Settings: Display Control Panel, Network and Dial-up Connections, Taskbar and Start Menu;... - Page 27 appears on the screen bottom. The following input will be done with the help of the keyboard. Tap on the keyboard to enter letters or numbers; During the input process, you can also control the following keys: “”Remove the cursor on the left or use the stylus to drag the selected character;...
-
Page 28: Setting And Optimization
Handwriting full screen input. Do not enter the input panel box while handwriting input. Tap on the “Symbol” on the Input Panel to select the punctuation mark. Precautions: In order to improve the recognition rate of handwriting input method, please write characters in a standard way as possible as you can. Setting and optimization Battery Main battery... - Page 29 time will be different. Tip: You can view the battery level by tapping on the Start Menu -> Settings -> Control Panel -> Power icon, or tap on this icon, in the Taskbar to view the battery level. Battery level When the battery level (10%) is low, the AUTOID product screen ®...
- Page 30 If the you work outdoor and can’t access to the power source, please bring a main battery to prepare for contingencies. 1) Turn off the program when you are not using the wireless network service. 2) Tap on Start Menu -> Settings -> Control Panel -> Backlight to adjust the backlight level.
-
Page 31: Memory
device goes to sleep after 1 min. Memory AUTOID series software (WINDOWS CE) can be divided into version ® of the ROM system version and RAM system version according to customer needs. Software (WINDOWS CE) RAM system version: The data stored in memory of the RAM system version will be lost when the device is rebooted and powered off. -
Page 32: System
System Tap on the Start menu → Settings → Control Panel or directly tap on My Device on the desktop. Double-tap on Control Panel and open the System settings. On this setting screen, you can set Volume, Backlight, Bluetooth, Wi-Fiand so on according to yourrequirements. Figure 2-4 Keyboard Keyboard Properties... - Page 33 Figure 2-5 Hotkey Setting Tap on the Start menu -> Settings -> Control Panel ->Hotkey setting, and then you can set their own shortcut keys. Tap on the Browse to select the application you want to set. Tap on OK and then you will be prompted thatSet hotkey successfully.
-
Page 34: Touchscreen
图 2-6 Figure 2-7 Touchscreen Adjust the backlight 1) When the LED backlight function of the touchscreen is turned on, the battery power will be greatly reduced, and the idle time can be set... - Page 35 to automatically turn off the backlight. Tap on the Start Menu -> Settings -> Control Panel -> Display. See in the figure below: Figure 2-8 1)The high LED backlight level of touchscreen will also make the battery power drain significantly and the high intensity ofbacklight will increase power consumption.
-
Page 36: Indicators And Notifications
1) Tap on the Start Menu -> Settings -> Control Panel and select the stylus to calibrate the screen. 2) Tap on the calibration page, and then tap onRecalibrate to start the calibration application, as shown in the figure below: Figure 2-9 Warning: Do not use any sharp objects to move around on the surface of the screen to avoid scratches. -
Page 37: Device Name
indicatorand low battery level indicator. Tip: The indicators of different specific models are slightly different. Refer to the AUTOID series user manual. ® Sounds 1) The rear horn of the device sets the sound for various events and opening and closing program. The sound volume can also be adjusted. 2) The headset microphone jack on the right side of the device can be used with the application as a handsfree device. -
Page 38: Network And Dial-Up Connections
Figure 2-10 1) On the General tab page, you can view the device hardware and software configuration. Figure 2-11 Network and dial-up connections You can set up a network and dial-up connection in either of the... -
Page 39: Windows Explorer
following ways: You can set up how to connect to the network directly or through dial-up; Tap on the Start Menu → Settings → Network and Dial-up Connections, and then enter theNetwork and Dial-up Connections screen. Tap on My Device on the desktopdirectly. Double tap on the Control Panel and Double tap on theNetwork and Dial-up Connections. -
Page 40: About Activesync
It should be noted thatthis product is used together with MS ActiveSyncversion 4.5. You can download the MS ActiveSync installer by logging on to the company's website at www.seuic.com and it can also be downloaded from the official website of Microsoft. -
Page 41: Sync With The Computer
CD-ROM provided by our company to the PC. Start the installation: 1) Double tap the MS ActiveSync.EXE file to enable MS ActiveSync4.5 Setup. Figure 2-14 Sync with the computer You can synchronize with your computer in either a single slot charge cradle or a USB data cable. - Page 42 1) Connect the device to the USB cable and then the system will automatically establish a connection, Choose No and tap on the Next button in pop-up Create Cooperationwindow. Figure 2-15 2) The ActiveSync window appears and the connection is completed. Figure 2-16 3) After the connection is complete, this icon, is displayed on the...
-
Page 43: File Manager
File manager When the AUTOID product is connected to a PC, you can browse the ® file information on the AUTOID product via ActiveSync, or copy and ® transfer files between the PC and the AUTOID product. ® 1) Tap on the Browsemenu of the PC’s ActiveSync window to view information on the AUTOID ®... - Page 44 Figure 2-18 3) Double click the file icon to only show the file properties in the window. You can not open files or run programs in the AUTOID product ® on your PC. 4) Conversion settings: Click the Tools menu in the PC’s ActiveSync and select the Advanced Tools option and then the advanced file conversion settings.
- Page 45 Figure 2-19 5) Click General Figure 2-20 1) Click the Generaltab and do not tick the “Sync, Copy or Move When Converting Files”. If ticked, it will cause Word or Excel documents conversion error in the PC, which can not be read on the AUTOID product.
-
Page 46: Backup And Restore
Backup and Restore In order to prevent data loss, we recommend that you always back up your data, or the unexpected circumstances may bring you unnecessary losses. When restoring the data, you can transfer the backup data back to the AUTOID productand the backup information will replace the ®... -
Page 47: Appcenter Manager
successful. 3) Click the Backup Nowbutton to start backing up the data. Restore 1) Connect the AUTOID product to the PC. ® 2) Turn off all running programs on the PC and AUTOID products. ® 3) Start the PC’s ActiveSync window and click Tools in the menu bar and then Backup/Restore. - Page 48 Desktop, the main screen of Appcenter, displays the current list of all applications that need to be managed. Double tap on the icon to run the corresponding application, or move the current focus through “up, down, left and right” keys on the keyboard. Tap on Enter on the keyboard to run the application of the current focus.
- Page 49 Figure 2-22 Note: The initial password for Appcenter V2.0 is: seuic 1) System application Most of the system applications are preset in the Appcenter. If you wantto display some of them on the desktop, tick “√” in the checkbox before the icon.
- Page 50 Figure 2-23 2) Settings The options in the Settings are mainly Appcenter's configuration. Tap on the Change Password button to reset the Appcenter's administrator password. You can tick in front of the item you want to display in the Appcenter status. Figure 2-24...
- Page 51 Note: If the Hide taskbaris selected, the Appcenter will be displayed on the desktop and the system tray will be hidden. If some applications are opened in Appcenter, the input method may not pop up automatically and the input method can not be selected. As long as you don’t hide the taskbar in the Settings, this phenomenon will not happen! 3) User Applications User Applicationsare mainly some programsthe user adds to the...
-
Page 52: Remote Desktop Connection
Figure 2-25 Tip: If the added software is deleted somewhere else or its storage path is changed, the software will not be found in Appcenter and a “(X)”prompt will be added to the program name in the software list! If you need to add a third-party program toAuto Start on Boot, the Auto Start on Bootmust be ticked in the Settings and User Applications at the same time. - Page 53 the computer remotely. Figure 2-26 Wi-FiConnection AP Connect PDA to the AP via Wi-Fi, so as to remotely access to the PC within the network. Create and save a remote desktop connection...
- Page 54 Figure 2-27 Tap on Options - Local Resources tab,and select On the local computer. Figure 2-28 Choose General taband tap on click Save As to store a remote desktop connection. Open the established remote desktop connection Tap on the already saved remote desktop connection and enter the remote desktop login interface.
-
Page 55: Wireless
Figure 2-29 Tip: Part of the old system version first requires seuichkbsip.dll to be copied to the PDA in the Windows folder (The folder property is hidden by default.) Update the system image The system image of the AUTOID product is updated via the serial ®... -
Page 56: Gprs
the wireless networks operations. Figure 2-30 Note: The current button status displays Enable, indicating the module function is turned off. 3.1 GPRS 3.1.1 Dial-up connection The software of AUTOID serieshas been set up and has the Dial-up ® icon by default. For example, you can use the default Dial-up to connect to the network, as shown below;... - Page 57 Figure 3-1 Directly tap on the Dial-up button, and then Dial-up Connection dialog box will pop up. Figure 3-2 Tap on the Connect button, and then you can dial up to connect to the Internet. If the connection is successful, you will see the screen shown in the figure below.
-
Page 58: 2Dial-Up Setting
There is a a connection management chartin below the taskbar. Tap on the icon to open this item, as shown in the figure below: Tap on the Dial-up button on the connection management screen. Figure 3-3 You can dial up to connect to the Internet. If the connection is successful, you will see the screen shown in the figure above. -
Page 59: Make New Connection
Figure 3-4 Connection Detection mechanism: If the device is in dial-up connection status, the system will detect the network connection once every 30s (Ping the specified IP address twice). If the two network detection failed(Ping for four times in total), the connection will be detected abnormal and then the system will disconnect the current connection and dial up again. - Page 60 1) Tap on Dialing in the Control Panel. Figure 3-5 Tip: Select Home or Unit , and the Country/Region and Area code are optional fields. Then tap on the Edit button. Figure 3-6 Tip: Enter G in all fields or only enter G in the first field, and tap on...
- Page 61 2) Go to Control Panel ->Network and Dial-up connections ->Make New Connection. Figure 3-7 3) Select the Dial-up Connection and tap on theNext button. Figure 3-8 4) Tap on the Configure button.
- Page 62 Figure 3-9 Tip: On the Port Settings page: Baud Rate: 115200; Flow Control: None Figure 3-10 Add a command on the CallOptions page: “+CGDCONT = 1, ”IP”, ”CMNET” (or +CGDCONT=1, IP, CMNET)”,...
- Page 63 and then tap on OK. 5) The default settings can be maintained in the other settings, such as TCP/IP Settings and Security Settings. TCP/IP Settings: General --> Tick Use server-assigned IP address, Use software compression, Use IP header compression; Name server -->Use server-assigned addresses (DNS can’t be configured.).
-
Page 64: Wcdma(3G
button. Figure 3-12 The screen in the figure above will show up when the connection is successful. Tip: Before installing SIM card, you need to open the back cover and remove the battery. The device itself has a backup battery and you must reset the card before the normal use after plugging and unplugging it. -
Page 65: Wi-Fi
3.3 Wi-Fi 3.3.1 Wi-Fi Connection In the Wireless Manager of AUTOID series, enable the Wi-Fi ® module and the connection interface will pop up. Figure 3-13 When the Wireless AP does not have a password, choose a device and tap on connection. - Page 66 Figure 3-14 When this icon, in the toolbar turns to this icon, , Wi-Fi is connected. When the Wireless AP has a password, double tap on the AP device name and then the Wireless Properties interface appears. Figure 3-15 Remove “√” in front of Automatically Provide Key, Enter password in the...
-
Page 67: Wirelessmanager
Network Key and then tap on OK. Figure 3-16 When this icon, in the toolbar turns to this icon, , Wi-Fi is connected. 3.3.2 WirelessManager You can open the Wi-Fi management interface by tapping onthis icon, under the taskbar or open it in Control Panel. Open Wi-Fi management, which Wi-Fi... - Page 68 Figure 3-17 Tap onStart on the Ping page and the default Ping address is the current network gateway. You can also set up IP address on your own. Figure 3-18 On the Config page, you can enable or disable Power Save. When the Power Save is enabled, power consumption will slow down.
-
Page 69: Bluetooth(Bt
finishing your setting, tap on the Apply button. Figure 3-19 Bluetooth(BT) Bluetooth technology data transfer rate is 1Mbps and the communication rangeis about 10 meters. The AUTOID series products prepare ® Obextool.exe for Bluetooth, a tool for Bluetooth file transfer. Tap on the Start Menu -->Run, and enter obextoolafter the Run interface pops up. - Page 70 Figure 3-20 The Bluetooth devices available will be listed on the Choose Device screen after the automatic device scan. Choose the Bluetooth device you need to pair and thenTap on the OK button. You will be prompted to enter PING code to verify. Figure 3-21 After the device pairing is completed, choose the File option in the...
-
Page 71: Data Capture
Send tab menu. Select the file you need to send in the pop-up dialog box. Tap on OK to start sending. You can also tap on the Receive tab to receive files. Figure 3-22 Note: This software is for testing purposes only. Data Capture 4.1 1D Scan 1D Scan application Scaner application is minimized at run by default... - Page 72 Figure 4-1 Clear: Clears all the information in the edit box Scan: Starts the Scanner. Hide: Hides the program window and minimize the program to the system tray. Exit: Close this program. Option: Open the option interface. Help: Displays the program name and company information. Edit box: Displays the scanned barcode information.
- Page 73 Figure 4-2 The tree controls display all command lists and double tap on the tree control to display the sub-menu of options: 1) On the Scanner tab, double tap the tree control item and then you can set various options of the command. Optionsare complicated and it is not recommended...
- Page 74 “Off”: Indicates that the function represented by this command is off. 2)On the Scanner tab, tap on Miscellaneous and then double tap onRestore scanner default settings to restore the default settings. Figure 4-4 3) Custom: Remind Mode after Scan. Figure 4-5 There are three ways to remind the user after scan, namely Beep,...
- Page 75 Vibrate and LED. You can set the the LED Interval. Barcode ShowMode and RunMode Figure 4-6 Figure 4-7 Show in Application: Displays the decoded contenton the home screen of the scan application. Send to Focus Window: You can choose to display how the decoded...
-
Page 76: Scan
content is entered in the text. CodeSuffix: You can choose the cursor display mode after entering the barcode content. Run at Startup: The scanner runs automatically when the deviceboots up. Minimize when Run: The application is automatically minimized to the system tray when it is enabled. - Page 77 Figure 4-8 2) Tap onFile tab in the menu bar on the top of the interface and tap to display the drop-down menu of the File tab. Figure 4-9 Exit: Closes the application. Clear: Clearscontents in the text edit box. Auto Clear: When Auto Clear is ticked, this function is enabled (as shown...
- Page 78 in the figure below). The decoded information of the last scan in the text edit box will be automatically cleared after the scan is successful. Then the newly decoded information will be displayed in the text edit box. If you tap to cancel the tick on the left of Auto Clear, this function is disabled.
- Page 79 Figure 4-10 1) Tap on Operation in the menu bar on the top of the interface to open the Operation drop-down menu. You can perform the relevant scan functions and settings. Figure 4-11 Start Scan: Enables the scanner to scan once. Automatic (Continuous): Enables the scanner for continuous scan, and...
- Page 80 then press the side-mounted scan button to stop scan. Auto Scan Delay: Tap to enter the interface for setting the scan interval (see in the figure below). Figure 4-12 The default setting is 0, which means there is no scan interval. When you set to 1, the next scan will automatically start with 1s delay after the last scan is successfully completed.
- Page 81 Simulation Keyboard mode, the decoded information will be printed out in keyboard mapping. 4) Tap on Settings tab in the menu bar on the top screen and then open the drop-down menu of Settings (as shownin the figure below). Adjust and set the Lights while scanning; enable or disable Centering mode;...
- Page 82 and Aimer are on by defaultwhile scanning. Choose Aimer and then green aiming light is on while scanning. Choose Backlightand then red backlight is on while scanning. ChooseNo Light and then neither red backlight nor green aiming light is on (Not Recommended). Flash LEDs: You can set whether the horizontal green aiming light flashes while scanning.
- Page 83 Fast scan mode does not recognize “Data Matrix”and “QR” bar codes with omnidirectional function. It can quickly scan the barcode in the center of the scan range, but can’t scan those barcodes located in the area around the center. The scan time is slightly shorter than that of the standard scan mode.
- Page 84 options in any combination. Symbology: You can open the Symbology settings interface in the drop-down menu ofConfig barcode option. Turn on/off various barcode decode functions. Restore Symbology: You can restore the scan mode and scan parameters for various barcode types to factory default settings. When each barcode type is ticked on the left, it indicates the decode function of this barcode type is on.
-
Page 85: Rfid Automatic Recognition
Figure 4-15 4.3 RFID Automatic Recognition According to the different operating frequency, RFID tags can be divided into low frequency (LF), high frequency (HF), Ultra High Frequency (UHF) and microwave and other different types. This model only supports high frequency (HF). 1) Tap on the icon, H3 on the desktop to open the application (The selected icon on the left in Figure 4-18). - Page 86 Figure 4-16 2) If communication is normal, the following screen appears (Figure 4-19). Figure 4-17 3) Read the tag ID The tag ID is the only one that is solidified when it is displayed, and can not be changed.
- Page 87 Tap on the Once button on the interface to capture the tag ID once; tap on the Continue button to capture the tag ID continuously; tap on the Stop button to stop reading tags, as shown in Figure 4. As to the hand-held device, the captured tag ID will be displayed in the list.
- Page 88 Figure 4-19 Select the ID of the tag data you want to write to and tap on the Write button. Figure 4-22 on the left shows that Read tag data successfully. Figure 4-22 on the right shows that Read tag data failed. Figure 4-20...
-
Page 89: Camera
4.4 Camera Camera is a application for taking photos. You can set thephoto style while taking photos, such as white balance, exposure, contrast. You can also set the photo size. The functions will be introduced respectively in the following. 1) File menu Figure 4-21 Photo: Tap to take photos and you can also use the shortcut key, Enter or the arrow key, Up. - Page 90 Figure 4-22 You can make advanced settings for your photos. White balance: It can be set to Automatic, Daylight, Cloudy, Fluorescent, Indoor. Sunlight is set by default. Exposure: There are five levels of exposure available (+2, +1, 0, -1, -2). Zero is set by default.
-
Page 91: Gps
4.5 GPS GPSGuider1V3 is a small software provided by our company to test the the number of satellites for GPS positioning. Only for reference. Tap to open the application and set the com port and baud rate. Tap on Figure 4-23... -
Page 92: Accessories
Figure 4-24 Note: This test GPS software needs to be provided separately and is not included in the system file. If you need it and can go to the company’s website to download. Please install the map software directly and set the serial port and baud rate to directly enable navigation. - Page 93 Rated input voltage DC 5V±5% Rated input current DC 5A (MAX) Maximum input power Rated output voltage DC 4.2V±5% Applicable 3.7V Lithium specification Battery Constant charging DC 4.2V±5% voltage Constant current DC 1.2A * 4 (MAX) Maximum charge time 5h Ripple current <50Ma Condition for...
- Page 94 ① no battery, red light flashing ② charging, red ③ fully charged, green ④ LED indicator Indication of Power status failure, red and green flashing alternately No-load power <0.1W consumption Spring Rope Lanyard...
Need help?
Do you have a question about the AUTOID 6L W Series and is the answer not in the manual?
Questions and answers