Advertisement
Table of Contents
- 1 Table of Contents
- 2 Introduction
- 3 Safety and Maintenance Information
- 4 Features / Specifications
- 5 Components in the Box
- 6 Product Layout
- 7 Linking the MTP 3100 - Energy Monitoring System
- 8 Display Information
- 9 History Data Clearance and Factory Reset
- 10 Getting into Setting Mode & Set-Up Instructions
- 11 Operation
- 12 Installation (Single Phase System)
- 13 Installation (3 Phase System)
- 14 Frequently Asked Questions (FAQ)
- Download this manual
Advertisement
Table of Contents

Related Manuals for MTP MTP 3100

Summary of Contents for MTP MTP 3100
- Page 1 INSTRUCTION MANUAL Wireless Electricity Monitor MTP 3100 Generation)
-
Page 2: Table Of Contents
2. Safety and Maintenance Information 3. Features / Specifications 4. Components in the Box 5. Product Layout 6. Linking the MTP 3100 – Energy Monitoring System 7. Display Information 8. History Data Clearance and Factory Reset 9. Getting into Setting Mode & Set-up Instructions 10. -
Page 3: Introduction
INTRODUCTION / SAFETY 1. Introduction Congratulations on the purchase of your new smart wireless electricity monitor, Model MTP-3100. This product was designed to help you monitor and better manage electricity consumption. This guide is aimed at helping you in the set-up of the wireless monitoring system. Careful use of this device will provide years of reliable service. -
Page 4: Features / Specifications
FEATURES/ SPECIFICATIONS/INCLUDED COMPONENTS IN THE BOX 3. Features Model Name / Number: MTP-3100 Frequency: 433MHz Transmission Time: 10s, 15s, 20s (settable) Transmission Range: ≤70m Voltage Range: 90V to 600V Measuring Current: 200A (max) Accuracy: 0.2A-1A ± 20% / 1A-150A ± 7% / 150A-200A ±15%... -
Page 5: Product Layout
PRODUCT LAYOUT 5. Product Layout TRANSMITTER www.mtpinc.com... -
Page 6: Linking The Mtp 3100 - Energy Monitoring System
LINKING THE MTP 3100 - ENERGY MONITORING SYSTEM 6. Linking the MTP 3100 – Energy Monitoring System Note : During the linking process, keep the transmitter as close as possible to the monitor. COMPONENTS STEP 1 Remove plastic tab on Transmitter... -
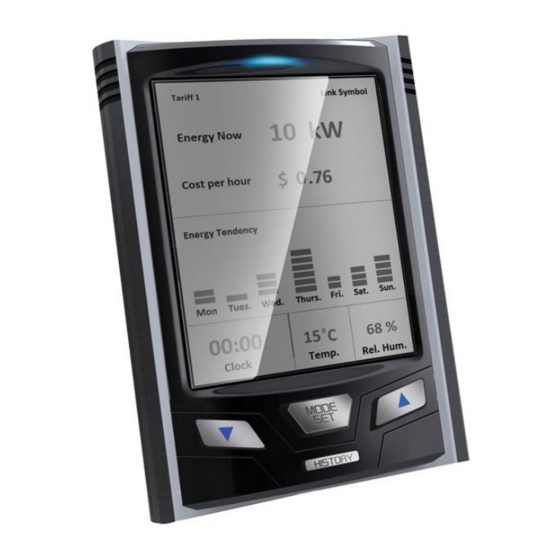
Page 7: Display Information
DISPLAY INFORMATION 7. Display Information Soon after successfully pairing the monitor and transmitter, the LCD screen will automatically return to the default display. The LCD screen will depend on user’s tariff choice, TOU (Time of Use) tariff or NMP (Normal Meter Pricing), the default tariff mode is TOU. - Page 8 Default Display Under Normal Working Conditions The image below is the Default Display, it appears automatically once the pairing is successful. LCD screen also returns automatically to this display if there is no button operation for a period of time. www.mtpinc.com...
-
Page 9: History Data Clearance And Factory Reset
HOW TO CLEAR DATA 8. History Data Clearance and Factory Reset History Data Clearance To reset only the History data, please follow the instructions below. Note that this does not perform a factory reset. 1. Press and release the HISTORY button to enter in the HISTORY mode. 2. - Page 10 Factory Reset 1. When the default screen is displayed, simultaneously press and hold down the MODE/SET and HISTORY keys. The full LCD screen will appear after 10 seconds. 2. When the red LED starts blinking, release MODE/SET and HISTORY keys and the ʺSoftware Versionʺ will appear.
-
Page 11: Getting Into Setting Mode & Set-Up Instructions
SET-UP INSTRUCTIONS 9. Getting into Setting Mode & Set-up Instructions While the default screen is displayed, press and hold down the SET/MODE key for 3 seconds, until the red LED starts blinking, then release the SET/MODE key. The monitor is now in Setting Mode. STEP 1 Hold Entering... - Page 12 Changing Values To change the values of any particular setting, begin by selecting the setting (eg. Voltage) and follow the instructions below. STEP 1 STEP 2 Press Press the ▲ or ▼ MODE/SET MODE to increase or decrease when the Setting (eg. Voltage value Voltage) is blinking...
- Page 13 Currency Setting 1. When in Setting Mode, If necessary, use▲ or ▼ key to select ʺKrʺ currency symbol then press MODE/ SET key to confirm and enter in selection. € 2. While in Currency Setting Mode, use ▲ or ▼ key to select the desired currency symbol (symbol will blink).
- Page 14 Changing Default (Factory) Settings for TOU : The default factory setting ʺTOUʺ tariff (based on Ontario Hydro tariff System) is as described on page 11. To make changes, please follow the instructions below. NOTE : When in Setting Mode, use ▲ or ▼ key to select TOU symbol, then press MODE/ SET key to confirm and enter in selection.
- Page 15 Set TARIFF 05 for Weekend ( Saturday / Sunday ) ( For TOU - Summer/Winter Period ) STEP 6 IMPORTANT : Press Summer ▲or▼ $0.063 After completing STEP 6, To select you are now ready to Tariff Rate configure the setting for the Winter Season Then press MODE...
- Page 16 Setting a Single Tariff Rate (NMP1) : When selecting a single tariff (NMP1): 1. Press the ▲or▼ key and select NMP1 by pressing MODE/SET key. 0.163 2. Adjust the tariff rate by setting the values (0-9) for each flashing digit. Use the SET/MODE key to confirm each digit.
- Page 17 Set Tariff Rate for Period 2 STEP 3 STEP 4 Tariff Rate Time Press Press Period 2 Period 2 ▲or▼ ▲or▼ to set Rate to set Values (0-9) Starting Time Press MODE Then press MODE to confirm Hour and to confirm Minutes for each Setting a 3 Period Tariff Rate (NMP3):...
- Page 18 Calculating Factor Setting ( Greenhouse Gas Emission) Please contact your local electricity provider to determine the Greenhouse Gas Emission per kWh consumed. Depending on the electricity production method (Hydro, Wind, Coal, Nuclear, etc.), the CO₂ emission will vary. 1. While kg co is blinking, press MODE/ SET key to access the kg co Setting Interface.
- Page 19 TIME (Clock) Setting 1. While Clock is blinking, press MODE/ SET key to access the Clock Setting Interface. The Hour value will start flashing. 2. Press the ▲ or ▼ key to increase or decrease value. 3. Press the MODE/ SET key to confirm these digits and move on to minute value. 4.
-
Page 20: Operation
10. Operation Viewing History and Average Data When the default screen is displayed, press the HISTORY key to view the data that have been gathered up to present time for various time periods (Day, Week and Month). Note: When viewing the history data, if there is no button operation for 20 seconds, the display will return to default screen. - Page 21 Switching Data Type (History) When viewing the History (up to now), press the MODE/SET key at any time to change the type of data history displayed amongst any of the following options: Energy consumption (kWh) Currency ($) and CO emission (kg CO Energy Consumption (kWh) Press...
- Page 22 Retrieving History and Average Data (Past Consumption) Retrieve and View History Data of the Last 7 Days From the default display screen, click the HISTORY key one time and notice that the word "Daily" will appear on the screen (See picture below). The "Daily" function stores the past 7 days of data, as well as the accumulated data up to now, from 00:00 of today.
- Page 23 Retrieve and View the History Data of the Last 24 Months From the default display screen, click on the HISTORY key three times and notice that "Monthly" will be displayed on the screen (See picture below). Last Month This Month STEP 1 STEP 2 Press...
- Page 24 Backlight When powered with batteries, the backlight of the monitor is available only between 6:00 p.m. and 8:00 a.m. when there is key operation. On the other hand, when the monitor is powered by the external power adapter, the display backlight goes on whenever there is a key operation.
- Page 25 Signal Frequency Setting (Transmitter) Push and hold the button (on transmitter) for 3 seconds, the LED light will change color. To change the light color again, release the button and push again for 3 seconds. Once set, the LED will flash in the selected color. The light color codes represent the following signal frequencies.
- Page 26 INSTALLATION IMPORTANT NOTICE: Please contact a qualified electrician to carry out the installation. We will not be held responsible for damage as a result of a wrong connection which may cause injury or death. Please note that the monitor displays the apparent Power (VA) and not the Active Power (Watts). “Before making any connection to a Live Circuit”, connect all clamp sensors to transmitter.
-
Page 27: Installation (Single Phase System)
INSTALLATION 11. Installation (Single Phase System) IMPORTANT NOTICE: Please contact a qualified electrician to carry out the installation. We will not be held responsible for damage as a result of a wrong connection which may cause injury or death. Please note that monitor displays the Apparent Power (VA) and not the Active Power (watts). -
Page 28: Installation (3 Phase System)
12. Installation (3 Phase System) IMPORTANT NOTICE: Please contact a qualified electrician to carry out the installation. We will not be held responsible for damage as a result of a wrong connection which may cause injury or death. Please note that monitor displays the Apparent Power (VA) and not the Active Power (watts). -
Page 29: Frequently Asked Questions (Faq)
Limited Warranty and Limitations of Liability MTP Instruments warrants this instrument to be free of defects in parts and workmanship for one (1) year from date of shipment. This warranty does not apply to defects resulting from action of the user such as misuse, improper wiring, operation outside of specification, improper maintenance or repair, or unauthorized modification. - Page 30 4409 Charleroi street Montreal-North, Quebec H1H 1T6 Telephone: (514) 326-7167 Fax: (514) 326-7835 Toll Free Number: 1-888-326-7167 Web Site : www.mtpinc.com E-mail : info@mtpinc.com Distributed by : www.mtpinc.com...
Need help?
Do you have a question about the MTP 3100 and is the answer not in the manual?
Questions and answers
We just upgraded to Windows 11. Seems like the MTP3100 is not compatible with Windows 11? Is there a compatible device for windows 11?