
Related Manuals for NASA Marine BM-1 Compact

Summary of Contents for NASA Marine BM-1 Compact
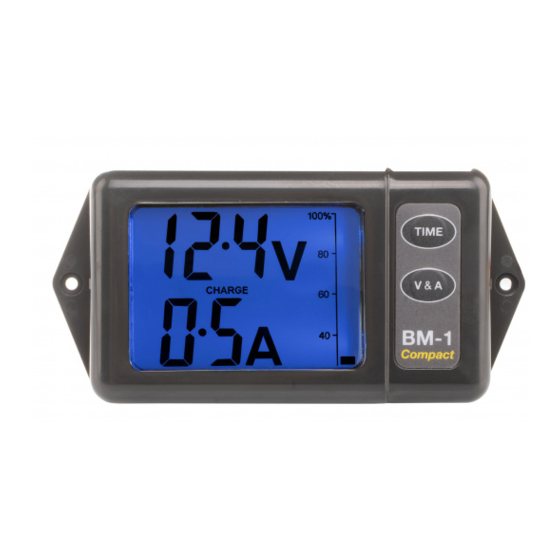
- Page 1 DESIGNED AND MANUFACTURED IN ENGLAND 100% TIME TIME TO DISCHARGE, hours V&A BM-1 Compact NASA BATTERY MONITOR BM-1 Compact RoHS 2002/95/EC...
-
Page 2: Table Of Contents
READ THIS FIRST INTRODUCTION INSTALLING THE DISPLAY SAFETY NOTES - IMPORTANT INSTALLATION OF THE DISPLAY UNIT NORMAL OPERATION SWITCHING THE BACKLIGHT SHOWING THE TIME TO GO SHOWING THE VOLTAGE AND CURRENT SETTING UP SETTING THE BATTERY CAPACITY SETTING THE ZERO-CURRENT BATTERY MANAGEMENT BASICS QUESTIONS AND ANSWERS... -
Page 3: Read This First
Short-circuiting a battery with a metal tool or piece of jewellery can cause catastrophic currents to flow. Before installing any of the BM-1 Compact units, remove all jewellery (such as rings or metal necklaces). Ensure that no metal tool can cause a short circuit. - Page 4 INSTALLATION OF THE DISPLAY UNIT The installation should be performed in the order specified in the following sections. Select a convenient position for the display. The area should be flat and remain dry at all times. Drill two 2mm holes to accommodate the stainless steel self-tapping screws supplied.
- Page 5 Figure 1 - Wiring Installation...
-
Page 6: Normal Operation
Do NOT put the battery on charge immediately. Apply a load to the battery by switching on lights or instruments and wait for a few minutes for the BM-1 Compact to “learn” the battery's characteristics and to show a steady reading before starting charging. -
Page 7: Switching The Backlight
SWITCHING THE BACKLIGHT Pressing either key switches the backlight on for approximately two minutes, after which it switches off to reduce the battery discharge. SHOWING THE TIME TO GO. 100% TIME TIME TO DISCHARGE, hours V&A BM-1 Compact Figure 2 - Percentage & Time to Go Figure 2 shows the display when the TIME key is pressed. -
Page 8: Showing The Voltage And Current
The maximum current measurement is 102 Amps. If the BM-1 Compact is left for long periods registering little or no charge or discharge current, the estimate of capacity may become unreliable. It is important to switch some load onto the battery for a few minutes so a reliable estimate can be calculated, and its value settles, before starting charging. -
Page 9: Setting The Battery Capacity
SETTING THE BATTERY CAPACITY Turn off the unit. With the V&A key pressed, re-apply the power. Release the key. CAP is briefly displayed to show that the capacity is to be changed. The TIME key increases the setting, and the V&A key reduces it. Keyboard repeat allows quick changes if the keys are kept pressed. -
Page 10: Battery Management Basics
When the battery is being charged, the voltage is no longer a reliable estimate of the state of charge, and so the BM-1 Compact integrates the Ampere hours added to the last known capacity to estimate the battery's state of charge on a continuous basis. - Page 11 If the battery voltage falls below 10.7 Volts (for a nominally 12 Volt battery), and charging is not started, sulphation of the plates can begin. The BM-1 Compact has an alarm which flashes the bell symbol when the voltage falls below 10.7 Volts. If the alarm is triggered, it is...
-
Page 12: Questions And Answers
Check the wiring is correct and securely terminated. Check the fuse, and check that the battery is not completely flat. Why does my BM-1 Compact show that the number of hours remaining is high or low when a constant discharge current is flowing?. - Page 13 Do I need to disconnect my BM-1 Compact when I leave the vehicle for long periods? No. The BM-1 Compact is designed to be permanently connected to the battery. It is independently fused, and draws only 1.5mA from the battery. At such a low current, it would take several years to discharge a typical fully-charged service battery.
- Page 14 Prior to unpacking this instrument read and fully understand the installation instructions. Only proceed with the installation if you are competent to do so. Nasa Marine Ltd. will not accept any responsibility for injury or damage caused by, during or as a result of the installation of this product.
Need help?
Do you have a question about the BM-1 Compact and is the answer not in the manual?
Questions and answers