Table of Contents
Advertisement
Advertisement
Table of Contents

Summary of Contents for Unitron Johansson TITANIUM 8700
- Page 1 User Manual TITANIUM COMPACT SATELLITE HEADEND Ref. 8700 - 8701...
-
Page 2: Table Of Contents
Unitron reserves the right to change the specifications of the hardware and software described in these manuals at any time. Unitron cannot be held liable for any damages resulting from the use of this product. Specifications are subject to change without notice. 11/17 ©... -
Page 3: Introduction
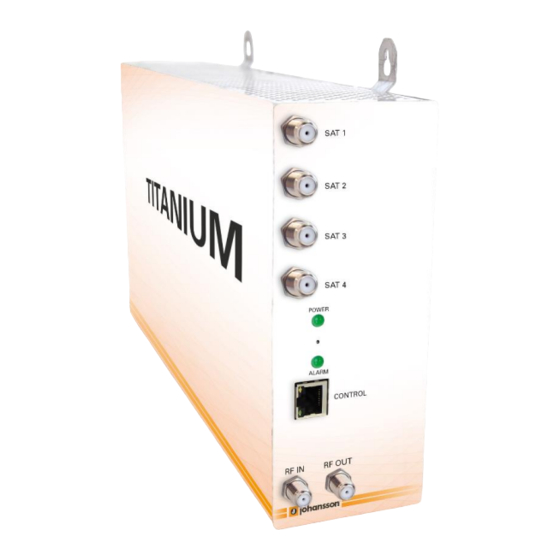
8700 – 8701 TITANIUM NTRODUCTION 1.1. Product description The Titanium is a compact satellite headend with 4 (Ref. 8700) or 8 (Ref. 8701) tuners. It is a transmodulator with 4 output MUXs (DVB-T/DVB-C). The standalone module with built-in power supply allows for very fast installation. The Titanium has 2 CI slots for CAM cards. -
Page 4: Package Contents
8700 – 8701 TITANIUM 1.3. Package contents 1 x Titanium (ref. 8700 or 8701) 1 x 75 Ohm terminators 1 x Mains cable (1,80 m) 1.4. Product dimensions... -
Page 5: Mounting
8700 – 8701 TITANIUM 1.5. Mounting Proper installation is critical to system performance. It is particularly important to install the Titanium correctly in order to receive and distribute optimal signal quality. Mount the Titanium to a wall in a well ventilated and cool room. For ventilation purposes, leave a minimum of 15 cm around all sides of the module. -
Page 6: Configuring The Titanium Using The Web Interface
8700 – 8701 TITANIUM ONFIGURING THE ITANIUM USING THE WEB INTERFACE MINIMAL SYSTEM REQUIREMENTS The WebGUI is supported by the following web browsers: Google Chrome Mozilla Firefox Internet Explorer Safari Make sure to use the most recent version of the browser. When using a different browser, we cannot guarantee a correct functioning of the interface. - Page 7 8700 – 8701 TITANIUM http://start Open your web browser, and go to: o The web interface of the Titanium will now open. o Go to Management Port o Tick off Obtain IP address from DHCP o Choose an IP Address, for instance: 192.168.55.55 o Press Apply Go back to Local Area Connection Properties, select Internet Protocol Version 4 (TCP/IPv4) to enter the IP settings of your adapter...
-
Page 8: Connecting The Module(S) To A Network
8700 – 8701 TITANIUM Connecting the module(s) to a network with DHCP To connect the module(s) to a network, go to the Management Port in the web interface. Tick Obtain IP address from DHCP and give each Titanium a unique hostname (for instance: http://8701). -
Page 9: Overview
8700 – 8701 TITANIUM 2. Overview The following actions are critical for optimal system performance: Information: o The folowing information can be found here: Device Type, Device Name, Device ID, Serial Number, Firmware Version, Hardware Version, Device Features and Device Temperature Preferences: o Choose dBM or dBµV as level unit. - Page 10 8700 – 8701 TITANIUM configurations of your Titanium. All settings can be reset to default by means of a factory reset. o The Titanium can also be manually reset. This can be done by inserting a pin (e.g. a paperclip) in the small opening in the front plate of the Titanium, between the power and alarm LEDs.
-
Page 11: Input
8700 – 8701 TITANIUM 3. Input Define the LNB settings (INPUT > LNB) o Label: custom label for each input (e.g. VLow, or ASTRA 19.2VLow, …) o Voltage: The LNB voltage to select the polarization 13V: Vertical polarization ▪ 18V: Horizontal polarization ▪... - Page 12 8700 – 8701 TITANIUM Define the settings for each of the tuners (INPUT > TUNER) o Input Selection: this refers to the LNB inputs; make sure the transponder frequencies you choose correspond to the right polarity of the LNB inputs o Frequency (Mhz): choose the frequency of the transponder you want to receive o Baud Rate (kBd): choose the baud rate of the transponder signal you...
-
Page 13: Output
8700 – 8701 TITANIUM 4. Output Set all the Mux (OUTPUT > MUX) o Frequency(kHz): Here you can select the frequency you want to transmit on. For DVB-T: 47000 to 862000, for DVB-C: 47000 to 1002000 o Bandwidth (DVB-T): Choose the desired bandwidth. o Baud Rate (DVB-C) (MBd): choose the baud rate of the transponder signal you want to output o Constellation: Choose the type of constellation you want to use. - Page 14 8700 – 8701 TITANIUM Define the output network (OUTPUT > NETWORK) o ONID: The Original_Network_ID (ONID) is defined as the “unique identifier of a network”, check the spreadsheets on http://www.dvbservices.com to find your correct ONID o NID: Choose your Network ID o Network Name: Set your network name o Version: set the version of the network (value between 0 and 31) o Private Data Specifier: choose between EACEM –...
-
Page 15: Cam
8700 – 8701 TITANIUM 5. CAM Set the CAM configurations for the Titanium (CAM > CAM 1-2) CAM settings o Type: Defines type of CAM module Select low-speed (default) for legacy CAM module that can run up ▪ to 50 MBps Select high-speed for second generation CAM module that can ▪... -
Page 16: Technical Specifications
8700 – 8701 TITANIUM 3. T ECHNICAL PECIFICATIONS Input: QPSK/8PSK (DVB-S/S2) Inputs 4 satellite bands 1 x RF in Tuners 4 tuners (4 transponders) (Ref. 8700) 8 tuners (8 transponders) (Ref. 8701) Frequency range 950-2150 Level -55 to -25 Bandwidth Modulation DVB-S2: QPSK, 8PSK / DVB-S: QPSK DC remote power at... -
Page 17: Safety Instructions
8700 – 8701 TITANIUM 4. S AFETY NSTRUCTIONS Read these instructions carefully before connecting the unit To avoid any risk of overheating: • Install the unit in a well aery location and keep a minimum distance of 15 cm around the apparatus for sufficient ventilation •... -
Page 18: Conditions Of Warranty
If during this period of warranty, the product proves defective, under normal use, due to defective materials or workmanship, Unitron N.V, at its sole option, will repair or replace the product. Return the product to your local dealer for reparation...
Need help?
Do you have a question about the Johansson TITANIUM 8700 and is the answer not in the manual?
Questions and answers