Table of Contents
Advertisement
Advertisement
Table of Contents

Related Manuals for Kaiser Baas TRAIL


Summary of Contents for Kaiser Baas TRAIL
- Page 1 Complete User Guide Visit kaiserbaas.com for more information...
-
Page 2: Table Of Contents
CO N TEN TS Safety Precautions Remote Flight Operation Preflight Checklist Flight Modes Product Features Smartphone Flight Operation Product Diagrams App Diagram Battery Charging Combo Mode Operation Setup & Installation Intelligent Flight Modes Transmitter Calibration Specifications & Support... -
Page 3: Safety Precautions
Above all, maintain a safe distance from people and any other material that could enter the Drone ● Flying near electrical hazards, such as power property when operating your Trail Drone – a safe and its internal compartments, including the lines or towers. - Page 4 Do not use the battery with unspecified equipment. anywhere. Consider your personal liability when you choose to operate your Drone. It is imperative that only a Kaiser Baas Trail Drone Do not reverse charge or over-charge the battery. Do not touch a leaking battery directly. Never let battery contents touch your skin or clothing.
-
Page 5: Preflight Checklist
● Foldable flight hazards may occur. regulations surrounding the flying of their UAV. The Trail Drone can be used with its camera ● Auto Hover This list serves as a guide only: or Remote Control Transmitter in the following ●... -
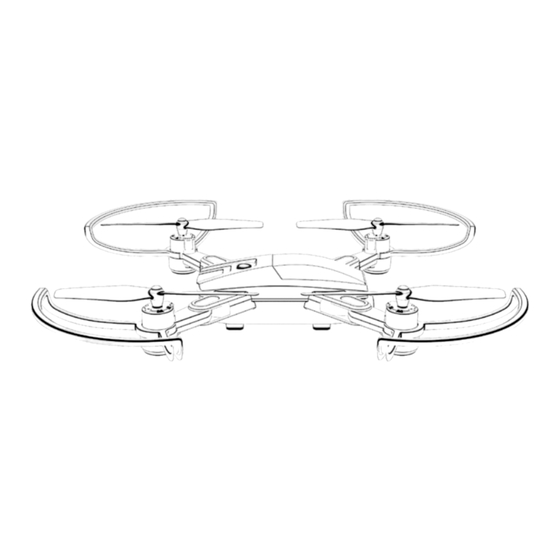
Page 6: Product Diagrams
P R O D U C T D IAGR A M P R OD U CT D I AG RAM 0 7 - E NG 0 8 - E N G 1. Power ON / OFF 4. Foldable Arms 7. Battery H OL D F OR 3 S EC O N D S CO M PA CT THE Drone P R E SS &... - Page 7 C O N T R O LLER D IA GR A M C O NTR OL LE R DI A GR AM 0 9 - E NG 1 0 - E N G 1. Speed 4. GPS Mode 7. Camera Tilt 10.
-
Page 8: Battery Charging
Remove the Rotor Blade by pulling up and off Low Battery the motor axis bar. Rotor guard installation The Trail drone is also able to return to its home Assembly It is highly recommended to install the Rotor point when the battery level is low when the drone Blade Guards before using the Drone to is on the GPS mode. -
Page 9: Setup & Installation
Turn on your Drone by holding the power Place the Drone on level surface button for 2 seconds. Turn on the Trail Drone & pair with the The Drone lights will flash indicating it is ready controller. to pair to a Remote Control Transmitter. -
Page 10: Calibration
GPS signal is strong. Drone received sufficient GPS signal. Trail Drone will enter default into GPS mode once it received the GPS signal. If the Drone does not receive the signal, check the GPS Trail on the remote controller and ensure that it is on. -
Page 11: Remote Flight Operation
Throttle/Yaw Left Stick slightly UP to fly. Remote Control Transmitter Binding Section. The To do this, press the GPS button then press the stick (Throttle/Yaw) and right stick (Pitch/Roll). Trail Drone comes equipped with a Take-Off and Take-off/Landing button. Left Stick Landing function. -
Page 12: Flight Modes
2 0 - EN G Speed Modes Mode 2-Pro Mode Headless Mode There are 2 Speed modes on the Trail Drone. To enable this mode, press the Speed Mode To enable Headless Mode, simply press the They can be cycled through on the Remote Button TWICE. -
Page 13: Smartphone Flight Operation
Operation features includes Follow-me, Waypoint, Orbit The Trail drone is also able to return to its home The Trail Drone has a feature that lets you mode etc. point when the battery level is low when the control the Drone exclusively via the APP. -
Page 14: App Diagram
A P P D IA GR A M AP P D I AG RAM 2 3 - E NG 2 4 - EN G 1. Home 4. Satellite 7. Wifi Signal 10. Intelligent Flight Modes 14. Auto Take Off / Landing 18. -
Page 15: Combo Mode Operation
Now, hold the Drone straight and horizontally Drone. KB Trail interface. If the SD card is not inserted rotate 360° in clockwise direction for 3 times when the Drone is connected to smartphone, files continuously. -
Page 16: Intelligent Flight Modes
Pair your smartphone with the Drone and Once the Drone is airborne, tap on the mode minimum altitude of 5m and a maximum altitude launch the KB Trail app. activate icon (Fig.3) to begin the waypoint of 50m. For better videos an altitude between flight mode. - Page 17 You can take over the control manually anytime during the flight by tapping the Joystick control. Pair your smartphone with the Drone and launch the KB Trail app. Wait for the Drone to receive GPS signal and sufficient number of satellites.
-
Page 18: Faq
Insufficient Battery Power. If the Drone LEDs are Micro SD card flashing and the Drone Rotor blades are spinning File Storage / Smartphone without any lift, recharge the Drone battery. The Rotor Blades are distorted. Replace them with Intelligent Flight mode only official Kaiser Baas replacement blades.
Need help?
Do you have a question about the TRAIL and is the answer not in the manual?
Questions and answers