Advertisement
Advertisement
Table of Contents

Related Manuals for az-instrument AZ8922


Summary of Contents for az-instrument AZ8922
- Page 1 DIGITAL SOUND 8922 Owner‘s manual Sound level meter...
-
Page 2: Safety Instructions
Safety instructions This device is designed and tested in accordance with the safety regulations for electronic measuring instruments. The proper functioning and operational safety of the device can only be guaranteed if the generally applicable safety measures and the device-specific safety instructions given in this manual are respected during operation. -
Page 3: External Power Supply
If the device is transported from a cold to a warm environment condensation may result in device function failure. In this case you have to wait until the temperature of the device has adapted to the ambient temperature, before switching it on. If it is assumed that the device can not be operated safely any more, it must be put out of operation and secured against further usage. - Page 4 Fire hazard due to incorrect polarity Installing the battery incorrectly may damage the device and the battery. Pay careful attention to inserting the battery with the cor- rect polarity. Possible damage caused by leaking battery Battery leakage may damage the device permanently. Remove the battery from the device if it is not going to be used for a long time.
-
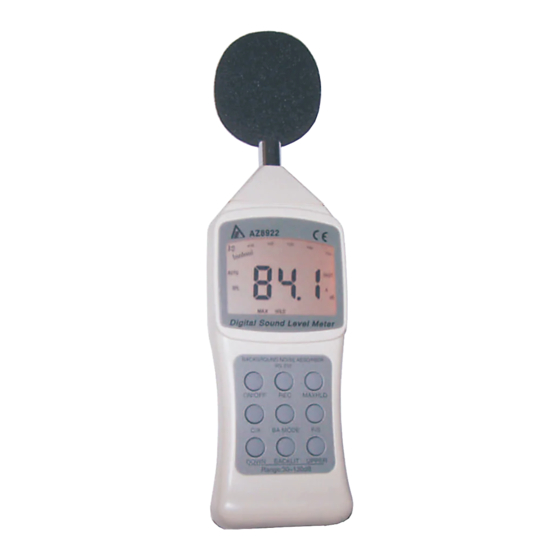
Page 5: Operating Elements
Operating elements Microphone ON/OFF On / off button Button to record the readings MAXHLD Button to store the maximum value Button for IEC rating filter BA MODE Button for background suppression Button to set the measurement interval DOWN Button to select the measuring range UPPER Button to select the measuring range DC 9V... - Page 6 Operating Sound level measuring Press ON / OFF to turn the unit on. During the self-test when powering up, initially all segments are lit in the display. Then follows an initialization phase, in which the unit counts down in the display. Only after that, the unit starts measuring of the current level values.
- Page 7 Determining the minimum and maximum sound level 1. Turn on the meter. 2. Then press the REC button. The REC message appears in the lower part of the display. The machine now starts with determining the maximum and minimum sound levels. 3.
-
Page 8: Display Illumination
Display Illumination Press the Backlit button to light the display for about 5 seconds. This facilitates viewing in low light conditions. Automatic or manual range selection The meter offers six measurement ranges in steps of 10 dB: 30~80 dB, 40~90 dB, 50~100 dB, 60~110 dB, 70~120 dB, 80~130 dB. When you turn on the device, it is in automatic range selection mode. -
Page 9: Data Interface
Data interface To use the interface for data transfer, you need a special RS-232 / phone jack cable. This can be found in our range. Since modern computers usually don‘t offer a serial port anymore, one also needs a USB -> COM adapter. You also find two additional analog outputs: X The AC output delivers the microphone signal. - Page 10 Software GSOFT 8922 As a comfortable recording program with online documentation, GSOFT 8922 is available (optional accessory). In addition to data recording on hard disk, the programme‘s most important feature is the graphical representation of all measured and recorded channels in a reading-time diagram (recorder func- tion).
-
Page 11: Technical Specifications
Technical specifications Standards IEC 651 type 2, ANSI S1.4 type 2 Evaluated frequency spectrum 31,5 Hz ~ 8 kHz Accuracy ± 1,5 dB Weighting filter A measuring range 30 dB ~ 130 dB Weighting filter C measuring range 35 dB ~ 130 dB Measuring ranges 6 ranges in steps of 10 dB: 30 ~ 80 dB, 40 ~ 90 dB, 50 ~ 100 dB,... - Page 12 Disposal • This product is subject to the European Waste Electrical and Elec- tronic Equipment Directive (WEEE). Do not dispose with your normal household waste. Dispose of this device through an approved waste disposal firm or through your local waste facility. When discarding the device, comply with the rules and regulations that apply in your country.
Need help?
Do you have a question about the AZ8922 and is the answer not in the manual?
Questions and answers