Table of Contents

Related Manuals for AnaCom AnaSat-C Series

Summary of Contents for AnaCom AnaSat-C Series
- Page 1 1961 Concourse Dr. San Jose, CA 95131, USA Phone: 408.519.2062 FAX: 408.519.2063 P/N 30723 Rev 13 www.anacominc.com ® AnaSat -C series ® AnaSat Transceiver Operating Manual Extended EC Super Extended SEC Russian RC PALAPA PC INSAT XC...
- Page 2 2018 AnaCom, Inc. All rights reserved. The information furnished by AnaCom, Incorporated, in this publication is believed to be accurate and reliable. However, no responsibility is assumed by AnaCom for its use, nor any infringements of patents or other rights of third parties resulting from its use. No license is granted by implication or otherwise under any patent or patent right of AnaCom, Inc.
-
Page 3: Table Of Contents
3072313 Operating Manual ® AnaSat C-Band Transceivers Table of Contents ® AnaSat -C Quick Start Guide ..................5 Introduction ........................6 ® Typical Operating Parameters - AnaSat C-Band ............7 ® Physical Characteristics - AnaSat C-Band ..............8 ... - Page 4 3072313 Antenna Adjustment ...................... 20 M & C Operation ....................... 20 Terminal Display ......................20 Gain Adjustments....................... 22 Transmitter Gain ......................22 Receiver Gain......................... 22 Basic M & C Commands ....................23 Maintenance ........................24 ...
-
Page 5: Anasat ® -C Quick Start Guide
3072313 ® AnaSat -C Quick Start Guide 1. Mount the transceiver and the LNC/LNA on the antenna. 2. Connect the cables as shown in the drawing (See page 16 of Operations Manual). 3. Connect a terminal to a serial port, configured to 1200bps, 8 data bits, no parity, 1 stop bit, CR/LF Off. -
Page 6: Introduction
3072313 Introduction ® The AnaSat -C VSAT series C-Band transceivers are designed for continuous outdoor duty in all ® types of environments. Ideally suited for SCPC, MCPC, and DAMA applications, the AnaSat -C series transceivers transmit in the 6 GHz frequency range and receive in the 4 GHz range. ®... -
Page 7: Typical Operating Parameters - Anasat ® C-Band
3072313 ® Typical Operating Parameters - AnaSat C-Band Unit Power 1 dB Compression Point 44.8 47.8 TX Gain 75.8 78.8 Unit Power 100W 125W 150W 180W 200W 300W 350W 400W 1 dB Compression Point 48.5 51.8 52.6 54.8 55.4 TX Gain 79.5 82.8 83.6... -
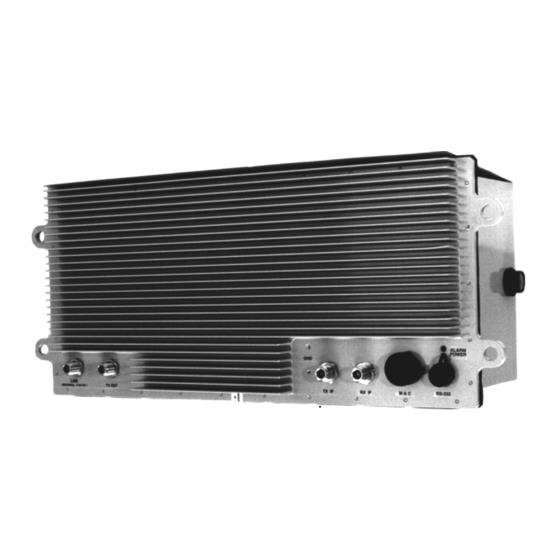
Page 8: Physical Characteristics - Anasat ® C-Band
3072313 ® Physical Characteristics - AnaSat C-Band Unit Power Typical Power Consumption Prime Power Recommendation Weight ( lbs.) (kg.) Unit Power 100W 125W 150W 180W 200W 300W 350W 400W Typical Power Consumption 1179 1179 1539 1539 2832 2832 2832 Prime Power Recommendation 1200 1200 1600... -
Page 9: Installation
-C transceiver and LNC are properly grounded. Do not rely on coaxial cable ® shields for the ground connection. If the cover is removed from any AnaCom product, ensure that all: gaskets are intact and free of damage prior to reinstallation ... -
Page 10: Power Supply
Site Considerations The installation requirements of any particular site are the responsibility of the system operator. AnaCom offers an optional installation mounting kit, that can be used at most sites. Contact AnaCom for details. Antenna The transceiver must be attached to some form of mounting structure which is usually the antenna feed boom or the antenna bracket structure. -
Page 11: Power Requirements
3072313 Power Requirements The AnaSat -C transceiver requires a power source that supplies 110 VAC or 220 VAC at 50 or ® 60 Hz, through a circuit breaker. Specific circuit breaker size will depend on which transceiver is being used. To assure uninterrupted service, some method of backup AC power is recommended. Installing surge arrestors and AC power line filters will reduce voltage surges from the AC power input. - Page 12 3072313 Figure 2-1a Transceiver Mounting for Single Thread ® AnaSat Transceiver C-Band...
- Page 13 3072313 Figure 2-1b Transceiver Mounting for Single Thread ® AnaSat Transceiver C-Band...
-
Page 14: Lnc/Lna/Tr Filter Mounting
Route the 10-foot cable to the transceiver and connect to the LNC/LNA N-connector. Figure 2-2. LNC assembly. Longer or shorter cable lengths may be used; contact ANACOM for details. Caution: Never touch the ground-plane antenna pin found inside the wave-guide flange of the LNC/LNA. -
Page 15: Ac Power
-C via either RS- 232 or RS-485 serial ports. Appendix C shows the pinout of the serial outputs. Both 6-pin and 18-pin weather-tight circular connectors are included. An optional serial computer cable is available from ANACOM. ® AnaSat Transceiver C-Band... -
Page 16: Final Check
3072313 Final Check Recheck all bolts and cabling. Refer to Figure 2-5 to verify cable connections. After all other connections have been made, connect the AC power cord to an active outlet. Water Resistance Wrap The application of moisture-resistant wrap (mastic tape) to all connectors is recommended to prevent water entry and resultant water damage. - Page 17 3072313 Fig 2-5. Transceiver Cabling Diagram ® AnaSat Transceiver C-Band...
-
Page 18: Operation
The AnaCom M&C features automatic baudrate sensing on the serial ports. If a wrong baudrate is detected, the M&C will drop to 1200 baud and wait for user to move to 1200 baud. AnaCom provides a CD with both our Supervisor and Supervisor Jr. software on it that will establish a link with the ODU automatically, regardless of the last used settings. - Page 19 3072313 = TX IF + 5854 + Ch# MHz = RX IF + 3629 + Ch# MHz For negative channels: = TX IF + 5855 + Ch# MHz = RX IF + 3630 + Ch# MHz For example, if the following commands are given to the transceiver: RXCHAN 50 TXCHAN 50 Then with a TX IN intermediate frequency of 72.5 MHz the result is an output frequency of...
-
Page 20: Antenna Adjustment
3072313 Antenna Adjustment Do not transmit while adjusting the antenna position. Follow the antenna manufacturer’s instructions for antenna position adjustment. For final alignment, contact the satellite operator and get the correct polarization, azimuth, and elevation of the satellite and also confirm the desired transponder is operational. Apply power to the AnaSat -C. - Page 21 3072313 ꞏ RXGAIN is the actual receiver gain value selected in dB. The remainder of the display gives detailed monitoring information as follows: OSL LOCK gives alarm status of the OSL phase locked loop; NORMAL or FAULT ꞏ ꞏ TXLOCK gives alarm status of the transmit phase locked loop; NORMAL or FAULT ꞏ...
-
Page 22: Gain Adjustments
3072313 Gain Adjustments Transmitter Gain After the transceiver has warmed up for at least 5 minutes (OCXO warm-up) the transmitter may be activated. Set the transmit gain to achieve the desired output level (in dBm) with the transmit gain control, TXGAIN. Output power is selectable in 1 dB steps. Smaller steps can be entered, for example: TXG 62.5 and the M&C will attempt to provide that gain as close as possible. -
Page 23: Basic M & C Commands
3072313 Basic M & C Commands (see Appendix 1. Using the terminal, configure the transceiver to the proper frequency nnn ranges from 1 to 501 RXCHAN nnn nnn ranges from 1 to 501 TXCHAN nnn 2. Configure receive gain and transmit gain. nnn ranges from 85 to 100 in 1 dB steps RXGAIN nnn nn ranges from:... -
Page 24: Maintenance
3072313 Maintenance ® AnaSat Transceivers are designed for a minimum of maintenance. Periodic scheduled maintenance is not required. Replacement of the weatherized fan after 7 years is recommended however. LNC/LNA Replacement ® Although the AnaSat -C family of transceivers is designed to need no normal maintenance, if it ever becomes necessary to replace the LNC, this procedure may be accomplished in the field with a minimum of equipment. -
Page 25: Fan Replacement
A replacement fan available from AnaCom, Inc., can then be mounted on the shroud and it’s connector plugged into the receptacle on the heatsink. The shroud can then be re-attached to the heatsink using the original screws. -
Page 26: Alarm Relay Closure Option
3072313 Alarm Relay Closure Option If this option is installed, a mechanical relay is used in the transceiver for alarm indication. The red LED mounted on the transceiver is illuminated whenever a problem exists and the relay has closed. The alarm relay has normally closed contacts, so it defaults to the alarm state when power is off. Monitored Values The following internal points are monitored and can result in Alarm closure if out of range: ... -
Page 27: Appendix A. M & C Command Set
3072313 Appendix A. M & C Command Set The transceiver will not respond to any command until a carriage return has been entered, terminating the command input. Multiple commands may be entered before a carriage return, using “;” as a delimiter. Example: TXCHAN 54;... - Page 28 3072313 TXCHAN ................................ 32 TXFREQ ................................. 33 TXGAIN ................................33 UNLOCK PASSWORD ..........................33 UTIMER ................................33 WARMUP ............................... 33 TXD; TXDAC ..............................33 RXD; RXDAC ..............................33 ALARMS This command returns a list of raised alarms for the given transceiver. The possible alarms are: WARMING, FANERR, OSLOCK, TXLOCK, RXLOCK, UCMUTE, PATEMP, TXOUT, P12V, PA, N5V, OSLPLL, TXPLL, RXPLL, P5V, LNCV, PROMERR and RXOUT.
- Page 29 3072313 ALARM_MODE [ NORMAL | PROTECTION ] There are two modes for alarm relay operation: Normal and Protection. In the NORMAL mode, the relays operate as MAJOR and MINOR relays as described above. In PROTECTION mode, the relays become redefined as TX and RX summary fault relays. The relay normally called MAJOR becomes the TX relay and the relay normally called MINOR becomes the RX relay.
- Page 30 1. The unit can be reset using the internal DIP switches. See Appendix D. 2. If the unit is attached to a modem, and presently accessible remotely, telephone ANACOM. MODE This command returns either MODEM_MODE or PC_MODE. Example: MODE might return MODE MODEM_MODE when the user is connected to the unit via a phone line and a Hayes compatible modem.
- Page 31 3072313 MODEM_STRING [TEXT] When the M & C computer is in modem mode it will periodically send a Hayes compatible initialization string of up to 40 characters to the modem to make sure it is properly configured. The user can get [set] this string via this command. The default string as part of factory settings is: MODEM_STRING AT S0=1 &C1 &S0 \Q0 E0 MSG TEXT...
- Page 32 3072313 RXGAIN [number] This command gets [sets] receiver gain. The acceptable range is a two or three digit integer between 85 and 100 (dB). SAVE This command saves present M & C operating parameters to a FLASH EEPROM. SET_PASSWORD PASSWORD PASSWORD The M &...
- Page 33 3072313 TXFREQ [number] This command gets [sets] the transmit channel number. The acceptable range depends upon model type. The [number] is the actual transmit frequency output with TXIF at 70 MHz [or 140 MHz]. TXGAIN [number | INC | DEC] This command gets [sets] or returns the transmit power amplifier gain.
-
Page 34: Appendix B. Arm9 M&C Card Connection Methods
This is a new method introduced with the ARM9 M&C card, and uses FSK signals on the TXIF cable. At present only the AnaCom packet protocol is supported using FSK, but we expect to support other protocols as requested and provided. -
Page 35: Ethernet-Based Methods
Most Ethernet network traffic uses an IP protocol and therefore requires a device to have an IP address. AnaCom transceivers are shipped with a default address of 0.0.0.0. When a transceiver with this address is placed on a network, it will use the DHCP protocol to acquire an address from the local router. -
Page 36: Supervisor 10
3072313 Supervisor 10 Supervisor 10 can manage multiple serial port connections and ethernet connections at the same time. It is not necessary for transceivers to have IP addresses, nor is it necessary for there to be a DHCP server in order for Supervisor to find and manage any number of transceivers on the local network. A switch connecting all the transceivers together, with a computer running Supervisor 10, or a direct Ethernet cable running from a single transceiver to a computer is all that is necessary. -
Page 37: Telnet
3072313 Telnet This is a terminal emulator method that works over Ethernet. Such a method can be used for initial setup, or to send commands while another method is be used to monitor the transceiver while unattended. A good telnet program for Windows is PuTTY. More can be learned about it at http://en.wikipedia.org/wiki/PuTTY. -
Page 38: Http (Web Browser)
3072313 HTTP (web browser) By entering a transceivers IP address into a browser's URL field (IE, Firefox, Chrome, and Opera have all been tested), the transceiver provides a web page that can be used to monitor and control its function. Once connected, the web page can be set to refresh periodically. Multiple browsers on different computers can be monitoring a transceiver's web page simultaneously. -
Page 39: Snmp
NMS software for each device type. This file is used to describe all the data that can be read out of a device and those parameters that can be written to, using SNMP. AnaCom will provide a MIB for all devices that we support to any NMS vendor. The associated AnaCom OID is 1.3.6.1.4.1.4578. -
Page 40: Appendix C. Serial Port Wiring
3072313 Appendix C. Serial Port Wiring COM1, 6-Pin Circular Weathertight Connector Cable Wire View Cable End View Signal Description Data Terminal Ready Data Carrier Detect Data Set Ready Receive Data Transmit Data Ground Note dimple next to pin 1 COM0, 18-Pin Circular Weathertight Connector 10 11 12 18 17 17 18... -
Page 41: Rs485/Rs232 Selection
3072313 RS485/RS232 Selection (COM1, 18-Pin Connector Only) Pin 12 of the 18-pin Weathertight circular connector is the RS485/RS232 mode select pumper pin. Connect Pin 12 to Ground (Pin 18) for RS485 operation. Leave open for RS232 operation. This has no effect on the other serial port. -
Page 42: Appendix D. Satellite Channel Listings
3072313 Appendix D. Satellite Channel Listings EC-Band Ku-Band For channels 1 to 501 For channels 1 to 501 RX MHz = 3699+(channel) TX MHz = 13999+(channel) EKU-Band SEC Band For channels -250 to -1 For channels -75 to -1 TX MHz = 14000+(channel) RX MHz = 3700+(channel) TX MHz = 5925+(channel) For channels 1 to 251... -
Page 43: Appendix E. Dbm/Watts Conversions
3072313 Appendix E. dBm/Watts Conversions 20 ............0.10 1 ............30.00 20.5 ............ 0.11 2 ............33.01 21 ............0.13 3 ............34.77 21.5 ............ 0.14 4 ............36.02 22 ............0.16 5 ............36.99 22.5 ............ 0.18 6 ............37.78 23 ............ -
Page 44: Limited Warranty
LIMITED WARRANTY If this product should fail due to defects in materials or workmanship, AnaCom, Inc., will, at its sole option, repair or replace it with new or rebuilt parts free of charge for a period of two (2) years from the date of shipment from the AnaCom factory.
Need help?
Do you have a question about the AnaSat-C Series and is the answer not in the manual?
Questions and answers