Table of Contents
Advertisement
Advertisement
Table of Contents

Related Manuals for iConnectivity PLAYAUDIO 12


Summary of Contents for iConnectivity PLAYAUDIO 12
- Page 1 User Guide...
-
Page 2: Table Of Contents
Table of Contents Introduction Key Features In the Box System Requirements Macintosh Windows Hardware Connections Front Panel Rear Panel Getting Started Install iConfig and Upgrade Your PlayAUDIO12 Firmware PlayAUDIO12 Failover Redundancy How the PlayAUDIO12's Failover System Works How to Arm the PlayAUDIO12 for Automatic Failover How to Test Automatic Failover How to Configure the PlayAUDIO12 for Manual Failover Controls... -
Page 3: Introduction
Introduction Thank you for purchasing the PlayAUDIO12, a unique audio/MIDI interface and integrated failover system that has been designed to provide compact and easy-to-operate failover protection for the live per- formance arena. Your PlayAUDIO12 offers superb sound quality and flexible MIDI capabilities, and integrates performance and peace-of-mind by providing fail-safe control and playback of backing tracks, virtual instruments, and MIDI devices in a live setting. -
Page 4: In The Box
In the Box The PlayAUDIO12 Audio/MIDI interface. (1) USB-A to USB-B cable for connecting a MacOS or Windows computer to your PlayAUDIO12. The PlayAUDIO12 power supply. PlayAUDIO User Guide v1.0... -
Page 5: System Requirements
Product features are subject to change. Apple logo, Macintosh, OS X, Mac, iPad, iPhone, and iPod touch are trademarks of Apple Inc., registered in the U.S. and other countries. iConnectivity, iConnectMIDI, iCon- nectAUDIO, ConnectAUDIO, mio, PlayAUDIO, and Audio passThru are trademarks of iKingdom Corp. -
Page 6: Hardware Connections
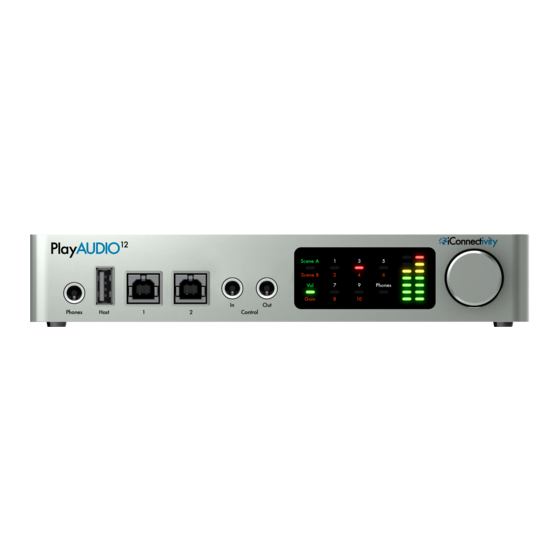
Hardware Connections Front Panel Stereo Headphone Jack USB-A Host MIDI port. This USB 2.0 jack supports up to eight 16-channel MIDI Ports from eight USB MIDI class-compliant devices. USB-B Device Ports. Use these ports to connect up to two computers or iOS devices simultaneously. Control In Jack. -
Page 7: Rear Panel
Rear Panel Power Jack. Connect the included PlayAUDIO12 power supply here. Balanced Analog Outputs. The PlayAUDIO12's 10 analog outputs provide low noise, phantom power-resistant connections that boast up to 24-bit/96kHz DA conversion. MIDI Ethernet Port. Use this port for long-distance MIDI connections. PlayAUDIO User Guide v1.0... -
Page 8: Getting Started
Install iConfig and Upgrade Your PlayAUDIO12 Firmware Before you begin using your PlayAUDIO12, we recommend that you upgrade your unit's firmware to the latest version using iConnectivity's iConfig application. Follow these steps to install the iConfig software and perform the firmware upgrade: 1. -
Page 9: Playaudio12 Failover Redundancy
How to Arm the PlayAUDIO12 for Automatic Failover A test tone generator is required to arm the PlayAUDIO12 for Automatic Failover. If a test tone generator isn't included with your Digital Audio Workstation, download and install iConnectivity's LifeSine test tone plugin from https://www.iconnectivity.com/downloads/. - Page 10 4. On both computers (Computer A and Computer B), open your Digital Audio Workstation and load your playback project. 5. On Computer A (your primary playback device), instantiate your test tone plugin on a free track and assign it to the PlayAUDIO12's audio output 13 (Control Tone). When your PlayAUDIO12 unit detects the test tone, the green Scene A LED light will blink, indicating that the PlayAUDIO12 is armed for automatic failover.
-
Page 11: How To Test Automatic Failover
6. Connect a MIDI external controller to the USB host port. Ensure that both DAWs are configured so that playback can be triggered on both DAWs simultaneously. 7. With the unit armed, use the attached MIDI external controller to trigger simultaneous playback on Computer A and Computer B. -
Page 12: Controls
Controls Interactive Touch Panel Display The PlayAUDIO12's Interactive Touch Panel Display is a capacitive touch panel that provides the fol- lowing features: Eight touch zones for intuitive control over Scene selection, level adjustment to the PlayAUDIO12’s analog outputs, and headphone levels. Dual 8-stage LED meters and independent metering modes for select functions. -
Page 13: Volume/Gain
Figure 6: Press once to toggle between Scenes. Volume/Gain Press once to toggle between Volume display mode and Gain display mode. Figure 7: Press once to toggle between Volume display and Gain display modes. Outputs Output zones have three states and will toggle successively in this order: Odd-numbered output Even-numbered output Stereo output pair... -
Page 14: Phones
Figure 8: Pressing the touch zone successively will select (in this example) Output 1, Output 2, or Stereo Output 1/2 Phones Press once to toggle between Volume mode and Gain mode. Figure 9: Press once to toggle Phones to Gain Set mode. PlayAUDIO User Guide v1.0...
Need help?
Do you have a question about the PLAYAUDIO 12 and is the answer not in the manual?
Questions and answers