Table of Contents
Advertisement
Advertisement
Table of Contents

Related Manuals for Tidel TACC-VI


Summary of Contents for Tidel TACC-VI
- Page 1 TACC-VI 450-0447-001 Rev. C...
- Page 2 Tidel would like to thank you for purchasing this TACC-VI product. To maintain proper working order, we recommend you read this manual completely and perform the preventive maintenance routines at the suggested intervals. The Manufacturer’s Warranty is limited to defects in workmanship and equipment hardware.
-
Page 3: Table Of Contents
Contents Component Location Initial Start-up Mandatory Programming Printer Information Touchscreen Layout/Entry Operations Performed From the Main Screen Courier Key Operations Door (Vault), Opening and Operations Inserting/Retrieving Manual Drops Emptying the Bill Acceptor Bill Acceptor Cleaning/Jam Removal Tube Vending Operations End Of Day/Shift Operations Adjusting Vault Contents Moving Vault Contents Printing Reports... -
Page 4: Component Location
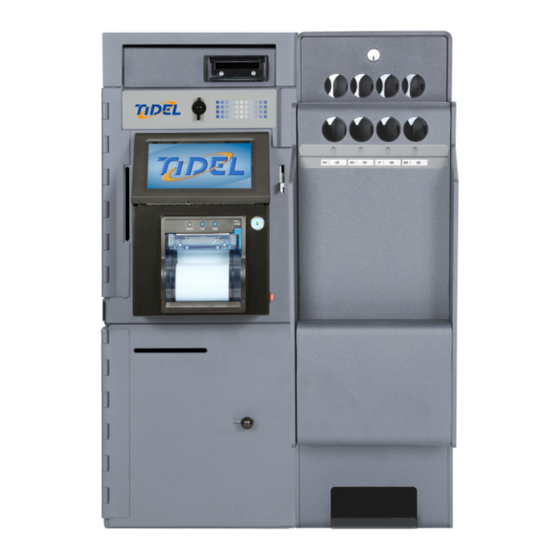
TACC-VI Controller 1) Bill Acceptor (MEI Single Note Feed pictured) 2) Bill Acceptor Maintenance Door 3) Bill Acceptor Vault Door Lever 4) i-Key Socket 5) Printer Paper Loading Door Release Lever 6) On/Off Switch and Electrical Breaker 7) Display - Touchscreen... - Page 5 TACC-VI with Drop Vault Base Bill Acceptor (MEI Single Note Feed pictured) Bill Acceptor Maintenance Door Latch Bill Acceptor Vault Door Lever i-Key Socket Printer Paper Loading Door Release Lever On/Off Switch and Electrical Breaker Display - Touchscreen Courier Tray Insertion Slot...
- Page 6 TACC-VI with Mailbox Drop Base Bill Acceptor (MEI Single Note Feed pictured) Bill Acceptor Maintenance Door Latch Bill Acceptor Vault Door Lever i-Key Socket Printer Paper Loading Door Release Lever On/Off Switch and Electrical Breaker Display - Touchscreen Courier Tray Insertion Slot...
- Page 7 TACC-VI with Tube Vend Module Bill Acceptor (MEI Single Note Feed pictured) Tube Vending Vault Lock (Maintenance Door) Tube Insertion Holes Bill Acceptor Vault Door Lever i-Key Socket Printer Paper Loading Door Release Lever On/Off Switch and Electrical Breaker Tube Retrieval Ramp...
-
Page 8: Initial Startup
Initial Startup The following options may be displayed at start-up: “Would you like to Perform End User Setup” X YES - Will prompt the selection of “Customer Specific” settings. Select the appropriate Customer X NO - Will allow the user to navigate the menus without loading Customer settings WARNING: If “NO”... -
Page 9: Mandatory Programming
Mandatory Programming Date and Time Log In > More > Date/Time a) Enter the Date and time (note date format). b) Select AM or PM (if applicable), then select “ENTER”. c) Select “GO BACK” until the Main Screen appears. Clerk and Manager Codes Log In >... -
Page 10: Printer Information
Built-In Printers Step 1: Press down on the Paper Door Release Button to expose the paper tray. Step 2: Pull enough paper off the roll to extend out of the paper tray and place the paper into the tray so the paper comes off the top off the roll. -
Page 11: Touchscreen Layout/Entry
Touchscreen Layout/Entry Name 789_ Done Clear Go Back NOTE: The top of the Display indicates the current screen. X Use your fingertips to “tap” in selections. Do not use sharp, pointed objects to select entries. To enter a character: Tap the corresponding icon repeatedly until the desired selection is displayed. -
Page 12: Operations Performed From The Main Screen
Main Screen Operations Sentinel Main Screen, version 4.60 Vend Tube Insert Bills Load Tubes Vault Drop Log-In X Selecting an icon on the Main Screen will prompt the User for code entry. X Selections that appear on the Main Screen will vary depending on the configuration and type of add-on modules equipped with the unit. - Page 13 Main Screen Operations Insert Bills 1) After code entry, the Bill Acceptor will become active. Bills can be inserted into the Bill Acceptor. Note: Approximately 25 bills can be inserted into a Bulk Note Bill Acceptor in a single transaction. 2) The Bill Acceptor will become inactive 30 seconds after the last bill was inserted or when “Done”...
- Page 14 Main Screen Operations Log In 1) The user will be prompted to enter a Clerk, Manager or Executive code to access the appropriate menus. Vault Drop 1) The user may be prompted to select tracking information prior to making a drop (Register Number/Name, Check Number, Reference Number, etc...).
-
Page 15: Courier Key Operations
Courier Log On Options When a Courier i-Key is placed in the socket on the front of the Control Panel, the following Menu selections may appear (dependent on access privileges): X Print Reports Reports can be printed from this menu. X Notation A 1-16 character notation can be entered each time “YES”... -
Page 16: Door (Vault), Opening And Operations
Opening the Bill Acceptor Vault TACC-VI Controller Step 1: Navigate to the “Open Vault” Menu and select the desired vault. Log In > (enter code) > Open Vault > Acceptor Vault Note: If the vault does not appear as a selection, the user does not have the ability to open the vault. - Page 17 Opening the Drop Vault Door TACC-VI with Drop Vault Base Step 1: Navigate to the “Open Vault” Menu and select the Drop Vault. Log In > (enter code) > Open Vault > Drop Vault Step 2: After the door opening delay time has expired, the top line of the Display will indicate “Vault Wait Complete”.
-
Page 18: Inserting/Retrieving Manual Drops
Bill Acceptor Vault. Items placed in the Upper Insertion Slot can also be collected by Armored Car Couriers Inserting Manual Drops TACC-VI with Drop Vault Base The Upper Insertion Slot is typically used for Armored Car collection (Courier Tray) - Page 19 Removing the Drop Vault Contents If Drops are being transferred to the Courier Tray: Step 1: Navigate to the “Cash Control Menu” and select DROPS TO COURIER TRAY. Log In > (enter code) > Cash Control > Drops to Courier Tray Step 2: The unit will display the drop contents.
- Page 20 Retrieving Items from the Courier Tray Step 1: Open the Bill Acceptor Vault Door to access the Courier Tray. If the Acceptor Vault was opened by a Courier a) The Courier will perform the necessary steps to clear the contents of the Courier Tray. b) The Courier Report will reflect the amounts removed.
-
Page 21: Emptying The Bill Acceptor
MEI Bill Acceptors Removing Cash from the Cassettes Step 1: Open the Bill Acceptor Vault. Step 2: Pull the Cassette out of the Bill Acceptor by the yellow handle. Standard Capacity Cassettes X Press the release button toward the center of the Cassette to open the access door. -
Page 22: Bill Acceptor Cleaning/Jam Removal
MEI Bill Acceptor Manual Cleaning NOTE: Manual cleaning should be performed every 30 days or when a “Cleaning Reminder” is displayed. A “cleaning reminder” will be displayed when manual cleaning is required. The cleaning reminder will continue to appear at regular intervals until a “Clear All Odometers”... - Page 23 MEI Bill Acceptor Removal Manual Cleaning and Jam Clearing Step 1: Open the Acceptor Maintenance Door. Single Note Feeder release Step 2: Press the release bar to remove the Bill Acceptor. Clean the “Cassette Present” sensors and rollers with a damp cotton swab Top Of Cassette...
- Page 24 MEI Bill Acceptor Manual Cleaning Clean the “Cassette Present” sensors with a damp cotton swab Cassette removed Slide the yellow cover forward to open the “Clamshell” Manuallly clean Sensors, Lenses and Rollers with a damp cloth (Do not use chemicals or solvents)
-
Page 25: Tube Vending Operations
Tube Vending Module Tube Module Vault Door Lock Column 2 Column 3 Column 1 Column 4 Column 5 Column 8 Column 6 Column 7 Tube Retrieval Ramp... - Page 26 Tube Vending Module Loading The Operating Cash Each one of the 8 columns will hold 11 tubes each. Step 1: All coins must be placed in tubes before loading into the columns. Do not place tape over the end of the tube. Tape will cause jams.
- Page 27 Checking The Number Of Tubes Step 1: Insert the dipstick into the tube loading hole with the highest number first and the numbers facing toward you. Step 2: The number at the bottom of tube loading hole is the number of tubes in the column. NOTE: Leaving the dipstick in the magazine may result in a jammed vend mechanism.
-
Page 28: End Of Day/Shift Operations
End Of Day/Shift X When an End of Day is performed, all transaction information from the previous End Of Day to the current End Of Day will be stored in a file, which can be re-printed. X Each time an End of Shift is performed, time (shift) periods will be divided on the End Of Day report and activity performed on those shifts will be listed. -
Page 29: Adjusting Vault Contents
Adjusting Vault Contents X When actual amounts of vault contents don’t match the reports, this function can be used to make corrections. Step 1: Navigate to the “Adjust Vault Contents” Menu. Log In > Cash Control > Adjust Vault Contents Step 2: The user will be prompted to select the category requiring modification: Drop - will modify the reported Vault Drop amounts. -
Page 30: Moving Vault Contents
Moving Vault Contents X This function is performed when funds are moved INTO or OUT OF the unit. Step 1: Navigate to the “Move Vault Contents” Menu. Log In > Cash Control > Move Vault Contents Step 2: Select a category to move the amounts FROM: X Outside - Funds from an outside source are being put into the unit. -
Page 31: Printing Reports
Printing Reports Step 1: Navigate to the “Reports” Menu. Log In > Reports Step 2: From the Reports Menu, select the desired report from the available choices. Note: Report selections may vary based on the report family set in the Reports Policy Menu. Reports Commonly Associated with Daily Auditing Current Content - Lists the existing amounts in the following... -
Page 32: Adding A Clerk
Adding A Clerk Step 1: Navigate to the “Clerk Accounts” menu. Log In > Accounts/Clerk Accounts > Add Step 2: Enter the Clerk’s PIN (4-9 numbers). Step 3: Verify the Clerk’s PIN by re-entering the number. Step 4: Enter the Clerk’s Name (2-8 characters) and press “Done”. Step 5: Edit the Clerk’s privileges: Can Open Acceptor Door (Y/N) -
Page 33: Screen Protector Replacement
Screen Protector Replacement Step 1: Turn the ON/OFF Switch OFF. Step 2: Locate the removal slots on both side of the Control Panel Bezel. Step 3: Spread the sides of the Bezel away from the Control Panel and remove the Bezel Step 4: Peel the existing Screen Protector away from the Control Panel frame. -
Page 34: Troubleshooting
Troubleshooting BILL ACCEPTORS: At least one Bill Acceptor needs cleaning: 1) Press “Done” to remove the reminder from the screen. 2) Clean the Bill Acceptor by the recommended procedure (see “Cleaning” in the Bill Acceptor section of this manual). X The reminder will continue to appear until a “Clear all odometers”... - Page 35 Troubleshooting DISPLAY: No Display: 1) Turn the Power Switch OFF, wait 30 seconds, then turn the Power Switch back ON. 2) Insure AC power is present at the wall socket. 3) Check the breaker on the right side of the Printer. Multiple images/Slow reaction: 1) Turn the Power Switch OFF, wait 30 seconds, then turn the Power Switch back ON.
- Page 36 Troubleshooting TOUCHSCREEN: Code entry difficult Control Panel selections not responding 1) Turn the Power Switch OFF, wait 30 seconds, then turn the Power Switch back ON. 2) Replace the Screen Protector. TUBE VENDING: Column out of service is shown when “Vend Tube” is selected 1) Turn the Power Switch OFF, wait 30 seconds, then turn the Power Switch back ON.
- Page 37 Troubleshooting VAULT DOORS: The Acceptor/Drop Vault has been open too long, please close it: 1) This error message is displayed when the unit detects a door has been unlocked for unusually long period. 2) Close and lock the appropriate door. 3) Select “Cancel”.
-
Page 38: License Agreement
License Agreement You have acquired a device (TACC-VI) that includes software licensed by Tidel Engi- neering from Microsoft Licensing Inc. or its affiliates (“MS”). Those installed software products of MS origin, as well as associated media, printed materials, and “online” or electronic documentation (“Windows CE”), are protected by international intellectual... - Page 40 2025 W. Belt Line Rd, #114 Carrollton TX 75006 1-800-678-7577 (phone) 972-484-1014 (fax) techserv@tidel.com...
Need help?
Do you have a question about the TACC-VI and is the answer not in the manual?
Questions and answers
I NEED TO SET UP BILL ACCEPTOR SO WE CAN MAKE CHANGE IE $100'S FOR 20'S