Table of Contents
Advertisement
Quick Links
Advertisement
Table of Contents

Related Manuals for Race Navigator RN PRO


Summary of Contents for Race Navigator RN PRO
- Page 3 Thank you for choosing RN PRO! Please read this manual before using the device for the first time. Visit the website for more information: www.race-navigator.com Updated 05-09-18 Release date: 11/05/2016...
-
Page 4: Table Of Contents
TABLE OF CONTENTS DELIVERY SCOPE ................................. 9 RACE NAVIGATOR PRO ............................... 9 RN PRO MAIN UNIT INSTALLATION ...........................10 TURNING ON THE RN PRO MAIN UNIT ........................10 RN PRO MAIN UNIT ..............................11 RN PRO DISPLAY ................................13 RN PRO WITH DISPLAY AND CAMERAS ........................15 RN PRO CLAMP ................................17... - Page 5 DASHBOARD · P 4 ............................27 ANEL DASHBOARD · P 5 ............................27 ANEL DASHBOARD · M ......................28 IRROR ASHBOARD MANUAL RECORDING ............................29 RECORDING WITH OBD-II DIAGNOSTIC DATA ....................30 LAPS HISTORY (LAPS)............................31 LAP DETAILS ..............................32 REVIEW DRIVE ..............................32 VIDEO PLAYER ..............................
- Page 6 TRACK ................................49 12.1 TRACK VARIANTS ............................. 52 12.2 TRACK VARIANTS · E ............................ 52 12.3 TRACK VARIANTS · A ............................ 53 EVENT ................................54 13.1 EVENT · T ............................. 55 RACKDAY 13.2 EVENT · E ............................56 NDURANCE 13.3 EVENT · T ..............................
- Page 7 16.4 DEVICE · D ............................82 IAGNOSTICS 16.5 DEVICE · RN R ............................. 83 ESET 16.6 RN R · R ..........................83 ESET ESET VENT 16.7 RN R · F ..........................84 ESET ACTORY ETTINGS 16.8 RN R · RN R .............................
- Page 8 RN WI-FI DASHBOARD MODES ........................107 22.1 RN M ............................107 IRROR ISPLAY 22.2 RN R ............................ 108 EMOTE ASHBOARD MORE INFORMATION AND SAFETY PRECAUTIONS ..................110 REGULATORY INFORMATION .......................... 112...
-
Page 9: Delivery Scope
Race Navigator PRO Take the Race Navigator PRO out of the box and The RN PRO is an autonomous modularly built system which largely functions check the content: wirelessly. The system is highly flexible and easy to use and sets the standard for video and data analysis. -
Page 10: Rn Pro Main Unit Installation
RN PRO Main Unit Installation Turning on the RN PRO Main Unit Connect the RN Clamp to the RN PRO (page 14). Take the holder and screw it to Turn the RN PRO on by pressing the Power button the device with the clamp. In the vehicle, put the sucker of the holder below the for at least three seconds. -
Page 11: Rn Pro Main Unit
RN PRO Main Unit USB 2.0 port LAN port (service port) Back view Microphone port Speaker port Top connector for Inside Camera Bottom connector (blue) for Second Camera (ex. Full HD) HDMI port (service port) External GPS Antenna ... - Page 12 Plan view 14. Home button Clicking the Home button in any location opens the main page of the RN PRO (the Home view, see 01. Home, page 17). The Home button lights up green when the device is turned on.
-
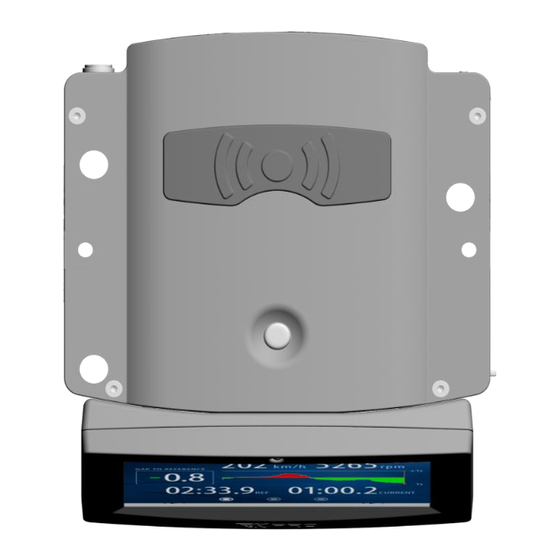
Page 13: Rn Pro Display
Front view RN PRO Display 17. Control LED 18. Display To connect the RN PRO Display: • press the Screen Lock button (10) and release the Front Cover, • press the button again and mount the Display. To disconnect the RN PRO Display: •... - Page 14 RN PRO Inside Camera External RN PRO Camera for internal picture recording. Dimensions: 29 x 29 x 33mm Port: USB 2.0 Angle: 165° RN PRO Full HD Camera External HD camera with the maximum resolution: 1920×1080 (1080p/30fps). Dimensions: 34 x 28 x 66mm Port: USB 3.0...
-
Page 15: Rn Pro With Display And Cameras
RN PRO with Display and Cameras A. RN PRO Inside Camera B. RN PRO Second (Full HD) Camera C. RN PRO Magnetic Camera Quick Release Set 5. Inside Camera top connector 6. Second Camera bottom connector (blue) 19. RN PRO Camera Thumb Screw ... - Page 16 Cameras to the RN PRO Main Unit: 1. You can screw each camera directly to the camera mounting ball. 2. You can use the RN PRO Magnetic Camera Quick Release Set. You can also easily mount the Cameras anywhere to the roll-cage in your racing car. All you need is...
-
Page 17: Rn Pro Clamp
• align the clamp with the device as shown in the picture on the right, • use two screws to attach the RN PRO Clamp to the RN PRO device. In the next step, you are able to connect the windshield mount. - Page 18 AP MODE is activated: on the RN PRO, go to SETTINGS > NETWORK and choose AP MODE. • If the RN PRO Display is not mounted, the AP MODE is Plan view activated automatically. In the next step, turn on the RN PRO Wifi Dashboard and ...
- Page 19 USB 2.0 port Left side view Turning on the RN PRO Wi-Fi Dashboard Turn the RN PRO Wi-Fi Dashboard on by pressing the Power button for at least 3 seconds or by connecting the device to the power supply. ...
-
Page 20: Rn Analyzer App
Open to download laps from device List of available laps RN Analyzer APP RN Analyzer is an extended analysis tool of the data from all Race Navigator devices. The application is very easy to use and offers a wide range of analysis options: •... - Page 21 • A possibility to compare two laps (or more!) and see exactly where you are gaining or losing time. • The section times analysis. It allows you to count your best theoretical time and best continuous time. • Laps overview. You can compare maximum and minimum values of the data types gathered by the system.
- Page 22 TECHNICAL PARAMETERS DISPLAY Display size -in or external) VIDEO CAPABILITIES (depends on used cameras) ✓ Recording resolution Max. Full HD, 1080p at 30fps Built-in recording layouts (up to 4 cameras) ✓ ✓ Rear mirror camera mode Manual/automatic start ✓ ✓ Stereo audio recording Real time overlay Lens viewing angle...
-
Page 23: Home
HOME Driver Selection Driver Track Name Event Type This page is the main page of the RN PRO and is displayed when the system starts. This view can be opened from any location by clicking the Home button. Dashboard Press this button to open the Dashboard. -
Page 24: Status Bar
STATUS BAR The bar at the top of the screen contains Warning important information about the RN PRO device and its current status. Device Clock Current View Progress Warning When the icon shows up, there is not enough disc space on your device or a different issue occurred. -
Page 25: Dashboard
DASHBOARD Current Speed Current RPM The Dashboard consists of four panels. Gap to Reference Gap to Reference Chart DASHBOARD · Panel 1 Panel 1 presents the data for the current lap and the reference lap. Gap to Reference This is a time gap between the current lap and the Next Panel reference lap, calculated for the current vehicle location on the track. -
Page 26: Dashboard · Panel 2
DASHBOARD · Panel 2 Panel 2 presents the laps from the current event. The best lap of each driver is colored yellow. Previous Panel Full laps are colored white, while the others are in grey. The selected reference lap you can find in the Reference Lap Time bottom the left corner. -
Page 27: Dashboard · Panel 4
DASHBOARD · Panel 4 Panel 4 presents your current speed, the time of the current lap (on the right; colored white) and the time of the reference lap (on the left, colored yellow). DASHBOARD · Panel 5 Panel 5 presents a trip distance and the overall distance made by the currently selected car. -
Page 28: Dashboard · Mirror View Dashboard
DASHBOARD · Mirror View Dashboard This panel displays the view from connected camera to the WiFi Dashboard in a mirror style as well as the current speed, gap time and current lap time. The waterproof camera can be located outside of a car on the spoiler. This mode is especially useful in cars that have limited back view in the mirror because of a built- up back side. -
Page 29: Manual Recording
MANUAL RECORDING In addition to the automatic recording possibility, you can also start and stop recording videos manually. Start/Stop Button To start recording, press the Start/Stop button on the right side of the Home Screen. Press the button again to stop recording. Start/Stop Button... -
Page 30: Recording With Obd-Ii Diagnostic Data
RECORDING WITH OBD-II DIAGNOSTIC DATA To extend the range of the recorded and displayed data you need to have the RN PLUG. The RN PLUG can be purchased for an additional fee. • Plug the RN PLUG into the OBD-II diagnostic port in your vehicle (it is usually located in the driver footwell, under the steering wheel, on the left side). -
Page 31: Laps History (Laps)
LAPS HISTORY (LAPS) The laps page displays all laps in the selected event. Full laps are colored white while the others are colored grey, except for the best laps of each driver which are colored yellow. The list can be sorted by column headers. You can change the sorting method by clicking on one of them. -
Page 32: Lap Details
LAP DETAILS Here you can get all lap details and view the recorded video. Back Button You can go one step back by clicking this button. Review Drive Here you can watch the animation with the lap data. View Video By clicking the button, you can display the video. -
Page 33: Video Player
VIDEO PLAYER In the player you can watch the video of the selected lap. The recorded videos consist of both camera views: the outer and inner. Along with the camera views, other lap data is presented such as: track name, current time, lap time and current speed. -
Page 34: Analysis
ANALYSIS On this page you can select two laps and compare them with each other. Full laps are colored white, while the others are in grey. The best laps of each driver are colored yellow. Change Event In order to select proper laps for comparison, you can change the event by clicking this button. -
Page 35: Settings
SETTINGS Here you can specify all device parameters. Driver You can select a driver. Press this button to select a specific car. Track You can select a track variant. Event Here you can select a type of event. Network You can connect to the network. Camera Here you can check the camera views. -
Page 36: Driver
DRIVER Each recorded video is associated with a driver, car, track and an event. To select a driver, go to the Settings view and click Driver. You will find there a list of existing users. Scroll down the list and select the proper one. - Page 37 Now you can use the cockpit camera of the RN PRO to take a photo of yourself. Press Take to take a picture. Use the Back button to complete the process. Consequently, you can find the new driver on the list and select it.
-
Page 38: Car
To select a car, go to the Settings view and click Car. There will be a list of previously added cars. Scroll down the list and select the proper one. Press Set to confirm your selection. Edit Here you can edit the existing car options. To add a new car, press this button. - Page 39 Now, you can find the new car on the list and select it. Confirm your selection by pressing the Set button.
-
Page 40: Car · Configure Can Bus
11.2 CAR · Configure CAN Bus The device integrates a logging function of additional data channels from the CAN Bus of a connected vehicle. For a communication it is necessary to use an appropriate CAN cable (see picture) please contact your supplier to get more details. - Page 41 Click on the car brand to list available car models. Select your car model and click SET button.
- Page 42 After going back to a car edit screen the name of your car is displayed as selected CAN FORMAT and the ENABLED checkbox set. A CAN transmission can be disabled by unchecking the CAN ENABLED option. If CAN ENABLED option is selected Bluetooth communication with RN OBD Plug is disabled.
- Page 43 On the next screen click the SELECT CAN button. Select your car brand or, if not available, click the Add button.
- Page 44 Type in the car brand and then the car model. If the brand is already available, but there is no model of your car, add it on a list of available car models. After adding new car model it is visible on the list with current details that are unavailable right now, because there is no data loaded yet.
- Page 45 CAN details screen will appear. There is a car model on the top-left corner, current CAN baud rate on the top right corner and current CAN data signals that during new CAN setup are empty. From here you need to set two options. SET CAN SPEED allows to choose from available baud rates for CAN...
- Page 46 LOAD DBC provide the file in .DBC format that includes a definition of all CAN protocol signals of your car. The system prompts to insert the memory stick with .DBC file copied directly on the stick. Prepare it and connect to one After a connecting of a memory stick with .dbc file included (can be more), all files are available to load.
- Page 47 You can change the baud rate again at any time, you can also load different .dbc file and the current CAN signals will be overwritten by the new ones. If you want that your channel names are compatible with typically used channels in Race Navigator please use listed names: steering_angle for steering wheel angle...
- Page 48 After going back you will see your car model with protocol. On the car settings you will see the CAN FORMAT name changed to the one that you recently set.
-
Page 49: Track
TRACK All filtered tracks are displayed here. To filter the tracks by countries, just click the Countries button. Click on the specific track to open the Track Variants view. You can select one of the available track variants or create a new one (see 12.1.2). If you want to disable automatic track detection... - Page 50 Here you can set the countries by which to filter the tracks. Select the country and click the Set button or just select the check box next to the country. The caption on the top of the view informs about the currently selected countries.
- Page 51 The tracks created by the user (see 12.1.2) are listed under the 'User Tracks' filter.
-
Page 52: Track Variants
12.1 TRACK VARIANTS All available variants of the selected track are listed here. Scroll down the list and select one of them. Press Set to confirm your selection. Edit You can edit a track variant. Here you can add a new track variant. Remove Press the Remove button, to remove a track Edit... -
Page 53: Track Variants · Add
Record button. Place the car exactly on the start line, press Start Track Recording and drive. The RN PRO automatically records the new track variant route when you drive. The track variant recording stops automatically without user interaction when you cross the same line as the start line. -
Page 54: Event
EVENT All available event types are listed here. You can browse through the list and select one of them. The available types are colored white, while the ones not available are colored grey. Press Set to confirm your selection. Trackday is a default event type and it is always available. -
Page 55: Event · Trackday
13.1 EVENT · Trackday • It is a default event type. • All data is recorded directly on the device. • Separate videos are prepared for each lap. • In the auto-recording mode, the recording is activated automatically and deactivated twenty seconds after the vehicle stops. -
Page 56: Event · Endurance
EVENT · Endurance • Endurance is a special mode designed for "Endurance" events, when it is important to transfer the video recorded by the Race Navigator to the memory stick immediately during the pit stop. • It can be also set to record both to the memory stick and internal RN device memory. -
Page 57: Event · Taxi
13.3 EVENT · Taxi • Taxi is a special mode designed for "Taxi" events. • For recording purposes, it is required to have the memory stick plugged in. Otherwise, the video will not be recorded and you will be notified about the missing memory stick. -
Page 58: Event · Street Mode
13.4 EVENT · Street Mode • The Street Mode is an event type designed for testing your car performance. • This mode allows you to measure the acceleration and deceleration of the vehicle during the drive, including the time measurement. •... - Page 59 ACCELERATION TEST (ACCEL) This option allows measure acceleration of a car. • To switch on to the Acceleration test, click the ACCEL button. • Choose one of three preconfigured speed ranges: 0-100 km/h, 0-200 km/h, 0-300 Time chart km/h or define your own range from value A to value B.
- Page 60 With braking You can also do the acceleration test with braking (select the check . In this case, after reaching your maximal defined speed, the test is continued until the very end of braking, that is 0 km/h. NOTE: The time spent while driving at a higher speed than the defined maximum is not included in the final measurement time.
- Page 61 BRAKING TEST In this mode, you are provided with the same features as in the Acceleration test but the speed range is defined as descending. • To switch to the Braking test, click the BRAKING button. • Choose one of the three preinstalled speed ranges: 50-0 km/h, 100-0 km/h, 200-0 km/h or define your own range from the customized start speed to 0 km/h.
- Page 62 DISTANCE TEST In this type of the Street Mode you can measure your driving time at a predefined distance. • To switch to the Distance test, click the DISTANCE button. • Choose one of three predefined distance values: 1/4 MILE, 1000 M, 2000 M or select your own distance value.
-
Page 63: Event · Rcn Mode
13.5 EVENT · RCN Mode The RCN event type is a feature prepared for the regularity driving events. There are total of 6 different racing groups predefined: the Blue, Red and Yellow defined for two track variants Nürburgring Nordschleife and Nürburgring 24H. The RCN event helps you to track your current lap number and type, each second calculates and displays the time difference to your set time,... - Page 64 The particular setups can be previewed on the Settings. In the RCN mode a new lap is created only when the start line is crossed, to avoid breaking the lap sequence. Make sure that the new event is created before the race begins.
- Page 65 3. Confirm Time Lap - when starting this type of lap, the Set Time Lap is selected automatically as the reference lap. The system calculates and displays each second the time difference between current lap time and set lap time. 4.
- Page 66 RESET RCN button Here you can stop current RCN Event and start a new one to begin a new RCN laps sequence. Keep recording during RCN when car stops Unchecked recommended setting, unchecked recording stops starts automatically when the automatic recording start/stop is on, check it only if you need a complete video also while fuelling, but then you need to wait longer after the race to download...
-
Page 67: Event · Rally
13.6 EVENT · Rally It is a specially-designed racing mode for the rally event, when conditions are often unpredictable and tend to change rapidly. Well-developed algorithms provide such system capabilities as: • Automatic start and stop of data and video recording of stages only stages are recorded, every stage gets its own video file and data,... - Page 68 Record button. • Place the car exactly on the start line, press the Record button and drive. The RN PRO automatically records the new special stage route when you drive. • Press the Record button once again to stop recording, when you reach the finish line.
- Page 69 Distance Measurement for Reconnaissance In Rally mode a specially designed Dashboard is available. It simplifies the measurement of distances between segments of the rally route including stages and checkpoints. The Dashboard is divided into three parts: • at the top you can see the distance travelled from the last checkpoint, •...
- Page 70 Before the official start: • connect your Race Navigator to constant power supply for the whole rally day, • check if you have enough storage, • go to SETTINGS > EVENTS and set the RALLY mode, • go to SETTINGS > AUTOSTART and set auto-recording option from 20 km/h, •...
-
Page 71: Event Auto Managed
13.7 EVENT Auto Managed The auto managed event type is a special designed mode that cooperates with the Race Navigator Event Management System (EMS). The EMS improves motorsport events handling with additional hardware components dedicated software modules. It makes the event organization easier thanks to an automatization of many functions, like automatic downloading of selected or all laps from all Race Navigators in the... -
Page 72: Event Auto Managed Rec Limit
13.8 EVENT Auto Managed Limit You can enable recording time limit by checking have more footage recorded than previously set. The same time limit will be applied for every driver. -
Page 73: Network
RN Access Point. RN Access Point Mode Click this button to create an access point for the RN PRO Wi-Fi Dashboard or your iPad with the RN Analyzer App. To use the encryption of the RN access point network, press the AP Settings button and select the check box at the top. - Page 74 Lan Settings In order to connect Race Navigator device to local Do not enable this option when you use the Race Navigator with the Wifi Dashboard connected by a LAN cable.
-
Page 75: Camera
CAMERA Here you can preview both camera views and check the resolutions. You can flip the camera view by 180 degrees by RN camera is mounted upside down (bigger picture in the final recording) with currently displayed camera. Chosen camera must meet the requirements of the chosen video layout. -
Page 76: Device
Diagnostics You can download the diagnostic data. Reset Here you can reset various device settings. Help Here you can read the descriptions of the RN PRO functions. Logo This option allows you to change the video logo. Video, Sound Here you can change video and sound settings. -
Page 77: Device · Status
The basic data of the device and its components is presented here. Edition Name Commercial edition name of the software. Device Name Unique name of the RN PRO device. Version The version of the installed software. Left SD/HD Video Time Estimated remaining recording time for SD/HD quality. -
Page 78: Device · Clock
16.2 DEVICE · Clock Here you can set the current date and time. Zones Zones You can choose the proper time zone or set the time manually. Use the Back button to complete the process. -
Page 79: Device · Update
16.3 DEVICE · Update You can install the latest version of the RN PRO software on your device. The Internet connection is required. Follow the instructions below to install the latest version. On the Settings page, click the RN Device button and then the Update button. - Page 80 When the download is finished, click the Install button on the Updates view. Wait for the next screen. On the next screen, click the Start Update button.
- Page 81 Installing the newest version is in progress. It may take a few minutes. The finished installation is marked with a proper caption. Press the Back button to restart your device.
-
Page 82: Device · Diagnostics
16.4 DEVICE · Diagnostics Here you can copy the diagnostic data directly to the memory stick. Press Export Data button to start the process. The memory stick is required to be plugged in. Otherwise, the Export data button will be disabled and you will be notified about the missing memory stick. -
Page 83: Device · Rn Reset
16.5 DEVICE · RN Reset Here you can reset various RN PRO settings and restore the device to the basic installation. 16.6 RN Reset · Reset Event Data Press the RN Reset button to display the list of events. Select a particular event and press the Remove button to reset the event data. -
Page 84: Rn Reset Actory Ettings
16.7 RN Reset · Factory Settings Press the RN Factory button to restore the tware to its original settings. In the next dialog, click YES to confirm or NO to abort the operation. The operation cannot be undone. 16.8 RN Reset · RN Recovery Press the RN Recovery button to proceed with the device recovery to the basic installation. -
Page 85: Device · Help
16.9 DEVICE · Help The Race Navigator Help Content is presented here. You can read the basic descriptions of your device functions. 16.10 DEVICE · Logo All available video logos are listed here. You can browse through the list and select one of them. -
Page 86: Device · Video, Sound
16.11 DEVICE · Video, sound Video Click the Video button to set the video recording quality. Different video quality options are available. The video can be recorded in: • High Quality (1920x1080, ~3MB/s; 1280x768, ~1 MB/s) • Low Quality (1920x1080, ~1MB/s; 1280x768, ~0,5 MB/s) Select the option by clicking on the proper element. -
Page 87: Device · Units
16.12 DEVICE · Units Race Navigator system provides 2 unit types for displaying a current speed: • KM/H • Select this option by pressing a chosen unit type. Use the Back button or Home button to complete the process. -
Page 88: Device · Additional Settings
16.13 DEVICE · Additional settings · PIT LANE MONITOR Pit Lane Monitor functionality is accessible from Home View -> Settings -> Device -> Additional Settings -> Pit Lane Monitor This functionality allows you to monitor your time spent in pit lane, focused on leaving it in a minimal given time, while not exceeding the speed limit. - Page 89 When Pit Lane is enabled a monitor is activated automatically on Pit Lane start and deactivated on Pit Lane end. Not every track has the pit lane start/end lines defined. If it is not available, a warning text will be displayed as in the picture on the right.
- Page 90 After changing the values, new coordinates will be displayed. Again, these can be checked in any map browser. In order to edit start button on the right side of the corresponding values. latitude, longitude or direction. Coordinates must be between -180°...
- Page 91 When everything is set up, the driver can go to Home Screen -> Dashboard and change the dashboard panel to the last one, which informs about current speed and displays the difference between Pit Lane minimum time and Pit Box to End Line time.
- Page 92 Countdown starts after crossing Pit Lane Start Line. When other dashboard panel is visible at this moment, it is automatically change to Pit Lane Monitor panel after crossing Pit Lane Start Line. Speed value warns about getting close to speed limit by coloring the value in yellow.
- Page 93 When the time is closer to 0, it warns by coloring the value in yellow (below 20 secs), orange (below 5 secs) and then red (after passing 0). When the time reaches 0, it is the signal to leave the Pit Box. Time that is still left is the Pit Box to End Line time.
- Page 94 After slowing down, the real time calculated Gap Time changes, and should be getting close to 0. When Gap Time is higher than 0, Pit Lane will be left after regulatory time that was set in Pit Lane Monitor settings (Pit Lane minimum time). After crossing Pit Lane End Line Gap Time pauses for 5 seconds and (if other dashboard panel was visible before entering Pit Lane) dashboard...
-
Page 95: Device · G-Force
16.14 DEVICE · G-FORCE G-Force settings allows user to configure the gyro-acceleration sensor to work correctly when the device is not mounted in a standard orientation. A default configuration is when the driving direction and not in upside down position. After entering the dialog, current configuration appears (default configuration shown in a picture on the left). - Page 96 direction. Choose the side that is facing down to the ground when the device is mounted in a car. Pressing the ACCEPT button saves current configuration that is visible in the main screen of the G-Force options. New orientation is displayed.
-
Page 97: Device Additional Settings Power Management
16.15 DEVICE Additional Settings Power Management If you want your device to automatically turn on when connected to the power source, check the Please note that this feature is not available for all RN PRO devices. -
Page 98: Device Additional Settings Auto Remove
16.16 DEVICE Additional Settings Auto Remove option, all automatically removed upon turning on the device. 16.17 DEVICE Additional Settings Time se time sychronization with off GPS. If this option is enabled, your timezone will not change. This option should only be used if precise time synchronization between many devices is needed. -
Page 99: Device · Non-Recording Zone
16.18 DEVICE · NON-RECORDING ZONE Non-Recording Zone is defined as the area on the track, that upon entering, triggers the device to stop video recording, and upon leaving, making the device to continue recording. Usually it is the pit lane area on the track. This option is useful when a video content is required to be available (processed) as soon as possible after entering a pit lane. - Page 100 When the track supports the Non-Recording Zone, warning disappears and after checking the option, the zone is being analyzed by the device during recording and stops recording upon entering the zone. You can disable this option to make the device record on a whole track area by unchecking it at any time.
-
Page 101: Autostart
AUTOSTART Different video recording modes are available. You can start recording manually which activates automatically after exceeding the required speed of 20 km/h or 40 km/h, or you can select the Standing Start mode. Standing Start automatically starts recording the video without any time and data when the vehicle near tracks... -
Page 102: Layout
LAYOUT The Race Navigator system provides different video layouts available to be used in recorded videos. Swipe the layout carousel and choose a desired video layout. Below you can change the video recording format resolution: • HD resolution • Full HD (works only with the external Full... - Page 103 The steering wheel angle in the video overlay is f you want to inverse If you want to hide the steering wheel image in the...
-
Page 104: Export Import
EXPORT IMPORT In order to import or export data to an external The memory stick must be plugged in. Otherwise, the both buttons will be disabled and you will be notified about the missing memory stick. -
Page 105: Export Video
EXPORT VIDEO Here you can export the video and data directly to the memory stick. The memory stick is required to be plugged in. Otherwise, the Copy button will be disabled and you will be notified about the missing memory stick. -
Page 106: Import Video
IMPORT VIDEO Here you can import videos and data from memory stick to Race Navigator device. Select desired event and go back. All laps from the selected event are listed. Full laps are colored white, while the others are colored grey, except for the best laps of each driver which are colored yellow. -
Page 107: Rn Wi-Fi Dashboard Modes
RN Wi-Fi Dashboard Modes You can use the RN Pro Wi-Fi Dashboard in two modes: RN Mirro Display and RN Remote Dashboard. 22.1 RN Mirror Display RN Mirror Display mode is used to emulate mirror view by using additional camera connected to the RN Wi-Fi Dashboard. -
Page 108: Rn R Emote D Ashboard
22.2 RN Remote Dashboard The RN Wi-Fi Dashboard can be used to control the RN PRO device and display all real time data from the device. To use Wi-Fi Dashboard in this mode, pair it with your RN Pro device by selecting it and tapping Your RN Pro device must be in Access Point mode. - Page 109 You can also make your RN Wi-Fi Dashboard connect automatically to the RN device by selecting it and tapping Almost all features available using the regular RN Pro display are also available while using RN Remote Dashboard Mode. These features are described earlier in the manual.
-
Page 110: More Information And Safety Precautions
Safety Precautions sunlight, when a too high internal cooling, • temperature is reached, the device Connect the charger to a proper The Race Navigator is the electronic can malfunction, power source, voltage device containing electronic boards, with •... - Page 111 • Battery additional notes Do not place anything on top of exterior of your device. Do not use your device or drop objects on your paper towels to clean the screen, • Caution: this device contains a • device, Never attempt to disassemble, non-replaceable internal Lithium •...
-
Page 112: Regulatory Information
FCC Rules. These limits are designed to provisions of Directive 2014/30/EU. provide reasonable protection against The Race Navigator PRO device complies Warning harmful interference when the equipment with the Electromagnetic Compatibility This is a Class A product. In a domestic is operated in a commercial environment. - Page 113 This transmitter must not be co-located Le présent appareil est conforme aux CNR de Il est conçu pour ne pas dépasser les limites or operating in conjunction with any other d'émission pour l'exposition à l'énergie antenna or transmitter. exempts de licence. L'exploitation est radiofréquence (RF) établie par l'ISDE.
- Page 114 The object of the warranty is a product named the rights that are the result of consumer law. If year since the purchase of Race Navigator, the RACE NAVIGATOR, manufactured by RN VISION the product is flawed, the consumers can choose if...
- Page 115 RN VISION company, for details of your rights with respect to its use. even in case where he bought the Race Navigator WHAT IS COVERED BY THIS WARRANTY? RN VISION does not warrant that the operation of...
- Page 116 After completing a warranty service, a (i) repair the RN VISION Product using new or HOW TO OBTAIN WARRANTY SERVICE VISION product, or a replacement product will be previously used parts that are equivalent to new in Please contact a RN VISION representative or an returned to the user configured in the same way performance and reliability, authorized RN VISION service provider.
- Page 117 © 2017 RN VISION GMBH: All rights reserved. (a) Service where RN VISION requires return of the PRIVACY Race Navigator PRO is a trademark of RN replaced product or part. RN VISION will maintain customer information and VISION company.
Need help?
Do you have a question about the RN PRO and is the answer not in the manual?
Questions and answers