Table of Contents
Advertisement
Advertisement
Table of Contents

Related Manuals for LewanSoul LSC-24

Summary of Contents for LewanSoul LSC-24
- Page 1 LSC-24 Servo Controller User Manual...
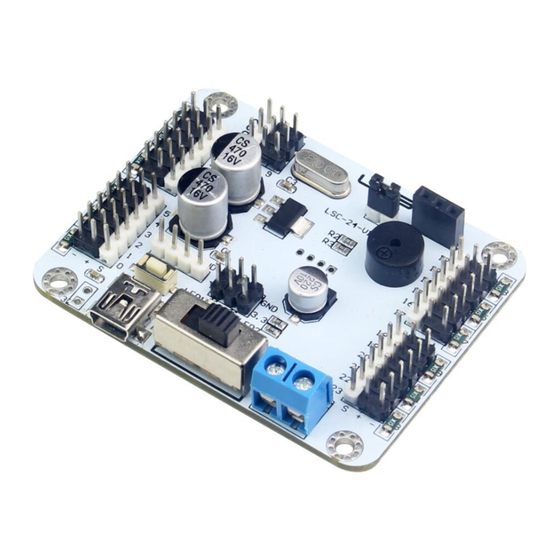
- Page 2 Thank you for purchasing this item. For your better use, please read the following instructions first. 1.All servo interfaces of this LSC-24 servo controller have over-current protection which is already shown in the picture below. 2.Please first fix nylon column or copper column on the servo controller to...
-
Page 3: Table Of Contents
Catalog Introduction to the servo controller.......... 4 1. Servo controller interface............4 2. Servo controller power supply..........5 3. Low voltage alarm..............5 4. Driver installation..............5 Quick operation................6 1. Start up PC software..............6 2. Single servo debugging............6 Introduction to the PC software interface....... 7 How to connect the handle receiver to the controller.. -
Page 4: Introduction To The Servo Controller
Introduction to the servo controller 1. Servo controller interface The instruction of servo controller are illustrated below... -
Page 5: Servo Controller Power Supply
2. Servo controller power supply The VCC + support voltage ranges from 5V to 9V. The power supply voltage depends on the voltage of the controlled servo. Both must be consistent. Tips: Be careful of the power short circuit in the process of power connection. 3. -
Page 6: Quick Operation
(PS: If the power supply is connected with controller, the controller still give an alarm, please refer to "3. Low voltage alarm”) Quick operation 1. Start up PC software Double click the icon and open the software. 2. Single servo debugging (1)When servo controller is connected to the computer, the interface indicator turn green indicates that connecting is successful. -
Page 7: Introduction To The Pc Software Interface
(4)Pull the No. 1 slider Pull the slider, the servo will rotate as the slider moves. (5)Place the slider to the position of 500, 1000, 1500, 2000, and 2500 respectively and add actions in turn. (6)Click “Run Online” button and observe the rotation effect of servo. (7)Click “Save Action Group”... - Page 8 2. Deviation Operation Window 3. Servo Icon Selection Window 4. The Introduction of the Servo Window function The servo slider can be free to drag ( the range is 500-2500). The P value will change as the slider moves, and it can visually show the rotation position of the servo at this time.
- Page 9 ranges from 100~100. When the deviation of each servo is adjusted, click the "Download Deviation" button, then the all deviations will be downloaded to the controller. If you want to modify the deviation later, please click on the "Read Deviation" button, the deviation will automatically show in the interface.
-
Page 10: How To Connect The Handle Receiver To The Controller
8. File operation window How to connect the handle receiver to the servo controller The description of wireless handle interface( 9P line interface) (The receiver number 1-9 with the motherboard 1-9 need one by one correspondence, and it can work effectively), the receiver can work properly only if the orientation of DuPont metal heads of three groups of DuPont line are consistent, as shown below. - Page 11 The handle requires 2 AAA batteries(self-provided), open the power switch of the handle, you can run the action group saved by upper computer software.
- Page 12 Wireless handle Instruction Description Comments Forced to stop current action group running and run the 0 action group once Press to keep running group 1 , release to run 0 action group once Press to keep running 2 action group, release to run 0 action group once down...
- Page 13 Run 5 action group once Run 6 action group once Run 7 action group once Run 8 action group once Run 9 action group once Press to keep running 10 action group, release to run 10th action group once...
- Page 14 Run 11 action group once Press to keep running 12th action group, release to run 12th action group once Press the select button Run 13 action group once first, then press the △ Press the select button Run 14 action group once first, then press the ×...
-
Page 15: How To Connect The Mp3 Module/Bluetooth Module To The
Press the select button Run 19 action group once first, then press the L2 SELECT+L2 Press the select button Run 20 action group once first, then press the R2 SELECT+R2 Warm Tips: The mode keys and joysticks are not set up the function, do not press the these buttons otherwise it is possible to make mistakes. -
Page 16: About Offline Running
About offline running Offline running means: disconnected from the computer and the robot works automatically 1. Download the action file that needs to be run offline to No.100 action group; 2. Press the offline button on the controller. 3. Press once to run offline once; press and hold for 3 seconds (until the blue light flashes), it will be running all the time. -
Page 17: Advanced Control(Serial Port Communication,Secondary Development)
Advanced Control(Serial Port Communication, Secondary Development) The communication wiring diagram of connecting 24-channal servo controller to external Arduino . (Not included, just to show that how to connect) -
Page 18: Technical Support
If there is anything that you do not understand, please check the instructions or the accompanying video tutorial, if the problem still can not be solved, please feel free to contact us by email at support@lewansoul.com Please visit the following link or scan the QR codes to get related instructions and video tutorial.
Need help?
Do you have a question about the LSC-24 and is the answer not in the manual?
Questions and answers