
Related Manuals for Ops-Core RAC


Summary of Contents for Ops-Core RAC
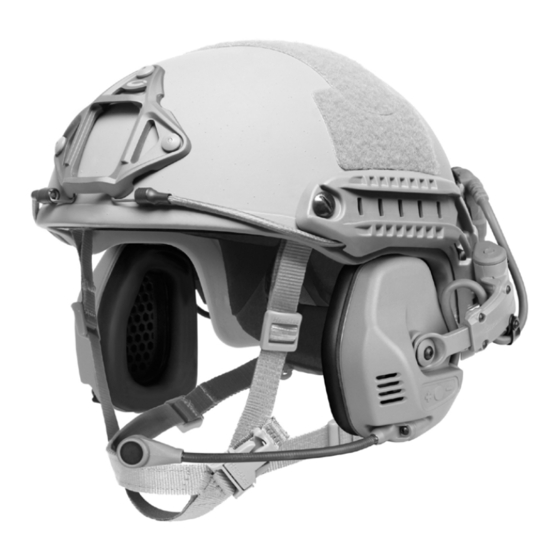
- Page 1 HEADSET ™ Operator’s Manual OM101116-00 REV. C Compatible with: FAST Maritime, FAST Ballistic High Cut, ® FAST Carbon, and FAST Base Jump Helmets...
-
Page 3: Table Of Contents
RAC HEADSET Operator’s Manual Headset Features Headset Components Included / Optional Items Preparing Headset for Use Installing Batteries Attaching Headset to Helmet Attaching Pile Fasteners Moving the Microphone Donning and Doffing Helmet with Headset Understanding Headset Positions Basic Donning Using Ventilation Mode... -
Page 4: Headset Features
Smooth compression algorithms eliminate “clipping.” • FAST ARC Rail Attachment The RAC Headset attaches to the rear of the FAST ARC Rails leaving the top portion of the rails free for mounting accessories, such as lights, cameras, etc. - Page 5 • Ear Cushions High performance to ergonomically fit the head geometry, providing a better seal and increased noise attenuation. • Streamlined Stowage Earcups rotate to the rear of helmet when not in use, creating a very low profile. • Quick-Release Downlead Connection Helmet/headset can be disconnected from the downlead, allowing users to easily remove the helmet as there are no excess cables to consider.
-
Page 6: Headset Components
HEADSET COMPONENTS Cable Cable Guides Hear-Through Microphones Earcup Earcup Pivot Pivot Button Button Seals Battery Battery Compartment Compartment Mic Boom Attachments Points Volume / Function Boom Microphone Buttons... -
Page 7: Included / Optional Items
INCLUDED / OPTIONAL ITEMS Items Included with Headset: • (2) AAA Batteries (to install into earcups) • Pile Fasteners (to attach to helmet for cable stowage) • Cable Loop (for cable stowage) • Utility Pouch (to store headset) (2) AAA Batteries Pile Fasteners Cable Loop Utility Pouch... -
Page 8: Preparing Headset For Use
PREPARING HEADSET FOR USE To prepare the headset for use, you will: Install the AAA batteries (one in each earcup) Attach the headset to the ARC Rails on the helmet Attach the pile fasteners to the helmet Move the microphone to the other earcup (if needed) -
Page 9: Installing Batteries
INSTALLING BATTERIES Installing the Batteries: NOTE: Also follow the applicable steps below to replace the batteries. Remove the (2) AAA batteries from the packaging. Pry the ear seal away from the earcup by pressing the tab at the bottom. Rubber Seal CAUTION: When performing Step 2, be careful not to damage the rubber seal in the groove on the underside of the earseal. - Page 10 CAUTION: Be careful not to pinch the ear seal in the groove when snapping it closed. Repeat Steps 2-4 to install the other battery into the other earcup. NOTE: Remove batteries before storing RAC Headset for extended periods of time.
-
Page 11: Attaching Headset To Helmet
ATTACHING HEADSET TO HELMET Attaching Headset to ARC Rails on Helmet: NOTE: Before you begin, ensure that: • The tab at the bottom of the headset is pointing down. • The pivot arm button is all the way out (not pushed in) – rotate the pivot arm out to the second click. -
Page 12: Attaching Pile Fasteners
ATTACHING PILE FASTENERS Attaching Pile Fasteners to Helmet: Use the pile fastener pieces included with the headset to stow the cable. NOTE: Use the headset several times to determine the best position for the pile fasteners. Steps 1 and 2 are provided as a guideline. On both sides of the helmet, attach the adhesive side of the fastener to the helmet near the... -
Page 13: Moving The Microphone
MOVING THE MICROPHONE Moving Microphone to Opposite Earcup (Optional): NOTE: To make this task easier, rotate the earcups to the stowed position behind the helmet as shown. Remove the screw that attaches Unplug the microphone from the microphone to the earcup. the earcup. - Page 14 MOVING THE MICROPHONE Plug the microphone into the Install the screw to attach the other earcup. microphone. Place the cover at the attachment Install the screw to attach point on the earcup from which the cover. you removed the microphone.
-
Page 15: Donning And Doffing Helmet With Headset
DONNING DOFFING Donning and Doffing Helmet with Headset: Donning and doffing includes the following tasks: • Understanding headset positions • Basic donning • Using ventilation mode • Doffing Understanding Headset Positions The headset has four positions: Use Mode Ventilate Mode Donning &... -
Page 16: Basic Donning
DONNING DOFFING Basic Donning With the headset in the stowed position, don the helmet, fasten the chin strap, and tighten all straps. Rotate the headset earcups over the ears. On both sides, press the pivot arm buttons all the way in so that the earcups enclose the ears completely and fit snugly against the head. - Page 17 DONNING DOFFING Ensure that the ears are centered within the earcups. If necessary, slide the earcups back or forward within the pivot arms to adjust the earcups over the ears. Adjust the microphone over the mouth (within ¼ inch) for optimal performance. Align the headset cable connector to the matching alignment indicators on the adapter cable or radio PTT cable and press the...
-
Page 18: Using Ventilation Mode
DONNING DOFFING Using Ventilation Mode If heat buildup occurs around the ears, pull the earcups away from the ears to the first click. • The increased airflow will reduce heat buildup. • The audio will still reach the ears. Out One Click Out One Click... -
Page 19: Doffing
DONNING DOFFING Doffing To doff the helmet, pull the earcups away from the ears to the second click. Unfasten the chin strap, and remove the helmet (this position also permits donning). Out Two Clicks Out Two Clicks... -
Page 20: Using Wireless Earbuds
USING WIRELESS EARBUDS Using Wireless Earbuds with Headset (Optional): Use the optional earbuds to increase hearing protection. The earbuds function wirelessly and contain no batteries. Select the largest tips to start and remove the foam tips from the packaging. Foam tip sizes are Slim, Standard, and Large (in case of fitting problems, try the next smaller size). - Page 21 USING WIRELESS EARBUDS Roll the foam tip between your fingers to compress it. Carefully insert the foam tip into the ear, ensuring that the earbud is level in the ear as shown. Repeat Steps 3-4 to insert the other earbud into the other ear. Don the helmet;...
-
Page 22: Headset Functions
HEADSET FUNCTIONS Headset Functions: Headset functions include Hear-Through 3DHT mode and balance mode, which you can control via the + and – buttons. You can also toggle the audio between earphones and earbuds via the center switch (with wireless earbuds only). + Button Center Switch - Button... - Page 23 HEADSET FUNCTIONS Balance Mode Balance mode allows you to personalize the balance between both ears to compensate for differences in you hearing. To enter balance mode: While the Hear-Through 3DHT is turned on, press the + and – buttons together twice. The headset will emit a constant tone that will increase in volume as described below. To increase volume to left earphone: Press the + button one or more times;...
-
Page 24: Maintenance
MAINTENANCE Maintaining Your RAC Headset: Simple maintenance will help keep the headset in good operating condition. Complete the following tasks as necessary. Inspection Inspect the ear seals regularly to ensure that they have no cracks, which can lead to sound leakage. - Page 25 MAINTENANCE Storage NOTE: When storing the headset, ensure that the ear seals are not compressed. Long-term compression can deform the ear seals, causing loss of sound attenuation. Remove the batteries before you store the headset. Enclose the headset in the pouch. Store the headset in a cool, dry area.
-
Page 26: Operator Notes
OPERATOR NOTES... - Page 27 OPERATOR NOTES...
- Page 28 Copyright © 2016 Ops-Core Inc. Ops-Core and FAST are registered trademarks of Ops-Core Inc., a wholly owned subsidiary of Gentex Corporation. RAC is a trademark of Gentex Corporation or its affiliates.
Need help?
Do you have a question about the RAC and is the answer not in the manual?
Questions and answers