Table of Contents
Advertisement
Available languages
Available languages
Advertisement
Table of Contents

Subscribe to Our Youtube Channel
Related Manuals for Premium PPC1058D


Summary of Contents for Premium PPC1058D
-
Page 2: Important Safeguards
IMPORTANT SAFEGUARDS When using electric appliances, basic safety precautions should always be followed including the following: 1. Read all instructions 2. Do not touch hot surfaces. Use handles or knobs. 3. To protect against electrical shock do not immerse cord, plug, appliance in water or any other liquid. - Page 3 Instructions.” 19.Do not fill the unit over MAX LINE marked in the inner pot. When cooking foods that expand during cooking such as rice, beans or dried vegetables, do not fill the unit over 1/2 (half) full. See “General Operating Instructions”. Overfilling the pressure cooker may cause clogging, which builds up excess pressure inside and may be dangerous.
- Page 4 mental capabilities, or lack of experience and knowledge, unless they are under the supervision of a responsible person or have been given proper instruction in using the appliance. This appliance is not intended for use by children. Any person who has not fully read and understood all operating and safety instructions contained in this instruction manual is not qualified to operate or clean this electric pressure cooker.
-
Page 5: Special Cord Set Instructions
Special Cord Set Instructions a) A short detachable power-supply cord is provided to reduce the risk resulting from becoming entangled in or tripping over a longer cord. b) Longer detachable power-supply cords are available and may be used if care is exercised in their use. -
Page 6: Product Specifications
Volume Size of Working Limit Warm Supply inner pot pressure pressure temperature PPC1058D (10) 120v~60Hz 900W 22cm 0-70kPa 90kPa 140-176 Before First Use Before the first use, please take out all accessories from the package and read this Manual carefully. Pay particular attention to operational instructions and cautions to avoid any injury or property damage. -
Page 7: Product Features
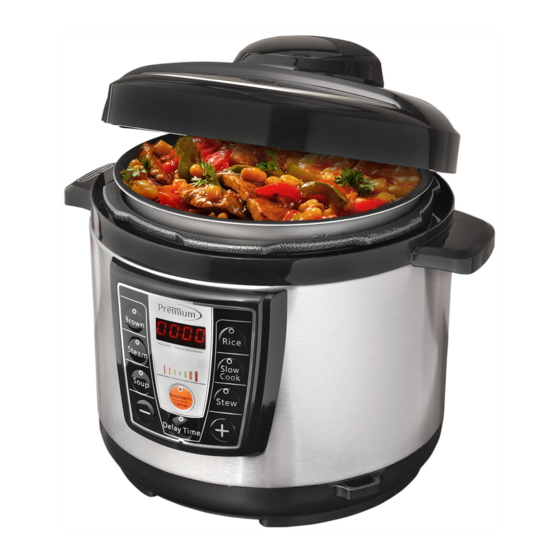
Product Features 01: Lid Handle 02: Lid 03: Top Cover 04: Exhaust / Pressure Release Valve 05: Steel Valve Core 06: Float Valve 07: Floating Valve 08: Removable Cooking Pot 09: Control Panel 10: Stationary Pot 11: Base 12: Pot Handle 13: Housing 14: Power Cable 15: Heating Plate... -
Page 8: Safe Lid Opening
Safe Lid Opening 1. Disconnect the power or the power plug. 2. Releasing pressure: A. Quick opening (for non-fluid food): • Slide the exhaust valve to the Release position. • Put a wet towel on the lid to cool faster until the float valve falls fully. B. -
Page 9: How To Use
How to Use The Premium Electric Pressure Cooker uses a large and user-friendly control panel with digital touch buttons. The convenient built-in cooking buttons allow you to cook your favorite food with a simple touch of the button. The intelligent pressure cooker includes 6 built-in cooking functions: Brown, Rice, Steam, Soup, Stew, and Slow cook. - Page 10 Functions Brown and Slow Cook do not have default pressure cooking time because they do not use pressure cooking. When you select a function and enter into the program, the display will show the default pressure cooking time (for rice is 12 minutes), and the pressure cooker starts to heat up. The default pressure cooking time shows on display will NOT start counting down until the food or liquid has heated up and the pressure cooker has started pressure cooking.
-
Page 11: Opening The Lid
lid. Release the pressure first. Opening the Lid When pressure cooking has come to an end, the cooker will go into Keep Warm mode. At this point you may choose to open the lid. Therefore, the pressure needs to be released. - Page 12 Hot steam escaping from the valve may cause serious injuries if precautions are not followed. Use pot holders, tongs or other tools to adjust the valve. USE POT HOLDERS WHEN REMOVING THE REMOVABLE COOKING POT. NEVER FORCE THE LID TO OPEN. THE LID WILL ONLY OPEN WHEN ALL PRESSURE IS RELEASED.
- Page 13 General Operating Instructions 1. Open the lid by turning the lid handle clockwise to the OPEN position, and then carefully lift the lid.(see pictures 1 & 2). 2. Take out the removable cooking pot, put food and water in it. NEVER fill the cooking pot more than 3/5 or less than 1/5 full.
- Page 14 4. Close the lid: Make sure the silicone gasket is seated properly inside the lid. Hold the lid handle and put the lid on the cooker; rotate the lid counterclockwise approximately 30 degrees until the lid is aligned with the “CLOSE” mark on the cooker.
-
Page 15: Cooking Functions
7. Connect to the power. The LED display shows “00:00” and it enters into standby state. 8. Choose the corresponding function according to your food recipe, and the related indicator will be on. COOKING FUNCTIONS Rice Function This is a 12 minutes program for cooking rice and grains 1. -
Page 16: Slow Cook Function
Slow Cook Function This function will allow you to cook slow cooker classics such as pot roasts in up to 10 hours. Load your ingredients in the morning and dinner will be waiting for you. 1. Place the removable cooking pot in the cooker. 2. -
Page 17: Stew Function
Stew Function This is a 20-minute program (00:20) for stewing food. 1. Follow the steps listed in this manual under the heading “General Operation Instructions.” Press the STEW button. 2. If your meal needs a longer or shorter cooking time, the default time can be changed during the first 5-seconds interval by pressing the plus(+) or minus(-) button. -
Page 18: Steam Function
4. Within 5 seconds, the indicator light will stop flashing to indicate the cooking process has started. 5. After about one minute of preheating, add food and begin browning. 6. Once you are done browning, press the “Keep Warm/Cancel” button to cancel the brown function. -
Page 19: Soup Function
open once the pressure is released. Remove the lid by lifting it away from you to avoid being burned by the steam. Soup Function This is a 30-minute program (00:30) for cooking soups. 1. Follow the steps listed in this manual under the heading “General Operation Instructions.”... -
Page 20: Time Delay Function
Remove the lid by lifting it away from you to avoid being burned by the steam. Time Delay Function The Premium Pressure Cooker has a delay time function of up to 24 hours. 1. Follow the steps listed in this manual under the heading “General Operation Instructions”. - Page 21 • Leaving raw food inside the pressure cooker for long periods of time prior to cooking may result in the food spoiling. • Cook food that can be left out such as beans, grains or other foods that will not spoil.
-
Page 22: Cleaning And Maintenance
Cleaning and Maintenance After use, unplug unit and allow the unit to cool completely before cleaning. The Premium Electric Pressure Cooker must be cleaned thoroughly after each use in order to avoid staining caused by a build-up of food or cooking residue. -
Page 23: Troubleshooting
14. Regular care or maintenance is essential in ensuring that this product is safe for use. In addition to the Sealing Ring gasket, the other safety devices on the Premium Electric Pressure Cooker must also be cleaned after each use. - Page 24 Symptom Possible Reasons Solutions Lid does not The sealing ring is not Reinstall the sealing ring lock properly installed The float is seized by the Push the rod with your hands push rod Cannot open The float is still up Press the float down the lid after air exhaust...
- Page 25 When the following circumstances take Solutions place • Power cord and plug suffer from expansion, •Stop using the product deformation, discoloration, damages, etc. immediately; send it to your • A portion of the power cord or the plug gets nearest customer service hotter than usual.
-
Page 26: Medidas Importantes De Seguridad
MEDIDAS IMPORTANTES DE SEGURIDAD Cuando se utilizan aparatos eléctricos, siga siempre las precauciones básicas de seguridad, incluyendo las siguientes: 1. Lea todas las instrucciones 2. No toque las superficies calientes. Use las asas o las perillas. 3. Para protegerse de descargas eléctricas, no sumerja el cable, el enchufe o el aparato en agua ni en ningún otro líquido. - Page 27 16. No utilice el aparato para otra cosa que no sea su uso previsto. 17. Riesgo de descarga eléctrica. Cocine únicamente en el recipiente removible. 18. Este aparato cocina bajo presión. El uso incorrecto puede provocar lesiones y quemaduras. Asegúrese de que la unidad esté bien cerrada antes de operar. Véase "Instrucciones de uso".
- Page 28 cuidado lejos de usted con el fin de evitar el contacto de la piel con el calor o el vapor saliente. 25. Esta olla de presión eléctrica genera calor y vapor que se escapa durante el uso. PRECAUCIÓN SUPERFICIES CALIENTES. Tome todas las precauciones necesarias para evitar incendios, quemaduras y otras lesiones personales durante su funcionamiento.
- Page 29 Instrucciones de Cable Corto a) Se proporciona un cable de alimentación corto para reducir el riesgo de enredarse o de tropezar con un cable más largo. b) Los cables de alimentación largos desmontables están disponibles y pueden utilizarse si se tiene cuidado en su uso. c) Si se utiliza un cable de alimentación desmontable: 1) La clasificación eléctrica marcada del cable debe ser por lo menos tan alta como la clasificación eléctrica del aparato.
-
Page 30: Especificaciones Del Producto
Tamaño del Presión de Presión Temperatura eléctrico recipiente funcionamiento limite tibia interno PPC1058D (10) 120v~60Hz 900W 22cm 0-70kPa 90kPa 60-80 Antes del Primer Uso Antes del primer uso, por favor, saque todos los accesorios del paquete y lea este manual cuidadosamente. Preste especial atención a las instrucciones de funcionamiento y precauciones para evitar cualquier lesión o daños materiales. -
Page 31: Características Del Producto
Características del Producto Estructura de la Válvula de Flotación 01: Asa de la Tapa 02: Tapa 03: Cubierta superior 04: Válvula de escape 05: Válvula Interna de Acero 06: Válvula de flotación 07: Válvula Flotante 08: Olla removible 09: Panel de control 10: Olla fija 11: Base 12: Asa de la Olla... - Page 32 Apertura Segura de la Tapa 1. Desconecte la alimentación o el enchufe de alimentación. 2. Libere la presión: A. Apertura rápida (para alimentos no líquidos): • Deslice la válvula de escape a la posición de liberación. • Coloque una toalla mojada en la tapa para enfriar más rápido hasta que la válvula de flotación baje completamente.
- Page 33 Como Usar La Olla de Presión Premium utiliza un panel de control grande y fácil de usar. Las cómodas funciones de programa incorporadas le permiten cocinar su comida favorita con el toque de una tecla de función programada. La olla inteligente incluye 6 programas: Brown (Dorar), Rice (Arroz), Steam (Vapor), Soup (Sopa), Stew (Estofado), y Slow cook (Cocción lenta).
- Page 34 Las funciones Brown (Dorar) y de Cocción Lenta (Slow Cook) no tienen tiempo de cocción prefijado. Al seleccionar una función y entrar en el programa, la pantalla mostrará el tiempo de cocción a presión por defecto (para el arroz es de 12 minutos), y la olla a presión empieza a calentarse.
- Page 35 caliente. El indicador de presión activa se apagará automáticamente la olla entra en el modo de mantener caliente. Tenga en cuenta que la olla está todavía bajo alta presión en ese momento. No intente abrir la tapa. Libere la presión antes de abrir. Para abrir la tapa Cuando la cocción a presión ha llegado a su fin, la olla se pondrá...
- Page 36 presión, la presión comenzará a descender. Esto tomará de 12 a 30 minutos. Durante este tiempo, la cocción continúa ligeramente. Cuando la presión está totalmente liberada, la válvula del flotador se hundirá. La tapa estará desbloqueada para abrir. PRECAUCIÓN: MANTENGA LAS MANOS Y LA CARA LEJOS DE LA VALVULA DE VENTILACIÓN.
-
Page 37: Instrucciones Generales De Operación
Instrucciones Generales de Operación 1. Abra la tapa: Sostenga el mango de la tapa, gire la tapa hacia la derecha hasta la posición de desbloqueo y levante la tapa cuidadosamente para abrir (ver figuras 1 y 2). 2. Saque la olla extraíble y coloque la comida y agua en ella. NUNCA llene olla a más de 4/5 o menos de 1/5. - Page 38 4. Cierre la tapa: Asegúrese de que la junta de silicona está bien asentada dentro de la tapa. Sostenga el mango de la tapa y coloque la tapa de la olla; gire la tapa en sentido anti horario aproximadamente 30 grados hasta que la tapa esté alineada con la marca “CLOSED IN THIS POSITION”...
- Page 39 Una vez que toda la presión se ha liberado, la válvula se sentirá suelta de nuevo. 7. Conecte a la electricidad. La pantalla LED muestra "00:00" y entra en estado de espera. 8. Elija el botón de función correspondiente de acuerdo a su receta de comida, y el indicador relativo se encenderá.
-
Page 40: Función De Cocción Lenta (Slow Cook)
tapa para abrir. La tapa sólo abrirá una vez que se libere la presión. Retire la tapa levantándola lejos de usted para evitar quemaduras por el vapor. Función de Cocción Lenta (Slow Cook) Esta función le permitirá cocinar clásicos de la cocina lenta, como estofados, en un máximo de 10 horas. -
Page 41: Función De Dorar (Brown)
al retirar el recipiente interior o al tocar cualquier parte caliente, y nunca fuerce la tapa para abrir. La tapa sólo abrirá una vez que se libere la presión. Retire la tapa levantándola lejos de usted para evitar quemaduras por el vapor. Función de Estofado (Stew) Este es un programa de 20 minutos (00:20) para hacer alimentos guisados o estofados. - Page 42 de corral. Dore la comida en lotes para mantener la temperatura correcta del aceite. 1. Coloque la olla extraíble en su lugar. 2. Añada la cantidad de aceite que se indica en la receta. 3. Pulse el botón de dorar (BROWN). La luz en el botón BROWN parpadeará y en la pantalla aparecerá...
- Page 43 presionando los botones más (+) o menos (-). 4. Cuando termina el tiempo de cocción, la unidad emitirá un sonido y entrará automáticamente en el modo de mantener caliente, hasta que se pulsa el botón Keep Warm / Cancelar. ADVERTENCIA: No sostenga la válvula de liberación de presión.
- Page 44 Función de Demora en el Tiempo (Time Delay) La Olla de Presión Premium cuenta con una función de demora de tiempo de hasta 24 horas. 1. Siga los pasos que se indican en este manual bajo el título "Instrucciones Generales de uso".
- Page 45 presionando las teclas más (+) o menos (-) botón (para intervalos de 30 minutos). 6. Después de 5 segundos, el tiempo de demora se establece y la luz indicadora verde está encendida, junto con la luz indicadora de la función seleccionada. La pantalla comenzará...
-
Page 46: Limpieza Y Mantenimiento
Después de su uso, desenchufe la unidad y deje que la unidad se enfríe completamente antes de limpiarla. La Olla de Presión Eléctrica Premium debe ser limpiada a fondo después de cada uso con el fin de evitar las manchas causadas por la acumulación de residuos de alimentos. - Page 47 la tapa. Comprobar periódicamente para asegurarse de que está limpio, flexible y no desgarrado. Si está dañado, no utilice esta unidad. Nota: El anillo de sellado debe ser reemplazado cada año o antes si es necesario. El anillo de sellado también puede necesitar ser reemplazada si la olla de presión eléctrica de primera calidad no se utiliza durante un largo periodo de tiempo, ya que puede endurecerse por falta de uso, por lo que es incapaz de formar un sello hermético.
-
Page 48: Resolución De Problemas
Resolución de Problemas Código Indicador Razones Falla del interruptor de presión Cortocircuito del sensor Circuito sensor abierto Sobre calentamiento Síntoma Razones Posibles Soluciones La tapa no El anillo de sellado no está Vuelva a colocar el anillo de cierra bien instalado correctamente sellado El flotador está... - Page 49 El flotador no se No hay suficiente comida y Compruebe la receta y levanta agua coloque la cantidad adecuada El aire escapa desde el borde Llame al Centro de Servicio al de la tapa y la válvula de límite Consumidor de presión Cuando las circunstancias siguientes Soluciones...
Need help?
Do you have a question about the PPC1058D and is the answer not in the manual?
Questions and answers
Cómo utilizar la **** de presión para cocinar granos
To cook grains using the Premium PPC1058D pressure cooker, follow these steps:
1. Prepare Ingredients: Add the grains and the appropriate amount of water into the inner pot. Ensure the total volume of food and water falls between 1/5 and 3/5 of the inner pot's capacity.
2. Plug In the Cooker: Connect the power cord to the pressure cooker, then plug it into a power outlet.
3. Select Cooking Function: Press the appropriate button for cooking grains. For grains, you may use the "Rice" function.
4. Start Cooking: Once the button is pressed, the default pressure cooking time will display. Cooking time may vary depending on the grain type, quantity, and texture.
5. Wait for Completion: The cooker will automatically cook the grains based on the selected function.
6. Release Pressure: Once cooking is complete, follow the manual's instructions to safely release pressure before opening the lid.
7. Serve and Clean: Serve the grains, then unplug the cooker, allow it to cool, and clean thoroughly.
This answer is automatically generated