Table of Contents
Advertisement
Advertisement
Table of Contents

Related Manuals for Biolase Waterlase Express


Summary of Contents for Biolase Waterlase Express
- Page 1 User Manual...
- Page 2 PAGE IS LEFT BLANK INTENTIONALLY.
-
Page 3: Table Of Contents
5. CONTRAINDICATIONS, WARNINGS, AND PRECAUTIONS ........19 5.1 Contraindications ........................... 19 5.2 Warnings and Precautions ......................19 6. SAFETY WITH THE WATERLASE EXPRESS ............... 22 6.1 Safety Measures ........................... 22 6.2 Safety Classification ........................22 6.3 Safety Instructions ......................... 23 6.4 Safety Features .......................... - Page 4 8.3.1 Initiating the Laser from OFF Status ..................39 8.3.2 Waking the system from SLEEP mode .................. 40 8.4 Activating the Waterlase Express ....................40 8.5 Turning the Waterlase Express Off ....................41 9. USER INTERFACE ......................42 9.1 Icons - Definition ..........................42 9.2 Main Menu .............................
- Page 5 12.10.1 Filling the Internal Cooling Water Reservoir ..............71 12.10.2 Draining the Internal Cooling Water Reservoir ..............72 12.11 Transportation ..........................73 12.12 Storage ............................73 13. TROUBLESHOOTING ....................74 13.1 Troubleshooting ........................... 74 13.1.1 Error Messages ........................74 13.1.2 Problem/Warning Messages....................77 Waterlase Express User Manual...
- Page 6 CAUTION: From time to time you may see software related updates from Samsung, please do not accept or execute software related updates without further instruction from BIOLASE to ensure that updates will not adversely impact the use of your Waterlase Express. Waterlase Express User Manual...
-
Page 7: Introduction
Overview Introduction Congratulations on the addition of the Waterlase Express™ all-tissue laser to your practice! Waterlase patented technology provides a minimally invasive, highly precise, and exceptionally gentle dental experience for your patients, as well as unmatched results in treatment outcomes. -
Page 8: Overview
Waterlase Express may also be used for specific endodontic and periodontal applications. When used for oral hard tissue procedures, the Waterlase Express laser provides optical energy to a user-controlled distribution of atomized water droplets and hydrated surface layer of hard-tissue. The water present in the target tissue absorbs laser radiation, resulting in explosive molecular expansion and ablation of hard-tissue. -
Page 9: Indications For Use
Indications for Use Indications for Use The Waterlase Express may be used for the following indications: GENERAL HARD-TISSUE INDICATIONS* • Class I, II, III, IV and V cavity preparation • Caries removal • Hard-tissue surface roughening or etching • Enameloplasty, excavation of pits and fissures for placement of sealants... - Page 10 NOTE: Any tissue growth (i.e., cyst, neoplasm or other lesions) must be submitted to a qualified laboratory for histopathological evaluation. • Soft-tissue crown lengthening • Treatment of canker sores, herpetic and aphthous ulcers of the oral mucosa • Vestibuloplasty *For use on adult and pediatric patients Waterlase Express User Manual...
- Page 11 • Removal of subgingival calculi in periodontal pockets with periodontitis by closed or open curettage • Waterlase Er,Cr:YSGG assisted new attachment procedure (cementum-mediated periodontal ligament new-attachment to the root surface in the absence of long junctional epithelium) Waterlase Express User Manual...
-
Page 12: Specifications
200 – 1200 µm • Output divergence ≥ 8° per side • Aiming beam 625-670 nm (red) laser, 1mW max (Laser Class 1) • Nominal ocular hazard distance (NOHD) • Maximum permissible exposure (MPE) 3.46 X 10⁵W/m² Waterlase Express User Manual... -
Page 13: Equipment Description
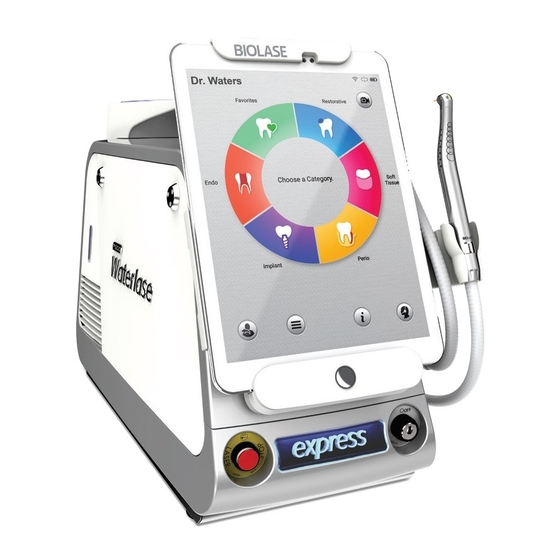
• Limited Warranty *Additional accessories, including extra Handpieces, Tips, and screen protectors may be ordered separately from BIOLASEstore.com. 4.2 GENERAL The Waterlase Express laser system consists of four primary components: 1. Laser Console 2. Tablet 3. Fiber Delivery System 4. Wireless Footswitch... -
Page 14: Laser Console
The emergency stop (red) button is located on the left front panel of the laser console. Pressing this button instantly stops the emission of laser energy; the button will glow red to indicate the emergency stop has been engaged and the screen will display the message “Emergency Stop Pressed.” Waterlase Express User Manual... - Page 15 The Handpiece Holder cradles the Handpiece when it is not in use. It can be attached to the Tablet Holder on the right or the left, based on user preference. Function Control Button Wireless Footswitch Connectivity Indicator Tablet Connectivity Indicator Tablet Latch Tablet Handpiece Holder Tablet Holder/ Control Panel Keyswitch Emergency Stop Figure 4.2 Waterlase Express User Manual...
- Page 16 Any damage from moisture or oil in the air line is not covered by the system warranty. Waterlase Express User Manual...
-
Page 17: Tablet
INTERNAL COOLING WATER RESERVOIR FILL CONNECTOR The Waterlase Express laser system contains an internal cooling water reservoir which must be filled prior to initial use of the laser. A reservoir fill kit is included with the system and attaches to the connector on the rear of the console. -
Page 18: Wireless Footswitch
Ready mode or when the laser is firing, replace the Fiber Delivery System. Cover 4.2.4 WIRELESS FOOTSWITCH The Waterlase Express laser will only emit laser energy when the user presses down on the Footswitch Pairing Button/ while the laser is in Ready mode. It is designed to... -
Page 19: Contraindications, Warnings, And Precautions
Contraindications, Warnings, and Precautions 5.1 CONTRAINDICATIONS All clinical procedures performed with the Waterlase Express must be subjected to the same clinical judgment and care as with standard techniques. Patient risk must always be considered and fully understood before clinical treatment. The clinician must completely understand the patient’s medical history prior to treatment and exercise caution for general medical conditions which might contraindicate a local procedure. - Page 20 Always use high-speed suction to remove any excess fluid and avoid directing the spray into deep pockets. Do not use the Waterlase Express if it is not possible to access the treatment site without directing air into an area that may collect or entrap air. In general, the same care and precautions should be taken when using the Waterlase Express as are taken when using any air and water emitting cutting device.
- Page 21 Do not proceed with using the laser if visibility in these areas is limited. TISSUE EVALUATION Any tissue growth (i.e., cyst, neoplasm and other lesions), either removed with Waterlase Express or conventionally, must be submitted to a qualified laboratory for histopathological assessment. TISSUE CONTACT AND TIP BREAKAGE Do not contact any hard surface with the Fiber Tip as it is very brittle and fragile and could break.
-
Page 22: Safety With The Waterlase Express
Safety with The Waterlase Express Safety with The Waterlase Express 6.1 SAFETY MEASURES WARNING: No modification of this equipment is allowed. Failure to comply with the following precautions and warnings may lead to exposure to dangerous voltage levels or optical radiation sources. Please comply with all safety instructions and warnings. -
Page 23: Safety Instructions
3. All persons present in the operatory, including patients, must wear protective eyewear suitable for blocking 2.78 µm (2780 nm) laser energy (OD 3 or greater, supplied by BIOLASE). CAUTION: Prior to use, inspect eyewear for pitting and cracking; do not use if damaged. For replacements or additional protective eyewear, please contact BIOLASE Customer Service or your authorized local BIOLASE representative. -
Page 24: Safety Features
WIRELESS FOOTSWITCH Waterlase Express will only emit laser energy when the user presses down on the Footswitch while the laser is in Ready mode. The Footswitch Cover shields the Footswitch to prevent it from being pressed unintentionally. -
Page 25: Installation And Setup
Installation and Set-Up Installation and Set-Up The Waterlase Express laser system must be unpacked and installed by a qualified BIOLASE employee or agent. Please leave the shipping container unopened until your trained representative arrives. 7.1 FACILITY REQUIREMENTS NOTE: The main power supply of the Waterlase Express laser system has an isolation transformer that complies with a Transient Voltage of 4kV. -
Page 26: Setup Requirements
Installation and Set-Up 7.3 SETUP REQUIREMENTS The Waterlase Express is designed to be transportable between operatories either manually, using the console handle, or by wheeling it on the custom cart offered as a system option. In either case, prior to use the laser must be properly set up, as described in this user manual, to ensure safe and efficient functionality. -
Page 27: Using The Remote Interlock
Contact BIOLASE or your authorized BIOLASE representative with any questions on how to install this feature. NOTE: The plug must be installed into the console in order for the laser to work, whether or not the remote interlock function is used (Figure 7.1). -
Page 28: Installing The Tablet
Control Panel USB/Accessory Port USB Connector (Inside Holder) Figure 7.5 NOTE: When installed, the Tablet will charge only when the system is plugged in and ON. If the system is OFF, the Tablet will not charge. Waterlase Express User Manual... -
Page 29: Filling The Patient Water Bottle
Even a small crack may cause damage when the bottle is pressurized. DO NOT USE IF DAMAGED. NOTE: BIOLASE recommends replacing the patient water bottle every five years. Refer to the expiration date noted on the bottle label. -
Page 30: Installing The Fiber Optic Cable Support Arm
3. Place the larger of the two screws supplied, with the lock Figure 7.8 washer, into the hole and tighten with the Allen wrench. 4. Insert the fiber support arm into the fiber support base (Figure 7.11). Figure 7.9 Figure 7.10 Figure 7.11 Waterlase Express User Manual... -
Page 31: Connecting The Fiber Optic Cable
Optic Cable once more and confirm there is no debris on the Locknut window, it is clean and not damaged. Collar 7. Carefully place the Fiber Optic Cable with its protective cover, or with the Handpiece connected, in the Handpiece Holder. Figure 7.13 Waterlase Express User Manual... -
Page 32: Installing The Fiber Optic Cable Retainer
3. To remove, push the bottom ends of the tabs back to unsnap them from the Tablet holder; pull up and over. If they do not move easily, press down on the top of the Cable Retainer while pushing the tabs. Figure 7.14 Figure 7.15 Figure 7.16 Waterlase Express User Manual... -
Page 33: Connecting/Disconnecting The Handpiece To The Fiber Optic Cable
5. To disconnect the Handpiece, hold the Fiber Optic Cable by the connector and gently, but firmly pull on the Handpiece until it comes completely off the fiber shaft. DO NOT apply excessive force. Figure 7.21 Waterlase Express User Manual... -
Page 34: Installing And Changing The Tip In The Handpiece
1. Slide the Handpiece laterally through the slot toward the Tip Holder or Revolving Tip Holder. 2. Place your thumb against the selected tip slot to prevent the laser Tip from falling out of the Tip Holder when disconnecting it from the Handpiece. Waterlase Express User Manual... -
Page 35: First Time Start-Up
Revolving Tip Holder; discard the used Tip in a medical waste sharps container. 7.3.11 FIRST TIME START-UP First time start-up of the Waterlase Express requires the user to follow a series of steps before initial use: 1. Insert the Tablet in the Tablet Holder: make sure it is turned ON. - Page 36 Installation and Set-Up Figure 7.29 Figure 7.30 Figure 7.31 Figure 7.32 Waterlase Express User Manual...
-
Page 37: Enabling Biolase Connect
Tablet itself. BIOLASE Connect may be enabled during first-time start-up, or at any later time by going to the main menu and selecting the Wi-Fi option. An active wireless connection is necessary to implement this feature on the Waterlase Express. -
Page 38: Operating Instructions
8.1 OVERVIEW Before using the Waterlase Express be sure the laser has been installed properly, as described in Section 7 of this user manual, to ensure safe and efficient functionality. -
Page 39: Daily Start-Up
Handpiece or skip this step (if the Handpiece is already primed). If "prime" is chosen, a message will appear confirming that priming is taking place (approximately 6 seconds) (Figure 8.3) Figure 8.2 Figure 8.3 Waterlase Express User Manual... -
Page 40: Waking The System From Sleep Mode
CAUTION: Make sure the Handpiece is stored in the Handpiece Holder whenever the laser system is powering up or waking from Sleep state. 8.4 ACTIVATING THE WATERLASE EXPRESS Place the system into Ready mode after selecting a procedure by pressing the Function Control Button on the Tablet Holder;... -
Page 41: Turning The Waterlase Express Off
Operating Instructions 8.5 TURNING THE WATERLASE EXPRESS OFF While it is not necessary to turn the laser OFF at the end of the day, it is best practice to do so. If the system is not turned OFF, the Tablet will go dark after a period of no activity. -
Page 42: User Interface
STEP UP STEP DOWN Increase settings for air/water/ Decrease settings for air/water/ illumination/aiming beam/laser power/pulse rate illumination/aiming beam/laser power/pulse rate FAVORITES HANDPIECE Save procedure/settings to favorites Handpiece selection DOCTOR CREDENTIALS Tip selection DEFAULT SETTINGS PULSE PER SECOND Waterlase Express User Manual... - Page 43 TECHNICIAN CALL Identifies the CALL as clinical and Identifies the CALL as technical and directs it to BIOLASE customer care directs it to a BIOLASE service technician REMOTE ACCESS SUPPORT When pressed by the user, allows BIOLASE SAVE Tech support to access the laser system for...
-
Page 44: Main Menu
Press the MENU button at the bottom of any screen to access a number of key features included with the Waterlase Express (Figure 9.1). To return to the menu at any time from any procedure screen, press the MENU button. -
Page 45: Settings
• Language • Wi-Fi (enable Wi-Fi, change network, disable Wi-Fi) • Footswitch Pairing *Requires the completion of a BIOLASE-sponsored training course to access. 9.2.3 SYSTEM INFORMATION System Information provides the user with the following data (Figure 9.4): • Specifications (system specifications and icon glossary) •... -
Page 46: Maintenance
• Daily • Service • System log In addition, the Remote Access Button, when activated, allows BIOLASE Service to provide remote access support in real time. 9.2.5 SESSION REVIEW Waterlase Express stores all session information (Figure 9.6), including procedure settings and duration, and allows the user to sort by: •... -
Page 47: Web Portal
This selection offers the user four choices (Figure 9.7), each accessible only if Wi-Fi is enabled: • Breaking news (displays a list of latest news items to choose from) • Discussion forum • BIOLASE Home • BIOLASE Store Return Home (Procedures Main) Screen Figure 9.7 Waterlase Express User Manual... -
Page 48: Home (Procedures Main) Screen
After exiting, choose the procedure or step desired. The previous choice of Tip, if different, will automatically be superseded. Figure 9.9 Figure 9.10 Figure 9.8 Waterlase Express User Manual... - Page 49 NOTE: The Standby/Ready/Firing indicator at the bottom of the Tablet screen is not a button. To change the status of the laser, use the control button on the control panel. Figure 9.12 Figure 9.13 Figure 9.11 Waterlase Express User Manual...
-
Page 50: Favorites
User Interface 9.4 FAVORITES The Waterlase Express has the capacity to store up to 12 favorite procedure or step settings. To access settings stored as Favorites, choose the Favorites category on the Procedures Home screen. 9.4.1 CREATE A FAVORITE Anytime a preset is modified, the star symbol that appears in the step selection segment changes to an unlocked lock. -
Page 51: Rename Or Delete A Favorite
• Touch the pull down icon at the top of the screen (Figure 9.19) • Adjust each element to the desired level (Figure 9.20) • Touch the pull up icon at the bottom of the screen to return to the Procedure screen (Figure 9.20) Figure 9.19 Figure 9.20 Waterlase Express User Manual... -
Page 52: Presets
9.6 BASIC MODE Basic is the default mode of the Waterlase Express. It provides access to most of the applications within the main categories and utilizes a pre-defined range of parameters for each. These settings may only be adjusted within a set minimum and maximum range. -
Page 53: Accessing Advanced Mode
2. Select Settings, then Modes. 3. Press Advanced. 4. Enter the customized code issued by BIOLASE Customer Care and press continue. 5. Return to the Procedure Home screen by pressing the home button. 6. Choose the desired procedure category and proceed as outlined in Section 9.3. -
Page 54: Software/Firmware/Content Updates
Figure 9.25 9.7.2 SOFTWARE/FIRMWARE/CONTENT UPDATES From time to time BIOLASE will update the Waterlase Express system Software and/or Firmware, or refresh the content of the Learning Center, adding new videos, animations, white papers, etc. All users will be notified of upcoming updates, along with a summary of the enhancements included with each update. -
Page 55: System Flow Chart
Software Versions System Information Applications License Code Set date & Time Purge/Prime Service Daily Maintenance System Log Handpieces and Tips Footswitch Battery Session Select Session Review Breaking News Discussion Forum Portal BIOLASE Home BIOLASE Store Figure 9.26 Waterlase Express User Manual... -
Page 56: Cutting Tissue
Cutting Tissue The Waterlase Express laser is designed to cut and remove hard- and soft-tissues. Cutting is achieved in a contact or non-contact mode by application of direct laser energy either with water for cooling and hydration, or without water for coagulation. It helps to understand the unique nature of the Waterlase Express laser in order to efficiently remove tissues. -
Page 57: Soft-Tissue Cutting
STEP 1—CLEANING PROCESS (HANDPIECE, TIPS) The cleaning process is intended to remove blood, protein and other potential contaminants, as well as to reduce the quantity of particles, microorganisms and pathogens present from the Handpiece, laser Waterlase Express User Manual... -
Page 58: Cleaning, Disinfection, And Sterilization
10. Using the Tip Holder or Revolving Tip Holder, remove the Tip from the Handpiece: A. Slide the Handpiece laterally toward the Tip Holder or Revolving Tip Holder (Figure 11.1). Waterlase Express User Manual... - Page 59 6. Place the tray into the autoclave chamber and set appropriate cycle, as noted in (Figure 11.3). 7. Upon completion of the cycle, the Handpiece and tips must remain in the sterilization pouches until used to ensure sterility. Waterlase Express User Manual...
- Page 60 NOTE: When handling, always hold a tip by the plastic ferrule to avoid damaging the fiber; use of damaged or worn Tips may cause damage to the cable and will compromise the clinical performance of the Waterlase Express laser system. STEP 3—DISINFECTING THE FIBER Always disinfect the Fiber Optic Cable between patients by wiping it completely with an appropriate disinfecting solution such as Cavicide™...
-
Page 61: Maintenance
DO NOT use bleach or abrasive cleaners. 12.2 ANNUAL MAINTENANCE The Waterlase Express should be serviced annually only by a qualified, trained, and certified BIOLASE technician to keep the product in compliance with its specifications. Any attempt to perform maintenance by anyone other than an authorized BIOLASE technician may lead to exposure to laser radiation and collateral radiation. -
Page 62: Tip Inspection Instructions (Using The Tip Cleaning And Inspection Kit)
(Figure Thumb 12.4). Refocus the microscope. Wheel Figure 12.3 Figure 12.4 Tip Holder With Tip Inside Figure 12.5 Waterlase Express User Manual... -
Page 63: Inspecting The Plastic Ferrule
2. Moisten a cotton swab with isopropyl alcohol drops. Figure 12.8 3. Push the fiber (distal/output) end into the cotton swab. 4. Twirl the cotton swab while maintaining pressure on the tip. 5. Repeat on the ferrule (proximal/input) end of the tip. Figure 12.9 Waterlase Express User Manual... -
Page 64: Handpiece Mirror Inspection
12.6.1 REMOVING THE HANDPIECE MIRROR 1. Insert the 3-pin side of the Handpiece mirror tool included in the Waterlase Express Accessory Box into the 3 holes of the cap at the Handpiece head. Make sure all the pins fit snugly (Figure 12.11). -
Page 65: Changing The Handpiece Mirror
3. To improve the alignment, remove the mirror, turn it 180°, and re- install it. 4. If this does not correct the problem, replace the Handpiece; if the visible spot is still uneven after replacing the Handpiece, replace the Fiber Optic Cable. Waterlase Express User Manual... -
Page 66: Fiber Optic Cable Check
5. If the surface is contaminated, clean the window with a cotton swab Good / Standby Mode dipped in isopropyl alcohol. 6. If a crater is visible in the middle of the window, it is damaged and must be replaced. Good / Ready Mode Figure 12.18 Waterlase Express User Manual... -
Page 67: Replacing The Protective Window
Maintenance 12.7.1 REPLACING THE PROTECTIVE WINDOW A protective window is used in conjunction with the Waterlase Express Fiber Optic Cable. A Fiber Optic Cable ships with a preinstalled Protective Window. The Protective Window may become burned or damaged during use, please follow the steps outlined below, should your Protective Window need to be replaced. -
Page 68: Installing/Replacing The Wireless Footswitch Batteries
NOTE: Replace both batteries at the same time; do not mix old and new batteries. Dispose of old batteries as regulated; do not throw them in a trash bin. To ensure the longevity of the battery power, only use BIOLASE-supplied batteries as replacements (p/n 6400463), which are industrial-grade and under normal use have a longer life than conventional AAA batteries. -
Page 69: Pairing The Footswitch And Laser
12.9.1 PAIRING THE FOOTSWITCH AND LASER Waterlase Express ships with the laser and Wireless Footswitch already paired. However, should the wireless connection fail at any time, or a new Footswitch incorporated into the system, pairing will need to be re-established. -
Page 70: Selecting The Footswitch Channel
Wi-Fi channel. The default Footswitch channel has been chosen at the factory to minimize the possibility of interference, however the Waterlase Express allows the user to choose from a list of available alternate channels in the event that interference is present on the default channel. -
Page 71: Internal Cooling Water Reservoir
12.10 INTERNAL COOLING WATER RESERVOIR 12.10.1 FILLING THE INTERNAL COOLING WATER RESERVOIR The Waterlase Express ships with the internal cooling water reservoir empty. Before first-time use, fill the reservoir with distilled or de-ionized water using the reservoir fill kit included with the laser system. -
Page 72: Draining The Internal Cooling Water Reservoir
12.10.2 DRAINING THE INTERNAL COOLING WATER RESERVOIR If the laser needs to be returned to BIOLASE for maintenance or repair, the water in the internal cooling water reservoir should be drained prior to shipping. Although draining the reservoir can be done by the user, it would be preferable to have an authorized field service technician prepare the unit for shipment. -
Page 73: Transportation
12.12 STORAGE The Waterlase Express and accessories should be stored in a cool dry place when not in use. Storage temperature should be 5° to 45°C (41°F to 113°F), relative humidity 10% to 90%, non-condensing. Cover the system when not in use for extended periods of time and store in a place where it will not be accidentally bumped or banged. -
Page 74: Troubleshooting
Troubleshooting 13.1 TROUBLESHOOTING The Waterlase Express constantly monitors its own performance and calibration and will alert the user of a performance error. 13.1.1 ERROR MESSAGES If a performance error occurs, the system will automatically go into Standby and the screen will display a message indicating the cause of the error and the recommended action for resolution (Figures 13.1, 13.2). - Page 75 Patient Water The patient water bottle Restart the system; contact your authorized Bottle Sensor sensor may be defective. Biolase service provider for further assistance if Error the problem persists. Internal Temperature levels above / Leave the system on for a few minutes then HV System below acceptable levels.
- Page 76 Internal Cooling The internal cooling Refill the cooling water reservoir; contact Reservoir Water reservoir water level is low. your authorized Biolase service provider for Level Low further assistance if the problem persists. System Water The system has detected an Restart the system; contact your authorized Spray Error error in the spray system.
-
Page 77: Problem/Warning Messages
Figure 13.2 CAUTION: There is one additional error that applies specifically to the Tablet: “The BIOLASE warning system has detected a condition which requires a Tablet reset." This can be accomplished by pressing the OK button. The Tablet will restart automatically. -
Page 78: Appendix A - Labels
Fiber Optic Cable end LOCATION: Side of console, near laser output NOTES: 1. LABEL SIZE: 14.0mm W x 14.0mm H. 2. MATERIAL: Waterlase Express User Manual - SUBSTRATE: WHITE, .002” THICK POLYESTER SHEET, BACKED WITH PERMANENT, PRESSURE ACTIVATED A... - Page 79 827 kPa MAX. (120 psi) 420 kPa MIN. (60 psi) LOCATION: 5201517 Rev. B Rear panel of console EMERGENCY STOP BUTTON LOCATION: Front panel, below Tablet Holder PROTECTIVE EARTH GROUND LOCATION: Inside laser console (only visible during service) Waterlase Express User Manual...
- Page 80 Bottom of console, bottom of Footswitch FCC AND IC LABEL: Lists Federal Communications Commission and industry Canada registration numbers. LOCATION: Bottom of console and of Wireless Footswitch NON-IONIZING RADIATION: Device includes an intentional radiator (Bluetooth) Waterlase Express User Manual...
- Page 81 DO NOT USE TAP WATER, REFER TO USER MANUAL LOCATION: Patient water bottle cap SINGLE USE ONLY – DO NOT REUSE LOCATION: Tips packaging REMOTE INTERLOCK LOCATION: Rear of console SHIPPING LABEL – LASER SYSTEM LOCATION: Outer carton (shipping box) EUROPEAN REPRESENTATIVE Waterlase Express User Manual...
- Page 82 Do not throw in trash bin. Dispose of as regulated.) LOCATION: Bottom of console THIS END UP LOCATION: Outer carton (shipping box) FRAGILE: HANDLE WITH CARE LOCATION: Outer carton (shipping box) KEEP DRY LOCATION: Outer carton (shipping box) TEMPERATURE LIMITATIONS LOCATION: Outer carton (shipping box) Waterlase Express User Manual...
- Page 83 RADIATION. AVOID EYE OR SKIN EXPOSURE TO DIRECT AND/OR SCATTERED RADIATION. Er, Cr: YSGG, 2.78µm, 4W max 5-50Hz, 250mJ, 60µs/700µs Pulse 1mW max @ 625-670nm Aiming Beam EYE PROTECTION REQUIRED CLASS IV LASER PRODUCT 5201541 Rev. C Waterlase Express User Manual...
-
Page 84: Appendix B - Accessories/Spare Parts
Tip Holder/remover 7230001 Tip starter kit 7200104 Tip cleaning and inspection kit 5201541 Laser warning sign 7250001 Waterlase Express Premium Cart 7250004 Waterlase Express Economy Cart 6201658 Fiber Optical Cable support arm 6201102 Mirror Refill Kit, 1 pc 6201037 Mirror Refill Kit, 3 pcs... -
Page 85: Appendix C - Tips
Tapered Product Type Tip Type Tip Diameter Z (Glass) (x 100μm) (MD, iPlus,Express) T (Sapphire) *Fiber Core Diameter TIP SETTINGS, WATERLASE EXPRESS HANDPIECE SINGLE-USE TIPS (GLASS) Handpiece Ferrule Color/ Tip Type Lengths (µm ) Tissue Types Calibration Maximum Diameter (µm) - Page 86 Tip. Failure to replace the Tip correctly could result in damage of the Tip or the Handpiece mirror. The Tips have a limited lifetime therefore damage of the cable attributed to overuse of the Single-Use Tip may not be covered by warranty. Waterlase Express User Manual...
-
Page 87: Appendix D - Electromagnetic Compatibility
GUIDANCE AND MANUFACTURER’S DECLARATION – ELECTROMAGNETIC EMISSIONS The Waterlase Express is intended for use in the electromagnetic environment specified below. The customer or the user of the Waterlase Express should assure it is used in such an environment. Emissions Test... - Page 88 GUIDANCE AND MANUFACTURER’S DECLARATION – ELECTROMAGNETIC IMMUNITY The Waterlase Express is intended for use in the electromagnetic environment specified below. The customer or the user of the Waterlase Express should assure that it is used in such an environment. IEC 60601...
- Page 89 GUIDANCE AND MANUFACTURER’S DECLARATION – ELECTROMAGNETIC IMMUNITY The Waterlase Express is intended for use in the electromagnetic environment specified below. The customer or the user of the Waterlase Express should assure that it is used in such an environment. IEC 60601...
- Page 90 GUIDANCE AND MANUFACTURER’S DECLARATION – ELECTROMAGNETIC IMMUNITY The Waterlase Express is intended for use in the electromagnetic environment specified below. The customer or the user of the Waterlase Express should assure that it is used in such an environment. IEC 60601...
-
Page 91: Appendix E - Wireless Equipment Compliance Statement
To satisfy RF exposure requirements, this device and its antenna must operate with a separation distance of at least 20 centimeters from all persons and must not be collocated or operating in conjunction with any other antenna or transmitter. Waterlase Express User Manual... -
Page 92: Index
Index Accessories/Spare Parts, 84 Footswitch, 18 Activating the Waterlase Express, 40 Footswitch Batteries, 68 Advanced Mode, 52 Air and Water Spray, 12 Air Supply, 25 Handpiece and Aiming Beam, 51 Atmospheric Pressure, 25 Handpiece Mirror Inspection, 64 Hard Tissue Cutting, 56... - Page 93 System Maintenance, 61 Tablet, 17 Tablet Holder, 15 Temperature, 25 Tip Cleaning, 63 Tip Inspection, 62 Tips, 85 Training, 19 Turning the Waterlase Express Off, 41 Warnings, 19 Waking the System from Sleep Mode, 40 Web Portal, 47 Waterlase Express User Manual...
- Page 94 PAGE IS LEFT BLANK INTENTIONALLY.
- Page 95 #18-1257 Waterlase Express™ software copyright ©2017 BIOLASE, Inc. WaterLase, WaterLase iPlus, and Waterlase Express are either trademarks or registered trademarks of BIOLASE, Incorporated in the United States and/or other countries. All other trademarks are property of their registered owners. Subject to change without notice.
Need help?
Do you have a question about the Waterlase Express and is the answer not in the manual?
Questions and answers