Advertisement
Available languages
Available languages
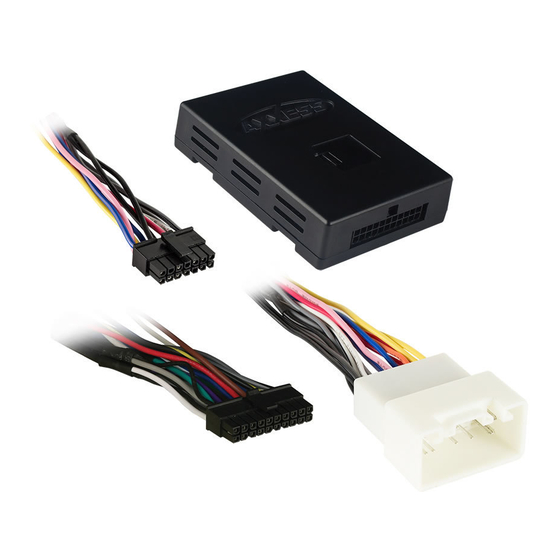
INTERFACE COMPONENTS
• TYTO-01 harness
• TYTO-01 interface
• 16-pin harness with stripped leads
APPLICATIONS
See inside front cover
AxxessInterfaces.com
Toyota Digital Amplifier Interface
Visit
AxxessInterfaces.com
for more detailed information about the product and up-to-date
vehicle specific applications
INTERFACE FEATURES
• Designed for amplified models
• Retains balance and fade
• Micro-B USB updatable
© COPYRIGHT 2018 METRA ELECTRONICS CORPORATION
TYTO-01
I N S TA L L AT I O N I N S T R U C T I O N S
2001-2015
TABLE OF CONTENTS
Connections .........................................................2-3
Installation .............................................................3
Programming .........................................................3
Audio level adjustment .........................................3
Wiring diagram ......................................................4
TOOLS REQUIRED
• Crimping tool and connectors, or solder gun,
solder, and heat shrink
• Tape • Wire cutter • Zip ties
• Small flat-blade screwdriver
Attention!
Let the vehicle sit with the key
out of the ignition for a few minutes before
removing the factory radio. When testing the
aftermarket equipment, ensure that all factory
equipment is connected before cycling the
key to ignition.
REV. 11/28/18 INSTTYTO-01
Advertisement
Table of Contents

Subscribe to Our Youtube Channel
Related Manuals for Axxess TYTO-01


Summary of Contents for Axxess TYTO-01
-
Page 1: Table Of Contents
• Crimping tool and connectors, or solder gun, solder, and heat shrink • Tape • Wire cutter • Zip ties • Small flat-blade screwdriver INTERFACE COMPONENTS • TYTO-01 harness • TYTO-01 interface • 16-pin harness with stripped leads Attention! Let the vehicle sit with the key out of the ignition for a few minutes before removing the factory radio. -
Page 2: Connections
APPLICATIONS CONNECTIONS LEXUS TOYOTA (Cont.) From the 16-pin harness with stripped leads to the aftermarket radio: ES Series 2007-2012 FJ Cruiser 2011-2014 • Connect the White wire to the left front positive speaker output. ES Series (w/ multi disc) 2002-2006 Highlander 2008-2013 • Connect the White/Black wire to the left front negative speaker output. GS Series 2001-2005 Matrix... -
Page 3: Installation
With the key in the off position: 2. With a small flat-blade screwdriver, adjust the potentiometer clockwise to raise the audio 1. Connect the 16-pin harness with stripped leads, and the TYTO-01 harness into the interface. level; counter clockwise to lower the audio level. 2. Connect the TYTO-01 harness to the wiring harness in the vehicle. -
Page 4: Wiring Diagram
Have the vehicle apart and ready to perform troubleshooting steps before contacting Metra/Axxess Tech Support. ® NOWLEDGE IS OWER Enhance your installation and fabrication skills by enrolling in the most recognized and respected mobile electronics school in our industry. - Page 5 • Cinta • Cortacables • Zip lazos • Pequeño destornillador de cabeza plana COMPONENTES DE LA INTERFASE • Arnés TYTO-01 • Interfaz TYTO-01 • Arnés de 16 pins con conectores pelados ¡Atención! Deje que el vehículo se asiente con la llave fuera del encendido durante unos minutos antes de retirar la radio de fábrica.
- Page 6 APLICACIONES CONEXIONES LEXUS TOYOTA (Cont.) From the 16-pin harness with stripped leads to the aftermarket radio: ES Series 2007-2012 FJ Cruiser 2011-2014 • Conecte el cable blanco con la salida positiva de la bocina izquierda delantera. ES Series (con multi disco) 2002-2006 Highlander 2008-2013 • Conecte el cable blanco/negro con la salida negativa de la bocina izquierda delantera. GS Series 2001-2005 Matrix...
- Page 7 2. Con un pequeño destornillador de hoja plana, ajuste el potenciómetro hacia la derecha 1. Conecte el arnés de 16 pins con conectores pelados, y arnés TYTO-01, a la interfase. para aumentar el nivel de audio y hacia la izquierda para disminuir el nivel de audio.
- Page 8 Tenga el vehículo separado y listo para realizar los pasos de solución de problemas antes de ponerse en contacto con el soporte técnico de Metra / Axxess. EL CONOCIMIENTO ES PODER Mejore sus habilidades de instalación y ®...
Need help?
Do you have a question about the TYTO-01 and is the answer not in the manual?
Questions and answers