Table of Contents
Advertisement
Quick Links
Advertisement
Table of Contents

Related Manuals for abc Fleck 5600SXT

Summary of Contents for abc Fleck 5600SXT
- Page 1 Fleck 5600SXT Water Softener with Upflow Carbon Tank Written by 602abcWATER...
-
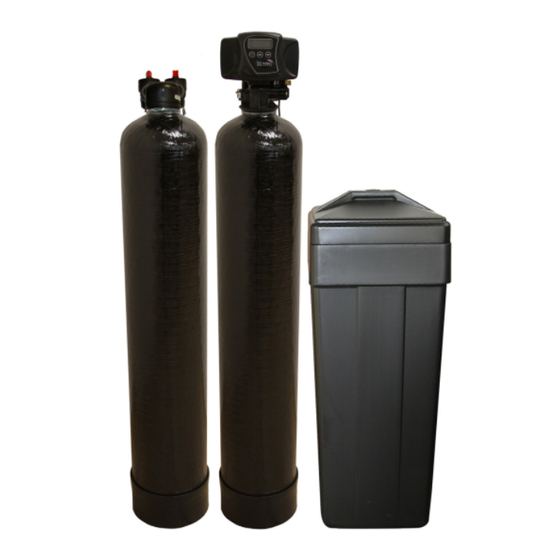
Page 2: Package Contents
602.222.9283. Package Contents Tanks Fleck 5600sxt Valve 1 – Mineral tank prefilled with carbon 1 – Fleck 5600sxt metered valve 1 – Mineral tank prefilled with resin 1 – Basket 1 – Brine tank 1 – 1” threaded yoke 1 –... - Page 3 Valve to Carbon Tank Step 1 – Assemble the in/out head 1. Please read entire manual before starting the installation. Please Verify you have all parts. 2. Lube O-ring located on the bottom of the in/out head. 3. Verify that the basket is secure- ly fastened to the in/out head and connect with distributor tube located in the carbon tank.
- Page 4 4. Open garden hose valve slowly to begin filling the tank (takes a few minutes). Once a steady trickle begins pouring from the opposite port, increase the water pressure. Do this for about 15 to 20 minutes until water flows clear. * Installers Tip: Once water looks clear, hold your hand under the flow- ing water.
- Page 5 Valve to Mineral Tank Step 6 – Plan Your water Softener system Location Plan where to position your water softener system: 1. Position 5 ft. from power source to oper- 2. Requires water drain for disposing of water 3. Requires access to home’s main water line Step 7 –...
- Page 6 Flow Direction of Service Mode Bypass Mode If your Carbon or Resin tank are not level. You can bear hug it, lift it a few inches and drop. Our bas- es are able to be leveled on uneven surfaces. Water Flow Shut-Off Water Flow Valve...
- Page 7 Brine Well Brine Line BRINE TANK Step 3a. The Brine Tank does its job depending on how you program your Fleck 5600sxt head. The Brine Tank uses common salt to create this brine (Side View) solution. In normal operation, hard water...
- Page 8 Meter & Valve Assembly Step 4 – Connect Bypass to Fleck Meter 1. Apply silicone lube to the 2 ‘o’-rings on the valve and make connection. We also recom- mend applying silicone to the inside of the female end on the bypass valve. 2.
- Page 9 Attach Tank Lines Step 6 – Attach Drain Line to Fleck Meter 1. Wrap threaded connection point with 3-4 wraps of Teflon tape. Install provided plastic barbed fitting. 2. Install drain line (not included) to barbed fitting (found on Fleck valve) with a stainless hose clamp (not included).
- Page 10 Step 11 – Connect Meter to Power Source 1. Plug in the Fleck 5600sxt digital meter to a power receptacle. Your power source should be less than 5 feet in distance from the Fleck meter.
- Page 11 Programming Step 1 – Confirm All Product Components 1. Add 3 bags of salt pellets or rock salt along with 5 gallons of water to the brine tank. **Add only 2 bags if using a SPACE SAVER system. **Note during normal operations it is normal for the water level to be anywhere from 1/3 to 2/3 full of water, depending on the salt level at the time of regeneration.
- Page 12 Our company is managed by water professionals with over 25 years of com- bined experience. Our goal is to provide you and your family with the best equipment available in the industry, offer a support experience that is sec- ond to none and have fair pricing that everyone can afford. If you have any questions about which equipment is right for your home, or have installation questions, give us a call.
Need help?
Do you have a question about the Fleck 5600SXT and is the answer not in the manual?
Questions and answers