Table of Contents
Advertisement
INSTALLATION INSTRUCTIONS
(800) 338-3697
www.paceedwards.com
Pace Edwards Company
2400 Commercial Blvd.
Centralia WA 98531
KET1-1707
UltraGroove Electric
Electric Retractable Tonneau Covers
TOYOTA TUNDRA
™
TABLE OF CONTENTS
Tools Required for Assembly ...................................... 1
Before You Start .......................................................... 1
Canister Drain Hole Locations ...................................... 1
STEP 1: Remove From Packaging, and
Review Contents .......................................... 1
STEP 2: Install Wiring Harness ................................... 2
STEP 3: Positioning Canister ...................................... 2
STEP 4: Installing Rails ............................................... 3
STEP 5: Installing The Top Cover ................................ 4
STEP 6: Installing The Clamp Extensions ................... 5
STEP 7: Installing The Clamps .................................... 6
STEP 8: Installing Tailgate Draintubes ....................... 8
STEP 10: Connecting the Electronics .......................... 8
STEP 11: Installing Canister Drain Tubes..................9
STEP 12: Release Handle Instructions....................10
Maintenance .....................................................10
Release Handle Assembly Maintenance..................10
Warranty Statement.............................................11
Advertisement
Table of Contents

Related Manuals for Pace Edwards UltraGroove Electric KE2051


Summary of Contents for Pace Edwards UltraGroove Electric KE2051
-
Page 1: Table Of Contents
STEP 9: Lubricating and Placing the Sweap Seals ..8 STEP 10: Connecting the Electronics ......8 www.paceedwards.com STEP 11: Installing Canister Drain Tubes……………...9 Pace Edwards Company STEP 12: Release Handle Instructions………………..10 2400 Commercial Blvd. Maintenance ……………………………………………..10 Release Handle Assembly Maintenance…...…………10 Centralia WA 98531 Warranty Statement…………………………………..11... -
Page 2: Tools Required For Assembly
TOOLS REQUIRED FOR ASSEMBLY Tape Measure Side Cut or Needle Nose Pliers Masking tape 3/8” Wrench #2 Phillips Screwdriver Utility Knife 5/32” Allen Wrench 1/8” Allen Wrench Note: There should be no drilling into the truck body needed on most standard or full-size trucks. BEFORE YOU START! Read the instructions carefully before you start. -
Page 3: Step 2: Install Wiring Harness
PACKAGING CONTENTS: Clamp Extensions Canister Drain Top Cover Tubes Foam Complete Tailgate Drain Canister Tubes Assembly Clamp Pack Hardware Top Cover Pack Rails (Left and Right) - In separate box than canister STEP 2: INSTALL WIRING HARNESS (If the optional wire harness Part# BL1120 is used, you may want to tape it to HARDWARE USED: the main harness to ease having to pull them through the bottom of bed separately). -
Page 4: Step 4: Installing Rails
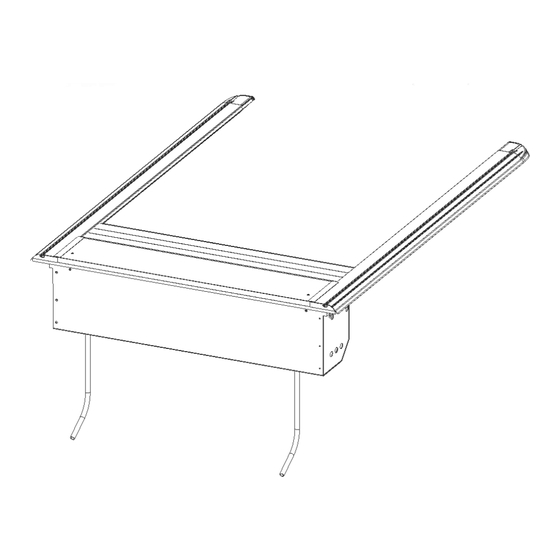
STEP 4: INSTALLING RAILS Remove the protective paper from the foam on the underside of the Rail flanges. This is for packaging purposes only. Next identify the left and right side rails (FIG 4A). The rail flange and foam towards the outside of the truck bed. -
Page 5: Step 5: Installing The Top Cover
Rail Rail Guide Lead Rib FIG. 4E threaded into rail FIG. 4F Then you can thread the Lead Rib into the rail an push the rail forward to the end of the can (FIG 4E &4F). If you have difficulty threading the Lead Rib into the rail, you can gently lift up on the lead rib with your left hand while pushing the rail forward with your right. -
Page 6: Step 6: Installing The Clamp Extensions
FIG. 5E Top Cover Rail FIG. 5D Foam FIG. 5F Next mark where the front of the rails sit and mark this position with masking tape, this will be a guide for placing your foam. (FIG 5D). Now pull the cover back until there is room to apply the foam. Lay the foam on the front sill of the truck from rail to rail, trimming the excess with a utility knife (FIG 5E). -
Page 7: Step 7: Installing The Clamps
TAILGATE END Cab End Location Clamp Extension Tailgate End Rail Location Set Screw Hole FIG. 6D FIG. 6C When you slide your clamp extensions to the desirable Set Screw Access tailgate and cab locations tighten the set screw with a 5/32” allen FIG. - Page 8 PART BETWEEN Part number is on the serial number NUMBER RAILS (BR) label in the upper KE2051 58 13/16 left corner of the KE2052 58 13/16 canister (looking from tailgate). KE2053 58 13/16 FIG. 7C Outside of Truck Bed Rail Rail Track Rail...
-
Page 9: Step 8: Installing Tailgate Draintubes
STEP 8: INSTALLING TAILGATE DRAINTUBES FIG. 8B To install the tailgate drain tubes you need to find suitable holes in the rear stiffener of you truck bed. Figure 8C shows possible hole locations. Next you will screw the drain tube into the drain fitting and slide it on the tailgate cap as shown in Figure 8B. -
Page 10: Step 11: Installing Canister Drain Tubes
STEP 11: INSTALLING CANISTER DRAIN TUBES First, ensure that the Foam Washer is in place on the Drain Fitting as this washer will help prevent water leakage. Next, test fit the drain tube to determine the length you want to trim it. Always caution on the long side. Trim Notch the end that will be inserted through the truck bed using the wire cutters or a Feature... -
Page 11: Step 12: Release Handle Instructions
STEP 12: RELEASE HANDLE INSTRUCTIONS If power is lost to the Ultragroove Electric unit or the electric drive system fails to operate and you have to use the cover right away you can do the following to open or close the cover: 1. -
Page 12: Warranty Statement
CLAIMS: If you have any warranty issues, please contact Pace Edwards Technical Support at (866) 419-4932 with the original Bill of Sale, the Unit Model and Serial Number. After determining the validity of the warranty claim, Pace Edwards will ship a replacement part prepaid to the customer. Labor costs to replace defective parts are the responsibility of the purchaser.
Need help?
Do you have a question about the UltraGroove Electric KE2051 and is the answer not in the manual?
Questions and answers