
Related Manuals for Wheatstone LXE 5


Summary of Contents for Wheatstone LXE 5
-
Page 1: Quick Start Guide
L X E Digital Control Surface Quick Start Guide WheatNetIP LXE Surface Setup GUI 1.6.3 and higher 600 Industrial Drive, New Bern, North Carolina, USA 28562... -
Page 2: Installation And Configuration
Installation and Configuration Introduction Wheatstone’s new LXE console brings control surface configuration to a new level. Going far beyond the usual “any source to any fader” network concept, the LXE is a fully flexible control interface, where every switch, fader, and rotary control is programmable to perform any available function. -
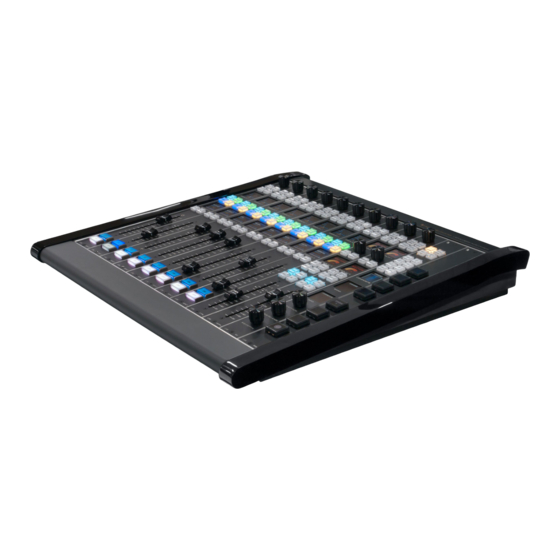
Page 3: Control Surface Placement
Q U I C K S T A R T G U I D E Control Surface Placement The LXE modular control surface is designed for countertop mounting or drop-in installation in counter top. Although the rubber feet on the bottom keep the surface from being easily moved when simply placed on the counter, pre-drilled holes have been provided so that screws may be used to mount the surface securely to the countertop. - Page 4 44" - 29 - POS. FRAME (shown on drawing) 50-1/16" - 33-POS. FRAME 56 -1/16" - 37-POS. FRAME 68-1/8" - 45-POS. FRAME 4-27/32" 4-5/16" LXE 5/9/13/17/21/25/29(shown on drawing)-POS. FRAME 4 HOLES D=3/16" 18-7/32" 21-17/ 32" 21-17/ 32" USE #8 SCREWS TO ATTACH TO COUNTER 12"...
- Page 5 50-1/16" - 33-POS. FRAME 56 -1/16" - 37-POS. FRAME 68-1/8" - 45-POS. FRAME 2-11/32" 2-7/8" LXE 5/ 9/13/17/21/25/29(shown on drawing)- POS. FRAME 4 HOLES D= 3/ 16" 18-7/ 32" 20-3 /8" 12" USE #8 SCREWS TO ATTACH TO COUNTER 4-3/ 8"...
-
Page 6: Power Supply
Rear view of the PS-1600 rackmount power supply The LXE control surface is powered by a Wheatstone Model PS-1600 If failsafe redundant sup- rackmount power supply. This unit occupies a single 19” wide rack space. plies have been ordered, you will be installing two Convection cooled, it requires ample ventilation space above and below it. -
Page 7: Failsafe Dual Redundant Supply
Failsafe Dual Redundant Supply Wheatstone failsafe power supply systems use two PS-1600 power supplies for each piece of powered equipment. Though either is capable of running a full load on its own, in failsafe operation both units run in tandem: if one fails, the other takes over, assuring uninterrupted operation. -
Page 8: Getting Started
Q U I C K S T A R T G U I D E Energizing Assuming the LXE control surface mainframe is properly placed and it’s PS-1600 power supply (or supplies) are correctly rack mounted and connected to the control surface, you may now energize the rack mount power supply by plugging it into the AC mains. -
Page 9: Button Navigation
Q U I C K S T A R T G U I D E Button Navigation The LXE GUI features a “button” navigation architecture to easily access features with a minimum number of clicks. This section introduces you to the buttons; detailed function information is included in the module sections. -
Page 10: Network Settings
When the surface boots, it enters user profile that was last accessed. Look in the lower right of the screen, under the Wheatstone LXE logo to see the current user profile. From the Factory the user Default will be loaded. - Page 11 Q U I C K S T A R T G U I D E LXE Modules Quick Start - page 10 LXE / Feb 2018...
- Page 12 Q U I C K S T A R T G U I D E By now you have read that the LXE is fully customizable. Each encoder, button, and screen can be programmed to any desired function. This is great news, as your mixing surface will not have the limiting factors as in the past.
-
Page 13: Input Module
Q U I C K S T A R T G U I D E Input Module The LXE features a new design for input modules. The new design incor- porates a rotary encoder on each input panel, 2 full color OLED displays to give operators quick at a-glance information about Program, Aux and Mix Minus assignments, Stereo Position, Source Selection, cue status and more. -
Page 14: Channel Select
Q U I C K S T A R T G U I D E A typical Input Source screen is shown below followed by descriptions for each of the functions. Channel Select The input fader number for which the set button is pressed is displayed here. You may also navigate to other input fader by clicking on the grey CHANNEL SELECT button. -
Page 15: Source Window
Q U I C K S T A R T G U I D E Source Window The source box on the input screen shows you the current source assigned to that fader. Clicking in the SOURCE field on the LXE Surface GUI screen opens the INPUT SOURCE SELECTOR window. - Page 16 Q U I C K S T A R T G U I D E MONO – Selects mono mode. If a stereo source is selected it is summed to mono and reduced by 6dB. LEFT (left only) – Passes only the left channel of a stereo source to both L and R. RIGHT (right only) –...
-
Page 17: Cue Button
Q U I C K S T A R T G U I D E OLED Displays The LXE Surface features two color OLED Displays. As with everything on the LXE, these displays can be customized as to what they will display to the user. From the Factory these will display the following: OLED DISPLAY 1 Input Assignments: Fader number, AUX, MXM, and PGM assigns,... - Page 18 Q U I C K S T A R T G U I D E Channel ON Button The channel ON switch turns the channel signal ON and fires any channel ON (START) logic mapped to the fader’s source signal. By default the Machine Start LIO function is disabled.
-
Page 19: Output Section
Q U I C K S T A R T G U I D E Output Section Each LXE control surface has two Monitor modules, and one Studio module. There are two Studio module types, either can control any of the Monitor feeds. Additional Monitor and Studio Modules can be added if needed. - Page 20 Q U I C K S T A R T G U I D E The Aux SEND LED indicators are displayed on the meterbridge, and additionally in OLED DISPLAY 1. Pressing the AUX/MXM button in the LXE Surface GUI switches the screen to the AUX and MIX MINUS MASTERS screen with four AUX MASTERS level controls and ON buttons.
-
Page 21: Source Select
Q U I C K S T A R T G U I D E MXM Talkback To interrupt a mix‑minus output with the surface’s predefined talkback signal, press any of the four MXM TB momentary switches located on the second Control Room module. Note that the Talkback source, typically a host mic, must first be cross connected to the surface’s TB input using either Navigator software or the LXE’s built in Route function. - Page 22 Q U I C K S T A R T G U I D E SET Button on Monitor 1 Module Allows setting Sources to the EXT Destinations. Used in Conjunction with the Rotary Encoder Source Select above it. Ext 1 and Ext 2 on Monitor 1 Module Use to assign Ext 1 or 2 to the Monitor 1.
- Page 23 Q U I C K S T A R T G U I D E Studio 2 OLED Display 3 Displays Monitor Source and Volume level. Studio TB and Dim Buttons on Studio 1 and 2 Modules TB Switch puts TB Source into the Studio 1 Monitor Destination DIM Switch Dims the Monitor Destination while selected.
- Page 24 Q U I C K S T A R T G U I D E Optional LXE Modules EQ/ Dynamics Module This optional module allows you to set and control Fader EQ and DYNAMICS settings without the need to have or use the Surface GUI Screen to apply the settings.
- Page 25 Q U I C K S T A R T G U I D E SW 24 Module Another optional module is the SW 24 for the LXE surface. It contains 3 Banks of 8 buttons each for a total of 24 Programmable Buttons. These buttons are configured in the LXE Surface Setup GUI.
- Page 26 Q U I C K S T A R T G U I D E Meters The METERS section consists of up to of five VU meter pairs on the control surface’s meterbridge. VU Meter Pairs VU meter pairs (PROGRAM, AUDITION, AUXILIARY, OFFLINE and SWITCHED) are stereo LED bargraph type meters.
- Page 27 AUX and Mix Minus Send Meters Meter Labels Current Running Event Custom Names applied in the LXE Surface Setup GUI. Program Meters Clocks and Timers Ext 1 and 2 Sources Loudness Meters Click to change Source assigned to External 1 ans 2 Destinations. User and Layer Selection Navigation Buttons Monitor Meters for Output Modules...
- Page 28 Current Event - Last event taken. Event Recall Select from available events. To load an event, select from the list, click Arm, then Take. Click UNDO to go back to the Previously loaded Event. Event Editor This section allows you to: Create a NEW event.
- Page 29 AUX MASTERS Section – Separate MIX MINUS MASTERS Section – ON/OFF and Master volume for Master volume and control for Mix each Aux bus. Minus Busses. Mix Minus Pre Fader and Pre 0n Controls – Select the appropriate buttons to allow the Mix Minus busses to be either Pre Fader, Pre ON or BOTH.
- Page 30 DESTINATIONS Section – List of SOURCES Section – List of Sources Destinations signals based on vis- signals based on visibilities set in the ibilities set in the Surface Setup GUI. Surface Setup GUI. TAKE Button to execute a route change. X/Y ROUTER Button selected LXE X/Y Router Screen Quick Start - page 29...
- Page 31 Aux Bus Assignment – Assignment of Source to Aux Bus 1-4 with Options for STEREO, MONO, LEFT, RIGHT, 5.1, PRE FADER, PRE ON, and ON Controls. On Screen Fader will control level from selected fader to Aux Bus. Channel Select – Shows Channel Source –...
- Page 32 Expander and Compressor Controls Output Level Fader – Can be set by entering values or by selecting parameter and moving bar in the graph using mouse, on screen fader, or touchscreen gestures. Expander IN Compressor IN Threshold Attack Timing Ratio Release Timing Depth Threshold...
- Page 33 Channel Select – Used to select Source Field – Will display Channel to apply EQ settings. Source assigned to Channel selected. EQ Graph – Graphical Representation of EQ Level Fader – Changes EQ parameters. color based on the Band Parameters can be modified using touch selection.
- Page 34 List of Saved Presets available to recall. Channel Select – Shows selected channel. Source – Shows source connected to selected fader. Preset – Shows currently loaded preset if any. Recall a Preset – Select from the list of saved presets and apply to currently selected input fader or all input faders.
- Page 35 Use this button to load Custom Screen Builder screens to the LXE Surface GUI. LXE Custom Screen Quick Start - page 34 LX-E / Feb 2018...
-
Page 36: Installation Media
Your system shipped with an USB with the LXE Surface Setup GUI installation package on it. If you did not receive or cannot locate the installation media, please contact Wheatstone Technical Support to obtain a download link. Software Installation Pre Requisites Windows 7 or later PC. - Page 37 Q U I C K S T A R T G U I D E Install LXE Surface Setup GUI Locate the Install Package from the shipped media or download. Double Click the WnetIP_LXE_Surface_Setup_GUI_X_XX_X.exe where, X repre- sents the version of the software, to start the Installation Routine. Click the I Agree button to accept the License Agreement.
- Page 38 Q U I C K S T A R T G U I D E Click Next to Install the Selected Components. Verify the installation directory. Click Install to continue. Quick Start - page 37 LXE / Feb 2018...
- Page 39 Q U I C K S T A R T G U I D E When the Installation steps are completed, click Close to finish and close the installer. Launch the LXE Surface Setup GUI When you launch the LXE Surface Setup GUI, you will be present with this screen. For the purpose of this Guide choose Synch from LXE Surface Option.
- Page 40 Q U I C K S T A R T G U I D E In this case, we are connecting to a surface that has a factory default IP and configu- ration settings. This option allows us to retrieve this information from the surface, and allow you to make necessary changes to fit your installation.
- Page 41 Q U I C K S T A R T G U I D E As you can see, there are many menus, and tab options for the LXE Surface Setup GUI. The LXE Surface Setup GUI part of the manual will cover these in detail. For the purpose of this Quick Start Guide, we just need to know how to change the IP address, add the associated panel hosts, and give this Surface a name so that it is later easily identified in the system.
- Page 42 Q U I C K S T A R T G U I D E You can click the Triangle to expand the information list for each panel. If you do not have any panel hosts in the right hand pane, click each one in the available pane to place it in the Surface panels pane.
- Page 43 Q U I C K S T A R T G U I D E Click the Ping (or Refresh) Button to get a list of WheatNet-IP devices on the network. Note that if you are on your main WheatNet-IP network you might get a long list of blades, surfaces, and other WheatNet-IP devices, in addition to the LXE Surface Host and Panel Hosts.
- Page 44 Q U I C K S T A R T G U I D E To confirm the IP address has changed, click the Refresh Button. (or Clear, then Ping on older versions). Note that now the IP has changed, the Module Panels are still associated with the old Surface Host IP.
- Page 45 Q U I C K S T A R T G U I D E Once restarted, clicking the Refresh (Clear and Ping) should return a list with the new information correctly displayed for the new IP. Now if you take a look at the status bar in the lower left part of the screen, the GUI will still show the Disconnected/Connecting Status.
- Page 46 Q U I C K S T A R T G U I D E Engine Blade Association At this point, if you have not added your LXE Engine Blade to a Blade Network, you should do that now. Give it an ID and IP Address and connect it to the main WheatNet-IP Network.
- Page 47 Q U I C K S T A R T G U I D E Once this step is complete we can now tell the Surface which Engine (host blade) to connect to. Click the Global Options Tab in the Primary Mix Engine Blade Info section. These fields may either be blank or have incorrect Blade ID and IP address.
- Page 48 Q U I C K S T A R T G U I D E In order to assign sources, we need to set Visibilities in the LXE Surface Setup GUI so that the sources can be browsed on the LXE Surface and the LXE Surface GUI. To set visibilities: •...
Need help?
Do you have a question about the LXE 5 and is the answer not in the manual?
Questions and answers