dji Mavic 2 Pro Quick Start Manual
Hide thumbs
Also See for Mavic 2 Pro:
- Quick start manual (84 pages) ,
- User manual (69 pages) ,
- Quick start manuals (13 pages)
Advertisement
Mavic 2 Pro Quick Start Guide
V1.0 2018.07
Aircraft (L1P)
TM
TM
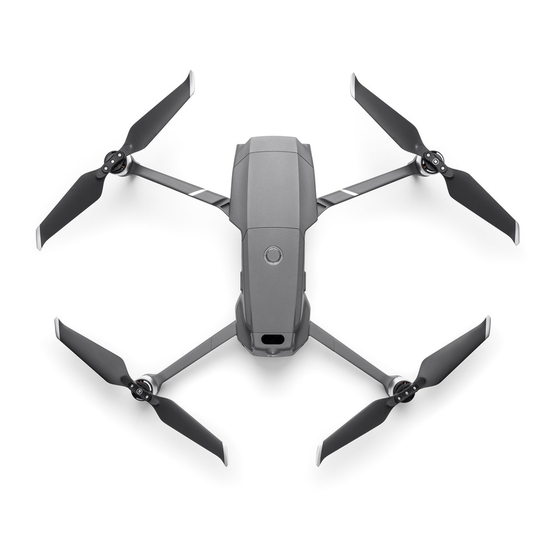
The DJI
MAVIC
2 Pro features Omnidirectional Obstacle Sensing, an Infrared Sensing System
and a fully stabilized 3-axis gimbal with a 1" CMOS sensor camera that shoots 4K video and 20-
megapixel photos. DJI signature technologies such as Obstacle Avoidance and Intelligent Flight
Modes like HyperLapse, ActiveTrack
Systems, help you capture complex shots effortlessly. The Mavic 2 Pro boasts a maximum flight
speed of 44.7 mph (72 kph) and a maximum flight time** of 31 minutes.
1.
Gimbal and Camera
2.
Forward Vision System
3.
Downward Vision System
4.
Lateral Vision System
5.
Downward Infrared Sensing System
6.
Fill Light
7.
microSD Card Slot
8.
Front LEDs
9.
Motors
10. Propellers
11. Antennas
12. Aircraft Status Indicator
TM
2.0, QuickShot, Panorama, and Advanced Pilot Assistance
*
,
Advertisement
Table of Contents

Related Manuals for dji Mavic 2 Pro


Summary of Contents for dji Mavic 2 Pro
- Page 1 Modes like HyperLapse, ActiveTrack 2.0, QuickShot, Panorama, and Advanced Pilot Assistance Systems, help you capture complex shots effortlessly. The Mavic 2 Pro boasts a maximum flight speed of 44.7 mph (72 kph) and a maximum flight time** of 31 minutes.
- Page 2 5 mi (8 km) and displaying video from the aircraft to the DJI GO 4 app on your mobile device at up to 1080p. An on-board LCD screen gives real-time aircraft data information and the detachable control sticks make the remote controller easier to store.
-
Page 3: Specifications
1. LCD Screen 2. Flight Pause Button 3. 5D Button 4. Control Sticks 5. Removable Power Button 6. Antennas 7. RTH Button 8. Control Sticks Storage Slot 9. Reserve Video-Downlink Port (USB) 10. Mobile Device Clamp 11. Flight Mode Switch 12. - Page 4 Operating Frequency 2.4-2.4835 GHz; 5.725-5.850 GHz Gimbal Controllable Range Pitch: -90° to +30° Yaw: -90° to +90° Camera Sensor 1’’ CMOS; Effective pixels: 20M Lens FOV: approx. 77° 35mm format equivalent: 28 mm Aperture: f/2.8-f/11 Focus: 1 m to ∞ ISO Range Video: 100-6400 Photo: 100-3200 (auto);...
- Page 5 ※ This content is subject to change without prior notice. Download the DJI GO 4 App and Watching Tutorial Videos Search “DJI GO 4” in the App Store or Google Play or scan the QR code below to download the app on your mobile device.
-
Page 6: Preparing The Aircraft
Preparing the Aircraft 1. Remove the gimbal cover from the camera. 2. Match the propellers to motors. Marked Unmarked 3. Press the propellers down firmly and rotate in the lock direction. 4. Unfold the front arms and the propellers. 5. Unfold the rear arms and the propellers. 6. -
Page 7: Charging The Batteries
Charging the Batteries Use the provided charger to fully charge the Intelligent Flight Battery before first use. Remove the Intelligent Flight Battery Charging Time: Charging Time: ~1 hour 30 minutes ~2 hour 15 minutes Remove the remote controller cable before charging. -
Page 8: Preparing The Remote Controller
Checking the Battery Levels and Powering On/Off Press once to check the battery level. Press, then press and hold to turn on/off. Press once to check the battery level on the LCD screen. Press once, then press and hold to turn on/off the remote controller. Preparing the Remote Controller 1. -
Page 9: Preparing For Takeoff
2. Place one end of the RC cable to the end of the slot. 3. Attach your mobile device within the clamps. Ensure the control sticks are firmly mounted. The remote controller cable with the Lightning connector is mounted by default. Use the appropriate cable for your mobile device to connect to the remote controller. - Page 10 3. Launch DJI GO 4 Flight Before taking off, make sure the Aircraft Status Bar in DJI GO 4 displays “Ready to Go.”...
- Page 11 TapFly Cinematic Mode Watch the tutorials in DJI GO 4 or at the official DJI website to learn more. Always set an appropriate RTH altitude before takeoff. When the aircraft is returning to the Home Point, you should guide it with the control sticks.
- Page 12 Fly Safe...
-
Page 13: Compliance Information
第十四條 低功率射頻電機之使用不得影響飛航安全及干擾合法通信; 經發現有干擾現象時, 應改善至無干擾時方得繼續使用。前項合法通信,指依電信法規定作業之無線電通信。低功 率射頻電機須忍受合法通信或工業、科學及醫療用電波輻射性電機設備之干擾。 EU Compliance Statement: SZ DJI TECHNOLOGY CO., LTD. hereby declares that this device is in compliance with the essential requirements and other relevant provisions of the Directive 2014/53/EU. A copy of the EU Declaration of Conformity is available online at www.dji.com/euro-compliance... - Page 14 Indirizzo di contatto UE: DJI GmbH, Industriestrasse. 12, 97618, Niederlauer, Germany Déclaration de conformité UE : Par la présente, SZ DJI TECHNOLOGY CO., LTD déclare que cet appareil est conforme aux principales exigences et autres clauses pertinentes de la directive européenne 2014/53/EU...
- Page 15 ISED This device contains licence-exempt transmitter(s)/receiver(s) that comply with Innovation, Science and Economic Development Canada’s licence-exempt RSS(s). Operation is subject to the following two conditions: (1)This device may not cause interference.(2)This device must accept any interference, including interference that may cause undesired operation of the device. L’émetteur/récepteur exempt de licence contenu dans le présent appareil est conforme aux CNR d’Innovation, Sciences et Développement économique Canada applicables aux appareils radio exempts de licence.
- Page 16 -- Reorient or relocate the receiving antenna. -- Increase the separation between the equipment and receiver. -- Connect the equipment into an outlet on a circuit different from that to which the receiver is connected. -- Consult the dealer or an experienced radio/TV technician for help. This equipment complies with FCC radiation exposure limits set forth for an uncontrolled environment.
Need help?
Do you have a question about the Mavic 2 Pro and is the answer not in the manual?
Questions and answers