
Related Manuals for Lithium Cycles Super 73 SG

Summary of Contents for Lithium Cycles Super 73 SG
- Page 1 2018 v.13 User manual Assembly, maintenance and warranty Original Instructions (English) Model: Super 73 S series...
-
Page 2: Welcome
The information contained in this publication is based on the latest information available at the time of printing. Lithium Cycles reserves the right to make changes at any time without prior notice, or obligation. This is not to be reproduced wholly or in part without the written permission of Lithium Cycles. -
Page 3: Table Of Contents
TABLE OF CONTENTS Welcome Preamble General Information Legal Requirements - Registration Intended Use 8 Diagram of a Super 73 S 9 Included tools and hardware 10 Tools 11 Assembly Instructions 35 Before the first ride 36 Operating the bike 37 Lights 38 Maintenance Schedule 39 General Warnings - Wet weather... -
Page 4: Preamble
PREAMBULE Super 73 electric bikes purchased in Europe and sold for use in Europe (models Super 73 SG and SG1) have been tested, certified and are conform to security requirements of EPAC (Electric Power Assisted Cycle) according to EN 15194, have a maximum speed of 25 km/h and a 250 Watt motor power output. -
Page 5: General Information
If you feel uncertain about proper configuration after assembling your Super 73 according to this manual, please contact your specialized retailer or Lithium Cycles directly. We will help you willingly. We wish you a great adventure with your new Super 73! -
Page 6: Legal Requirements
LEGAL REQUIREMENTS Please check your country or state’s regulations on electric bikes before riding. There are variations on age limit, speed, motor wattage and road accessibility. In most European countries and Australia, the rules of public traffic valid for bicycles also apply to e-bikes traveling up to 25 km/h. -
Page 7: Intended Use
INTENDED USE Your Super 73 electric bike is designed for the use on roads and paved paths only. You should therefore never ride on stairs, jump or perform wheelies or similar activities. Super 73 electric bikes are not approved for participation in competitions. Commercial use does not form part of the intended use. -
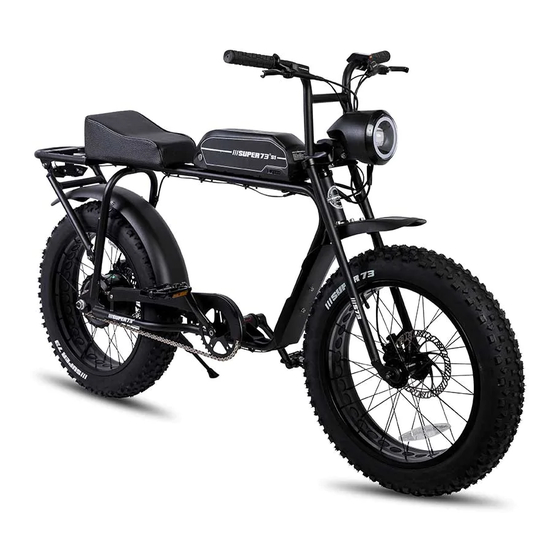
Page 8: Diagram Of A Super 73 S
DIAGRAM OF A SUPER 73 S All-terrain (knobby) tires Fenders Battery Top fork section and handlebars Cargo rack Steering Seat tube with triple tree fork Chain guard Lower fork section Dropouts Brake discs Pedals... - Page 9 IN THE PACKAGING 1 x lithium-ion battery 2 x keys for the battery 1 x battery charger 1 x bike frame and fork 1 x pack of small hardware for assembly 1 x user manual 1 x set of assembly tools PROVIDED HARDWARE Part Hardware...
-
Page 10: Tools
Lithium Cycles reserves the right to make changes at any time without prior notice, or obligation. For the latest updates, assembly instructions or information on components, please visit our website: www.lithiumcycles.com/pages/owners... -
Page 11: Assembly Instructions
ASSEMBLY INSTRUCTIONS VIDEO View our assembly video to follow step-by-step instructons on our website (www.lithiumcycles.com) or our YouTube channel: https://www.youtube.com/super73 LET’S START: You’ll need a second person to help unpack and assemble your Super 73. ACTION: Open the packaging with caution. Unpack your Super 73 over a large flat clean area, with a padded or soft surface like carpet to place bike parts without damaging them. - Page 12 ACTION: Remove the frame from its packaging. Stabilize the bike upright on the kickstand. Then, remove the battery off of the controller by sliding it horizontally towards the seat. CHARGE THE BATTERY Remove the battery from the main frame. Two keys are supplied to unlock and lock the battery. 1.
- Page 13 ACTION: Set aside the top half of the fork and the front wheel, remove both from their packaging. ACTION: Inflate both the front and rear tires. Use this diagram as a guide to help you seat the bead of the tire properly onto the lip of the rim.
- Page 14 ACTION: Inflate the tires Tires must be inflated with a pump with a Schrader valve tip with a recommended pressure of between 20 and 30 psi (1.37 and 2 bars). The maximum pressure is 35 psi / 2.41 bar. Check the condition of the tires and rims for damage, cracks or deformation.
- Page 15 Be sure to take attention to the directional arrow on the rotor. This arrow should be pointed in the same direction as the wheel spins during operation. ACTION: Loosen the front wheel axle nuts in preparation for installation.
- Page 16 ACTION: If your bike has hydraulic brakes, remove the brake pad spacer before attaching the front wheel. Insert the front axle into the front dropouts. Make notice of the front rotor, as it has to seat properly into the front brake caliper. The washer should be on the inside of the frame, between the inner hex nut and the frame.
- Page 17 Your bike should look like this. ACTION: Remove the middle triple tree bolt and set aside with the others. HARDWARE: #2 (8” Adjustable crescent wrench) & #3 (8mm Hex wrench)
- Page 18 ACTION: Remove (A) Head tube shipping plug and discard it. This is only necessary when the top half of the fork is removed. It helps stabilize the fork assembly. ACTION: Lift the rear end of the bike, pivoting it on the kickstand. This will help prevent separation of the headset components during the next step.
- Page 19 ACTION: Remove (B) steer tube bolt and (L) steer tube spacers. Hold the bottom of the tube to keep the parts from separating. Have a second person help to lift the rear end of the frame to keep the headset pieces in place. Keep a hand under the steering tube so that the assembly stays in place.
- Page 20 ACTION: Insert the handle bars/upper fork half into the lower fork half. A little wiggling of the fork is necessary as this is a precise and tight fit. This is the part of the assembly that can be fairly diffi- cult and a little force is required.
- Page 21 ACTION: Install and lightly tighten the outer two triple tree bolts that were previously set aside in step 11. Use the washers with the bolts below the bracket. HARDWARE: #2 (8” Adjustable crescent), #3 (8mm Hex wrench), C (Triple tree bolts), D (Triple tree lock nuts) &...
- Page 22 ACTION: Take the third triple tree bolt and the front light (if included in your model). Insert the triple tree bolt into the light bracket. HARDWARE: C (Triple tree bolt) ACTION: Insert bolt into the front center triple tree hole. Lightly install lock washer and nut. HARDWARE: C (Triple tree bolts), D (Triple tree lock nuts) &...
- Page 23 ACTION: Fully tighten triple tree bolts. The fork should now look like this. HARDWARE: #2 (8” Adjustable crescent) & #3 (8mm Hex wrench) ACTION: Fully tighten the steering tube bolt. Rotate the handle bars to make sure the bolt is not too tight.
- Page 24 Tighten all triple tree bolts. Your bike should now look like this:...
- Page 25 ACTION: Adjust the display/throttle to desired angle and tighten. HARDWARE: #6 (3mm Hex wrench)
- Page 26 BRAKES Go to www.lithiumcycles.com/pages/owners for videos and tutorials on brake adjustment Depending on your bike model, you may have mechanical brakes or hydraulic brakes. They look like these be- low. Follow the instructions according to the model you have: STEP 19 Mechanical brakes assembly, go to Mechanical brake lever Mechanical brake rotor...
- Page 27 ACTION: Adjust brake levers to desired angle and tighten. HARDWARE: #4 (5mm Hex wrench) ACTION: Install brake lines into corresponding brake levers. The REAR wheel brake line goes to the LEFT brake lever, and FRONT wheel brake line goes to the RIGHT brake lever.
- Page 28 ACTION: Line up the slots on the brake lever quick adjust screw. Insert the brake line through the slot. Twist the quick adjust screw to tighten the cable in. Brake cables wear out over time. It is therefore essential to maintain them well and replace them when needed. ACTION: Tighten the brake calipers using (4) 5mm Hex Wrench.
- Page 29 ACTION: First unwrap the brake lines and wires from the frame. Adjust brake levers to desired angle and tighten. HARDWARE: #7 (4mm Hex wrench)
- Page 30 WIRING HARNESS ACTION: Connect the wiring harness plugs into their corresponding connectors. (RED TO RED, YELLOW TO YELLOW, BLACK TO BLACK) The pins in these connectors are very sensitive. Line up the arrows to ensure that you do not break the pins. Controller cable ACTION: Rear brake cable*...
- Page 31 Your cable guide clips should be ACTION: Use the provided cable guide clips to secure the torque secure and look like this. sensor and motor cables. HARDWARE: (I) Cable guide clips ACTION: Attach harness cable to the cable guides shown below. Keep the zip ties slightly loose until the cable is in the correct spot and then tighten.
- Page 32 Proper configuration of cables with hydraulic brakes.
- Page 33 Proper configuration of cables with mechanical brakes.
- Page 34 ACTION: Install and tighten the pedals. Look for a small L/R on each pedal and make sure you install the left pedal on the left crank, the right pedal on the right crank. The right pedal is screwed on in a clockwise direction. The left pedal is screwed on by turning it counter-clockwise.
-
Page 35: Before The First Ride
BEFORE THE FIRST RIDE If you have purchased your bike from a specialist dealer, they must provide the electric bike in a condition ready to ride in order to ensure safe operation. The dealer must perform a final inspection and a test ride. DANGER! Make sure the brakes have already been applied prior to getting on to your bike. -
Page 36: Operating The Bike
OPERATING THE BIKE DANGER! Batteries that have not been fully inserted and locked can come loose during a ride and fall out. This can cause a crash and damage the battery. 1. INSERT THE BATTERY A. Make sure the battery is fully charged (the LED on the charger should be green). -
Page 37: Lights
4. TURNING ON THE LIGHTS To turn on your headlight and rear lights, if you have a US bike model, tap the light/power button once. Do the same to turn them off. If you have a European bike model, press on the up arrow to turn the lights on and off. -
Page 38: Maintenance Schedule
MAINTENANCE SCHEDULE In order to prolong the life expectancy of your bike, here is an example of a maintenance schedule, in the case of regular use, that we recommend following: 1. Before & after each outing - Check the brakes - Check the tire pressure and any damage - Check the alignment of the wheels - Check that the battery is locked on the frame... -
Page 39: General Warnings
GENERAL WARNINGS Like any sport, cycling involves risk of injury and damage. By choosing to ride a bicycle, you assume the responsibility for that risk. You need to know and practice the rules and safety regulations of riding this bicycle. Proper use and maintenance of your bicycle reduces risk of injury. -
Page 40: Safety / Notes
Do not remove front, rear or pedal reflectors. • Be familiar with your local e-bike laws. • Any after-market changes to your Super 73 bike not expressly approved by Lithium Cycles could void the warranty and create an unsafe riding experience. -
Page 41: Maintenance And Components
Lithium Cycles recommends 1.4 - 2 bar (20-30 PSI) (max: 35 PSI, 2.4 bar) for the front and rear tires on the Super 73. The minimal tightening torque of the wheels is 33.89 (Nm) or 25lb/ft. -
Page 42: Brakes
DANGER! We recommend using our recommended brand of spare parts, or the original manufacturer parts for replacement of used components. BRAKES See video on our website on how to adjust: www.lithiumcycles.com/pages/owners or Tektro brake adjustment manuals on www.tektro.com For optimum braking performance, Super 73 bikes are equipped with Tektro mechanical or hydraulic disc brakes. -
Page 43: Battery
Warning - Do not adjust the cable tension only to compensate pad wear. - After you replace with new pads, check to see if the rotor and pads have contact with each other. If so, go back to step 1 and 2 to adjust until a 0.3 mm clearance is visible. The Tektro warranty Super 73 brakes are from the Tektro brand. -
Page 44: Lighting System
E-Bike immediately after installing the battery. The power consumption warms the battery and you benefit from a good battery life, even when it is cold outside. • In winter however, plan for shorter trips or pedal with a lower level of assistance. Tips for Maximizing Range: •... -
Page 45: Warranty
United States of America (plus Hawaii and Alaska), and remains there. No vendor or distributor may change the terms of this warranty unless the vendor or distributor replaces the Lithium Cycles warranty terms with its own warranty terms on the company’s letterhead. This warranty does not cover: •... - Page 46 • Additionally, this warranty does not cover damage associated with commercial use. • If electrical parts have been repaired or modified by a person not authorized by Lithium Cycles, all warranties are voided. INFORMATION ON WEAR AND TEAR Some components of your bike are subject to wear owing to their function. The extent of wear depends on the care, maintenance and nature of the use of your Super 73 (mileage, riding in rain, dirt, salt, etc.).
Need help?
Do you have a question about the Super 73 SG and is the answer not in the manual?
Questions and answers