Table of Contents
Advertisement
Advertisement
Table of Contents

Related Manuals for Ardwolf A20


Summary of Contents for Ardwolf A20
-
Page 2: Table Of Contents
Product Introduction ----------------------------------------------1 1. Product Guide --------------------------------------------------------1 2. Brief Introduction ------------------------------------------------------3 Installation -----------------------------------------------------------4 Operation -------------------------------------------------------------7 1. Some Suggestions to Help Capturing the Fingerprint --------------------7 2. Fingerprint Unlocking --------------------------------------------------8 3. Password Unlocking --------------------------------------------------8 4. Mechanical Key Unlocking ---------------------------------------------9 5. Add Users under Normal Mode ---------------------------------------10 6. -
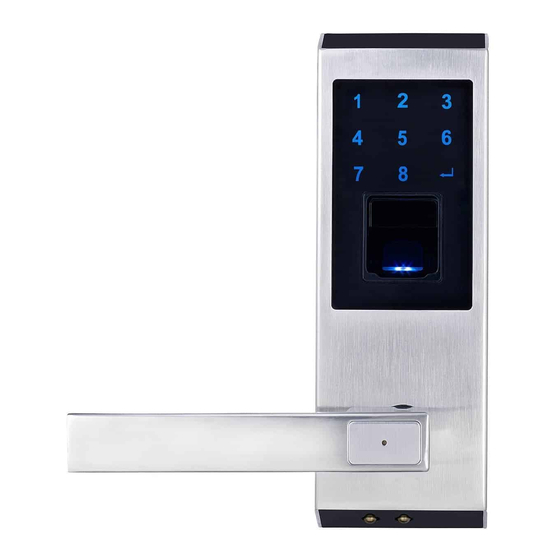
Page 3: Product Introduction
Product Guide Keypad “Delete” button Fingerprint sensor Mini USB port Nixie tube Mechanical key hole “Cancel” button 9V emergency power port “Confirm” button Battery area “Add” button... - Page 4 Product Guide Outside Panel Spindle Inside Panel Screw M4x16 Latch Screw M4x30 Screw for Latch Connection Rod Mounting Plate Strike Plate and Strike Box Mechanical Key...
-
Page 5: Brief Introduction
Brief Introduction There are 99 users available in the lock, which are divided by 2 levers: a) Master Level: Besides unlocking the lock, the master user can add and delete other users. The ID range is from “96” to “99”. b) Normal Level: This level of users only can unlock the lock, which cannot set up the lock or modify the other users. -
Page 6: Installation
Installation Nine times out of ten, an error is the result of an improper installation and/or wiring by the user. If you're not feeling particularly tech savvy, let a professional put it in. 60mm 70mm 4 “ 8 “ 1. Place the template 2. - Page 7 Installation 6. Install the front panel on the door. The cable goes on the top of the latch. 7. Install the base mounting 8. Connect the cable to the inside plate on the door, and fasten panel, and the spindle goes into with screws (M4x30) the hole in the inside handle.
- Page 8 Installation 10. Install the batteries 9. Install the inside panel on the mounting plate, and fasten with screw (M4x16) 11. Replace the battery case cover and fasten with screw. Once finishing the installation, please try to unlock the lock to make sure the installation is successful.
-
Page 9: Operation
Operation Some Suggestions to Help Capturing the Fingerprint When placing the finger on the sensor, please make sure the “core” of fingerprint is staying in the main area of sensor directly with a little bit pressure. Like the pictures show as following: The sensor may not capture the correct fingerprint image if you take the following operations. -
Page 10: Fingerprint Unlocking
Fingerprint Unlocking Place the finger on the sensor, the lock will be activated automatically and started to capture the fingerprint image for identification. Once the identification is passed, the keypad shows “Green” light with sounds, then you can press down the handle for unlocking. -
Page 11: Mechanical Key Unlocking
Random Password Protection For a better security protection to the password user, the lock is designed with a random password protection. You can add any digits before and after the real password. For example, the password is “1234-5678”, you can unlock the lock by inputting the password as following: 1 2 3 4 5 6 7 8 X X X X X X X X 1 2 3 4 5 6 7 8... -
Page 12: Add Users Under Normal Mode
Add Users under Normal Mode 1. Activate the lock 2. Press “+” key to enter 3. Press “+” and “-“ key to select by pressing any key registration state; the ID, then press “OK” to confirm; on the lock; “Green” “Green”... -
Page 13: Add Master User Under Normal Mode
Add Master User under Normal Mode 1. Activate the lock 2. Press and hold “+” key 3. Press “+” and “-“ key by pressing any key for 3 seconds to enter to select the ID, then on the lock; master user registration press “OK”... -
Page 14: Add Normal User Under Security Mode
Add Normal User under Security Mode Master User Authorization 1. Activate the lock 2. Press “+” key to enter 3. Place the master user by pressing any key user registration state; for authorization; on the lock; (the nixie tubes show “AD” for master user authorization) “Green”... -
Page 15: Delete Normal User Under Normal Mode
Delete Normal User under Normal Mode 1. Activate the lock 2. Press “-“ key to enter by pressing any key user deletion state; on the lock; 4. Press “C” to exit 3. Press “+” and “-“ to select the way to delete the user, then press “OK”... -
Page 16: Delete Master User Under Security Mode
Delete Master User under Security Mode Master User Authorization 1. Activate the lock 2. Press and hold “-“ 3. Place the master user by pressing any key key to enter master for authorization; on the lock; user deletion state; (the nixie tubes show “AD” for master user authorization) 5. -
Page 17: Delete Normal User Under Security Mode
Delete Normal User under Security Mode Master User Authorization 3. Place the master 1. Activate the lock 2. Press “-“ key to enter user authorization; by pressing any key user deletion state; (the nixie tubes show “AD” for on the lock; master user authorization);... -
Page 18: Passage Mode
Passage Mode When the lock is required to unlock frequently, set the lock to passage mode can let the people unlock the lock without any identification. Enable the passage mode “Green” 1. Unlock the lock with 2.When the keypad shows 3.Release the “... -
Page 19: Restore The Lock
Restore the Lock When the lock has problems and you can try to restore the lock to solve the problems. 1.The restore key is on the 2.Release the key when hearing back of interior panel, which “beep” sound, then the lock will is in white color. - Page 20 User data back up Mini USB 1.Connect the lock to the computer 2.Open the software “User Copy”; through the USB cable. The nixie tubes show “CO” if the connection is successful. 3.Click “User Backup” and select the direction to save the file, then the user data will be transferred to the computer.
- Page 21 User data recovery Mini USB 1.Connect the lock to the computer 2.Open the software “User Copy”; through the USB cable. The nixie tubes show “CO” if the connection is successful. 3.Click “User Recovery” and select the file in the computer, then the user data will be transferred to the lock.
-
Page 22: Software - Lock Assistant
Software – Lock Assistant With the “Lock Assistant” software, you can set up the lock and download the unlock records. The software only works with Microsoft Windows XP, 7, 8, and 10 systems. Setting This option helps you to check the firmware version in the lock, and set up the time in the lock. Load Current Time: The software will transfer the time in the lock and display in the software;... - Page 23 Users Load all users: download all users in the lock to the computers; Delete Selected User: delete the user; Delete All Users: delete all users in the lock, including the normal users and master users. All user data is only stored in this software. Unlock Records Load all records: download all unlock records in the lock to the computer;...
-
Page 24: Frequently Asked Questions (Faqs) And Troubleshooting
Records Inquiry If you want to track the unlock records for a single user, select the data and the ID, then the unlock records will be shown in the software. Frequently Asked Questions (FAQs) and Troubleshooting Q: How long can the lock operate with a set of batteries? A: The lock can work about 5,000 to 6,000 cycles. - Page 25 Q: I operate the lock normally and it is working well. After some days, the lock has problem and I cannot do anything. A: Try to take out the batteries to make the lock stays without power for 5 minutes, then install the batteries again and check.
Need help?
Do you have a question about the A20 and is the answer not in the manual?
Questions and answers