Table of Contents
Advertisement
Advertisement
Table of Contents

Subscribe to Our Youtube Channel
Related Manuals for Biosan Labaqua Trace


Summary of Contents for Biosan Labaqua Trace
-
Page 3: Table Of Contents
About this edition of user instructions The current edition of user instructions applies to following models and versions of water purification system: Labaqua Trace ................. version V.1A01 Labaqua HPLC ................. version V.1A02 Labaqua Bio ..................version V.1A03... -
Page 4: Safety Precautions
Safety precautions 2.1. Symbols in the user instructions. Caution! Make sure you have fully read and understood the present Manual before using the equipment. Please pay special attention to sections marked by this symbol. Attention! Do not service the unit with a working UV compartment. Otherwise, operator can receive dangerous levels of UV emission. - Page 5 2.5. ELECTRICAL SAFETY Use a power line regulator if the local mains network is susceptible to fluctuations exceeding 10% of the nominal values. Connect only to the mains with voltage corresponding to that on the serial number label. ...
-
Page 6: General Information
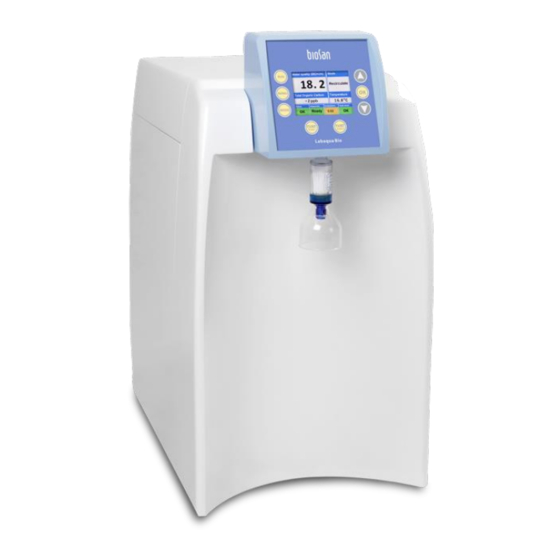
General information Biosan Labaqua is Ultrapure water purification system which requires external water tank that use tap water as feed water (tap water system). There are three models available: Labaqua Trace, Labaqua HPLC and Labaqua Bio. Water purification system Biosan Labaqua produces pure water that complies with ISO 3696 Grade II and Grade I water requirements. - Page 7 1. Power switch (on the back panel) 2. Water access connection (on the back panel). 3. Control panel and display. 4. Filter and clean water dispenser. 5. Pre-filter set, deionization and polish- ing modules (behind side door) Figure 2. Labaqua Trace scheme...
- Page 8 Figure 3. Labaqua HPLC / Bio scheme 3.2. Operation principle. 3.3. The hydraulic diagram of the Biosan Labqua water purification system can be seen in figures 2 and 3. 3.4. The input valve controls intake of feed water from the access. The first cleaning stage is the pre-filter set that uses activated carbon to remove particles, free chlorine, or- ganics and colloids.
-
Page 9: Pre-Installation Requirements
There must be at least one filter on the feedwater access pipe. Filter is available in the local plumber shops or by ordering at Biosan. Figure 4. Filter on the water access pipe. - Page 10 4.5. Feedwater supply connector and drain should be within 3 meters from the unit loca- tion. Attention Please note that if the pre-filter clogs prematurely, such malfunction will be covered by warranty only of the service department receives photographic proof of the particle filter installed in the feedwater ac- cess pipe.
-
Page 11: Getting Started
5.2. Complete set. Package contents: 5.2.1. Standard set: Water purificatiom system, Labaqua Trace/HPLC/Bio ........1 pce. Storage tank Pro ....................1 pce. Pre-filter cartridges ................... 2 pcs. Polishing module ....................1 pce. Deionization module ..................1 pce. - Page 12 5.3.2. Tube connection. Push the tube into the fitting to the stop (fig. 6/a) and tug back to ensure the clamping (fig. 6/b). Figure 6. Connecting tubes 5.3.3. Disconnecting tubes. Ensure that the system is not under pressure. Press the clamp sleeve on the fitting (fig.
- Page 13 Bottom Figure 9. Rear panel. 1. Unit info and serial number. 2. Operation / service socket. 3. Tank water level sensor socket. 4. Mains cable socket and fuse socket. 5. Power switch. 6. Feedwater inlet fitting. 7. Drain fit- ting. 8. Recirculating water inlet fitting. 9. Recirculating water outlet fitting. 5.5.
- Page 14 Figure 11. Polishing and deionization modules. 5.6.1.2 Remove both black corks from the module top. Note. Use the tool for tube detaching (figure 5, right) included in the stand- ard set, for easier operation. Press down the small rubber ring on the fitting with fingers (fig. 12/a) or with the tool (fig.
- Page 15 5.6.1.4 Insert the guide rail in the slot (fig. 14/a). Push both connectors into the fittings on the unit (fig. 14/b) to the stop. Check the connecting fittings for a tight fit. Figure 14. Fitting the module inside the unit. 5.6.1.5 Repeat the operation with the second module.
- Page 16 Figure 16. NPTF ½" to JG ¼" adapter for feedwater. 5.7.2. Connect another ¼" OD tube to the DRAIN fitting on the rear panel (fig. 9/8). Connect the open end of the tube to the drain that is prepared according to section 4. Pre- installation requirements.
- Page 17 5.9. Installation of dispenser filter. 5.9.1. For Trace and HPLC models. Unpack the 0.22 μm dispenser filter (fig. 19/a) and the black sealing ring (fig. 19/b). Screw the filter in the slot below the display so that the ring stays on top of the thread of the filter (fig. 19/c) in the slot as shown on figure 19/d.
- Page 18 5.9.2. For Bio model. Unpack the dispenser ultrafilter (fig. 20/a) and the yellow sealing ring (fig. 20/b). Screw the filter in the slot below the display so that the ring stays on top of the thread of the filter (fig. 20/c) in the slot as shown on figure 20/d. Blue bell cap must cover the dispenser at all times when the water is not being dispensed.
-
Page 19: Operation
Operation 6.1. Open feedwater access (see 4.4). 6.2. Check the power cable for damages and connect the plug to a grounded mains socket. Turn the power switch (fig. 9/6) to I (on). 6.3. After several second of loading, the display shows (figure 21): ... - Page 20 Figure 22. Diagnostics mode. 1. Dispensing volume. 2. Grade I water quality. 3. TOC monitor (HPLC & Bio). 4. Polishing mod- ule status. 5. Water level in storage tank. 6. Pre-filter countdown. 7. Grade II water quality. 8. Deionization module status. 6.6.
- Page 21 Note. You can set the volume by teaching the unit directly. Before dispens- ing, press the up arrow key (fig. 21/9). Parameter Volumetric changes to Teach on a red background on display (figure 25). Dispense the neccessary volume (see 6.10). Unit remembers the dispensed vol- ume and uses it for the next dispensing.
- Page 22 Figure 27. Figure 28. Figure 29. Figure 30. Figure 31. 6.10. Dispensing Grade I water. After rinsing (see 6.6) and filling the tank (see 6.7), remove the bell cap and place the vessel for purified water. Press the Dispense key (fig. 21/4).
-
Page 23: Specifications
+15°C to +30°C (59 to 86 °F) in a non-condensing atmosphere and relative humidity between 20% and 80%. Biosan is committed to a continuous programme of improvement and reserves the right to alter design and specifications of the equipment without additional notice. -
Page 24: Troubleshooting
Replace pre-filters (fig. 15) Replace feedwater access pipe suspended particle fil- Low Pressure stage mode ters (fig. 4) or contact Biosan for a solution Check if solenoid valve is in order, contact Biosan for a solution Error 1 Replace deionization module (fig. 11) Error 2 Replace polishing module (fig. -
Page 25: Care And Maintenance
Care and maintenance 9.1. If the unit requires maintenance, disconnect the unit from the mains and contact Bio- san or your local Biosan representative. 9.2. All maintenance and repair operations must be performed only by qualified and spe- cially trained personnel. - Page 26 9.6.3. Polishing module. To replace, use the tool on figure 5. Put the unit in the OFF stage by pressing the Run key; Open the side door; Insert the tool under the right angle fitting (fig. 33/a) and press down (fig. 33/b); Rotate the fittings inside fig.
- Page 27 Remove the storage tank lid (fig. 10/3) and add hydrogen peroxide solution to the tank so that the finac concentration would be approximately 1% by volume; Caution! 30% hydrogen peroxide solution can damage polypropylene compo- nents. Use appropriate containers and protective equipment when working with unsafe liquids.
-
Page 28: Warranty
To obtain the claim form, visit section Technical support on our website at link be- low. 10.5. Extended warranty. Contact your local Biosan representative or our service depart- ment through the Technical support section on our website at the link below. -
Page 29: Eu Declaration Of Conformity
11. EU Declaration of conformity Unit type Water purification system Models Labaqua Trace, Labaqua HPLC, Labaqua Bio Serial number 14 digits styled XXXXXXYYMMZZZZ, where XXXXXX is model code, YY and MM – year and month of production, ZZZZ – unit number. - Page 30 Biosan SIA Ratsupites 7, build.2, Riga, LV-1067, Latvia Phone: +371 67426137 Fax: +371 67428101 http://www.biosan.lv Edition 1.01 – September 2018...
Need help?
Do you have a question about the Labaqua Trace and is the answer not in the manual?
Questions and answers