Table of Contents
Advertisement
Quick Links
Model/Modelo/Modéle
T2767 & T4767
T2768 & T4768
Series/Series/Seria
Ara
®
Write purchased model number here.
Escriba aquí el número del modelo comprado.
Inscrivez le numéro de modèle ici.
Rough-in mounting / valving required to complete installation
El montaje / la valvulería eléctrico/a oculto/a que se requiere para completar la instalación
Plomberie brute montée/à soupape nécessaire pour terminer l'installation
You may need/Usted puede necesitar/Articles dont vous pouvez avoir besoin:
1/8" (3.17mm)
For easy installation of your Delta
faucet you will need:
• To READ ALL the instructions completely
before beginning.
• To READ ALL warnings, care, and maintenance
information.
• To complete the deck and valve rough-in prior to
installing this trim kit.
Para instalación fácil de su llave Delta
usted necesitará:
• LEER TODAS las instrucciones completamente
antes de empezar.
• LEER TODOS los avisos, cuidados, e
información de mantenimiento.
• Para completar el borde y la instalación de
válvulas dentro de las paredes previa a la
instalación de la llave y sus accesorios.
Pour installer votre robinet Delta
facilement, vous devez:
• LIRE TOUTES les instructions avant de débuter;
• LIRE TOUS les avertissements ainsi que toutes
les instructions de nettoyage et d'entretien;
• Installez le corps du robinet et terminez le
pourtour du bain avant de poser les accessories
de finition.
www.deltafaucet.com
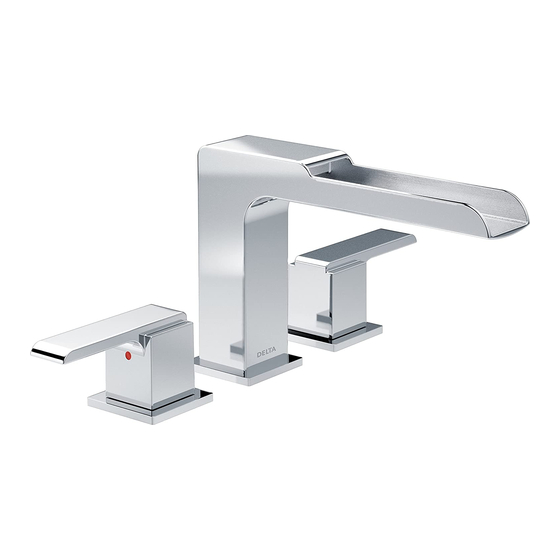
TWO HANDLE ROMAN TUB TRIM
75181
LLAVE Y SUS ACCESORIOS
PARA BAÑERA ROMANA DE DOS
MANIJAS (MANERALES)
ACCESSOIRES DE FINITION DE
ROBINET À DEUX POIGNÉES POUR
BAIN ROMAIN
?
1
1/8"
(3.17mm)
1/8 po
3/32"
(2.38mm)
3/32 po
9/27/16 Rev. C
Advertisement
Table of Contents

Related Manuals for Delta Ara T4767 Series


Summary of Contents for Delta Ara T4767 Series
- Page 1 • To READ ALL warnings, care, and maintenance information. • To complete the deck and valve rough-in prior to installing this trim kit. Para instalación fácil de su llave Delta usted necesitará: • LEER TODAS las instrucciones completamente antes de empezar.
- Page 2 à compter de la date d’achat. Aucune pour toutes les demandes en vertu de la garantie, sauf si le produit a été enregistré auprès de Delta garantie ne couvre les piles.
- Page 3 Model / Modelo / Modèle T2767 RP75500▲ ▲Specify Finish Handle Assembly (2) ▲ Especifíque el Acabado Ensamble de la Manija (2) Manette (2) ▲ Précisez le Fini RP75499▲ Set Screw, Button & Wrench Tornillo de Presión, Botón & Llave Vis de Calage, Bouton & Clé RP73386 Set Screws &...
- Page 4 Model / Modelo / Modèle T2768 RP75500▲ ▲Specify Finish Handle Assembly (2) ▲ Especifíque el Acabado Ensamble de la Manija (2) Manette (2) ▲ Précisez le Fini RP75499▲ Set Screw, Button & Wrench Tornillo de Presión, Botón & Llave Vis de Calage, Bouton & Clé RP73386 Set Screws &...
- Page 5 T2767, T2768 3/32" (2.38 mm) 3/32 po RP40668 Diverter Assembly Ensamble del Desviador Dérivation T4767, T4768 T4767, T4768 Maintenance NOTE: The deck and valve rough-in must be finished before installing the trim kit. (Rough-in sold separately). If faucet leaks from spout outlet–Shut off water supplies– Replace Seats and Springs RP4993 (1).
- Page 6 T4767, T4768 T2767, T2768 T4767, T4768 T4767, T4768 For Model T4767, T4768 Only Push handle bases (1) with gaskets (2) over end valves (3) and align with wall. Option: Use silicone under the gasket if deck is uneven. Install lift rod assembly (1) into spout. Remove diverter assembly Screw on retaining nuts (4).
- Page 7 T4767, T4768 T4767, T4768 Install handles. Be sure glide ring (1) is properly seated in bottom of Slide hose (1) through conical nut (2). Attach hose (1) to braided handle before installing. Insert red button (hot) into handle on left side metal hose (3) using gasket (4) and tighten.
- Page 8 T2767, T2768 T4767, T4768 T4767, T4768 T4767, T4768 Model T2767, T2768 For Model T4767, T4768 Only Turn faucet handles (1) all the way on. Turn on hot and cold water supplies Pull hose (1) to its farthest extension and point it down into the and flush water lines for one minute.
Need help?
Do you have a question about the Ara T4767 Series and is the answer not in the manual?
Questions and answers