
Related Manuals for TOOLSMART TS01


Summary of Contents for TOOLSMART TS01
- Page 1 LASER DISTANCE MEASURER USER’S MANUAL TS 1 Please read this manual carefully and thoroughly before using this product.
-
Page 2: Table Of Contents
Recalling Stored Measurements/Calculations ... 17 – 18 Using the Laser Distance Measurer with the ToolSmart™ App and an Apple iOS or Android Smartphone ....18 Specifications . -
Page 3: Introduction
INTRODUCTION Thank you for purchasing General Tools & Instruments’ (General’s) TS01 ToolSmart ™ Laser Distance Measurer. Please read this user’s manual carefully and thoroughly before using the instrument. The Laser Distance Measurer (LDM) is designed to replace a tape measure for... -
Page 4: What's In The Box
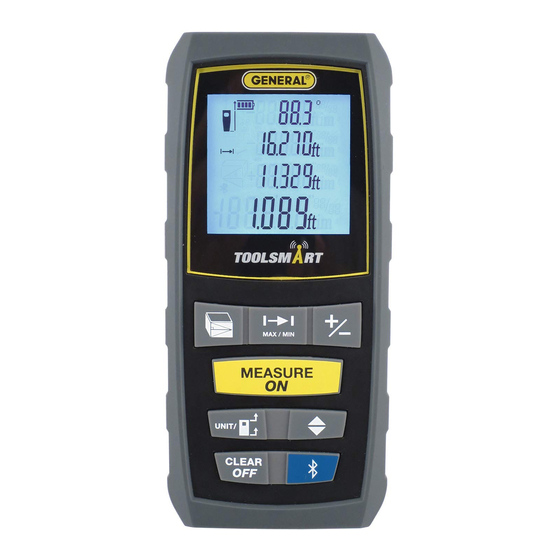
• Addition, subtraction, and continuous measurement (tracking) modes ideal for layout work • Fast response time • Automatically stores 20 most recent measurements/calculations • References measurements from top or bottom of housing or end of extension ruler • Auto power off, auto laser off and auto backlight off •... - Page 5 MEASURE CLEAR Fig. 1 4. Measurement button. Activates laser and makes measurement 5. Two-function button. Press briefly to cycle through three measurement reference options: top and bottom of LDM housing, and bottom of extension ruler. Press and hold to cycle through four available distance units. 6.
- Page 6 Fig. 2. The LDM’s display indications and icons 1. Measurements referenced from top of LDM housing 2. Flashes when laser is on 3. Measurements referenced from bottom of LDM housing or bottom of extension ruler 4. Operating in Direct or Continuous Measurement Mode 5.
-
Page 7: Safety Instructions
11 12 11 12 ➤ 6 7 8 9 10 6,7,8,9,10 Fig. 2 SAFETY INSTRUCTIONS CAUTION! The LDM’s targeting laser is a Class 2 type that emits less than 1 mW of radiation at a wavelength between 630 and 660 nanometers. Avoid direct eye contact with the laser, and do not point it at people or animals. -
Page 8: Setup Instructions
SETUP INSTRUCTIONS INSTALL BATTERIES The LDM is ready to use after you install the two supplied “AAA” batteries in a compartment in the back of the unit. To open the compartment, use the included flat-head screwdriver to loosen the single screw holding the battery compartment cover in place (see photo at right). -
Page 9: Choosing A Measurement Reference
To temporarily change the distance measurement unit, follow the instructions on p. 10. If the laser has timed out (i.e., it has been on for more than 30 seconds), or if you have just made a measurement, you will not see a red dot on the target and there will be no flashing icon (Callout 2 of Fig. -
Page 10: Clearing Values/Undoing Actions
CLEARING VALUES/UNDOING ACTIONS When pressed briefly, the two-function button: CLEAR 1. Works like the “Clear Entry” button on a calculator to clear the last value entered in a calculation sequence 2. Works like the “Undo” command on a computer menu to cancel the last action selected CHANGING THE MEASUREMENT UNIT The LDM’s default distance measurement unit is feet with decimal fraction. -
Page 11: Continuous Distance Measurement
LDM will chirp, and the distance to the target—in the default distance unit of feet with decimal fraction—will appear on the bottom line of the display. To temporarily change the distance measurement unit, follow the instructions on p. 10. Figure 4 is a screen shot of a measurement of 0.0º... -
Page 12: Adding And Subtracting Distances
When you and the LDM reach the specified distance, press the button to MEASURE silence the chirping. The subsequent inactivity triggers the 30-second countdown to laser power off and the 3-minute countdown to LDM power off. The LDM’s MIN, MAX and current distance values remain on the display (Fig. 6) until it powers off automatically. -
Page 13: Indirect Measurements Of Height And Length Using Triangulation
to the second line and a flashing icon will appear at the left of five dashes (representing the distance value to be subtracted) on the third line. Then press the button while aiming the laser at the point from which the first MEASURE measurement was made. - Page 14 two right triangles “C1” and “C2”. Once these two values are known, the LDM can solve two Pythagorean equations for the missing values of the other two legs (“A1” and “A2”). The final calculation, which solves for A—the height of the building—is A = A1 + A2.
- Page 15 Fig. 11. A two-input indirect measurement of the 0.0º height of a tree standing 4.990 meters tall 7.687 5.846 To automatically measure the height of any object using triangulation with two inputs: 4.990 1. Use the button to choose the top of the LDM as the measurement reference.
-
Page 16: Measuring Areas And Perimeters
19.54 Fig. 12. A three-input indirect measurement of the height of a wall standing 14.27 ft. tall 17.90 ➤ 19.02 14.27 MEASURING AREAS & PERIMETERS The LDM can calculate the area of a square or rectangular room or space by measuring its length and width and multiplying the two values. -
Page 17: Measuring Volumes
MEASURING VOLUMES The LDM can calculate the volume of a square or rectangular room or space by measuring its height, depth and width and multiplying the three values. To measure a volume: 1. Make sure the LDM is using its bottom as the measurement reference and that the laser is on. -
Page 18: Using The Laser Distance Measurer With The Toolsmart™ App And An Apple Ios Or Android Smartphone
™ AND AN APPLE iOS OR ANDROID PHONE To download measurements and calculations made by the LDM to an Apple iOS or Android smartphone, begin by downloading the ToolSmart ™ app from the iTunes Store or Google Play Store to your mobile device. -
Page 19: Specifications
SPECIFICATIONS Measurement Range (indoor) 8 in. to 100 ft. (200mm to 30m) Measurement Accuracy ±1/16 in. (±1.5mm) Resolution Display Unit Options feet with decimal fraction (default), feet plus fractional inches, inches, meters Response Time 2 seconds, max Laser Type, Wavelength, Power Class 2, 630 to 660nm, <... -
Page 20: Operating & Maintenance Tips
OPERATING & MAINTENANCE TIPS Because the laser silently auto powers off after 30 seconds of inactivity while the LDM remains powered on, you’ll often find that when you press the button MEASURE expecting to make a measurement, all you have done is reactivate the laser. In this case, you have to press the button a second time to take a reading. -
Page 21: Warranty Information
WARRANTY INFORMATION General warrants its instruments and accessories, and digital tools products against defects in material or workmanship for one year from the date of purchase unless otherwise stated on the packaging, manual, and/or marketing materials. General also warrants its non-digital tools products against defects in material or workmanship on a limited lifetime term. -
Page 22: Return For Repair Policy
RETURN FOR REPAIR POLICY Every effort has been made to provide you with a reliable product of superior quality. However, in the event your instrument requires repair, please contact our Customer Service to obtain an RGA (Return Goods Authorization) number before forwarding the unit via prepaid freight to the attention of our Service Center at this address: General Tools &... -
Page 23: Fcc Statement
FCC STATEMENT This device complies with part 15 of the FCC Rules. Operation is subject to the following two conditions: (1) This device may not cause harmful interference, and (2) This device must accept any interference received, including interference that may cause undesired operation. This equipment has been tested and found to comply with the limits for a Class B digital device, pursuant to part 15 of the FCC Rules. - Page 24 Secaucus, NJ 07094 PHONE (212) 431-6100 FAX (212) 431-6499 TOLL FREE (800) 697-8665 e-mail: sales@generaltools.com www.generaltools.com TS01 User’s Manual Specifications subject to change without notice ©2016 GENERAL TOOLS & INSTRUMENTS NOTICE - WE ARE NOT RESPONSIBLE FOR TYPOGRAPHICAL ERRORS. MAN# TS01 01/14/16 GeneralToolsNYC General Tools &...
-
Page 25: Manual Del Usuario (En Español)
MEDIDOR DE DISTANCIA A LÁSER MANUAL DEL USUARIO TS 1 Lea cuidadosamente todo este manual antes de usar este producto. - Page 26 Recuperando mediciones/cálculos almacenados ..42 – 43 Usando el medidor de distancia a láser con la aplicación ToolSmart ™ en un teléfono inteligente Apple iOS o Android ..43 Especificaciones .
-
Page 27: Introducción
INTRODUCCIÓN Gracias por haber comprado el Medidor de distancia a láser TS01 ToolSmart ™ General Tools & Instruments (General). Lea cuidadosamente todo este manual del usuario antes de usar el instrumento. El Medidor de distancia a láser (LDM) está diseñado para reemplazar una cinta métrica, para profesionales de la construcción, arquitectos, ingenieros, agrimensores,... -
Page 28: Contenido De La Caja
• Modos de suma, resta y medición continua (seguimiento), ideales para trabajos de distribución • Respuesta rápida • Almacena automáticamente las últimas 20 mediciones/cálculos • Toma mediciones de referencia desde la parte de arriba o de abajo del gabinete o desde el extremo de la regla de extensión •... - Page 29 MEASURE CLEAR Fig. 1 4. Botón de medición. Activa el láser y realiza la medición 5. Botón de dos funciones. Presiónelo levemente para moverse a través de las tres opciones de referencia de medición: arriba y abajo del gabinete del LDM, y parte de abajo de la regla de extensión.
- Page 30 Fig. 2. Indicadores e íconos de la pantalla del LDM 1. Mediciones desde la parte de arriba del gabinete del LDM 2. Parpadea cuando el láser está encendido 3 Mediciones desde la parte de abajo del gabinete del LDM o desde la parte de abajo de la regla de extensión 4.
-
Page 31: Instrucciones De Seguridad
11 12 11 12 ➤ 6 7 8 9 10 6,7,8,9,10 Fig. 2 INSTRUCCIONES DE SEGURIDAD ¡CUIDADO! El láser del puntero del LDM es del tipo Clase 2 que emite menos de 1 mW de potencia a una longitud de onda entre 630 y 660 nanómetros. Evite el contacto directo de los ojos con el láser, y no lo apunte hacia personas o animales. -
Page 32: Instrucciones De Preparación
INSTRUCCIONES DE PREPARACIÓN INSTALACIÓN DE LAS BATERÍAS El LDM está listo para usar luego de instalarle las dos baterías “AAA” incluidas en el compartimiento que está detrás de la unidad. Para abrir el compartimiento, use el destornillador plano incluido para aflojar el tornillo que sostiene la tapa del compartimiento de las baterías (ver la foto a la derecha). -
Page 33: Instrucciones Rápidas
INSTRUCCIONES RÁPIDAS Para realizar una medición rápida de distancia: 1. Encienda el LDM. 2. Dentro de los 30 segundos, apunte la parte superior del instrumento a un MEASURE objetivo y presione el botón . La línea inferior del instrumento mostrará la distancia al objetivo en las unidades de medición por defecto (pies con decimales). -
Page 34: Borrando Valores/Deshaciendo Acciones
El botón del panel delantero le permite seleccionar la parte inferior o superior del gabinete, o la parte inferior de la regla de extensión, como referencia para la medición. Los tres íconos negros que se muestran en la Fig. 3 de abajo son las indicaciones correspondientes de la pantalla. -
Page 35: Encendiendo Y Apagando La Iluminación De Pantalla
ENCENDIENDO Y APAGANDO LA ILUMINACIÓN DE PANTALLA Para encender la iluminación de la pantalla, presione levemente el botón . La iluminación permanecerá encendida durante 10 segundos y luego se apagará automáticamente (sin hacer ruido) para conservar la carga de la batería. MIDIENDO DISTANCIAS Mediciones directas Para medir la distancia a un objetivo:... -
Page 36: Medición Continua De Distancia (Seguimiento De Distancia)
Medición continua de distancia (Seguimiento de distancia) Este modo de operación es ideal para transferir mediciones desde planos de construcción. En la práctica, usted mueve el LDM hacia atrás desde una pared hasta una distancia específica mientras la unidad va siguiendo su propia posición, midiendo la distancia a la pared dos veces por segundo. -
Page 37: Mediciones Indirectas De Altura Y Longitud Usando Triangulación
Por ejemplo, piense cómo el LDM podría acelerar las mediciones necesarias para colocar una larga pared de ladrillos de muchas secciones, que no estén en línea recta. Una vez que las estacas, los hilos y el bastidor estén en su lugar, el LDM podría medir con exactitud la longitud de cada sección disparando desde una estaca hasta la siguiente. - Page 38 Como el LDM y la parte inferior del edificio están ambos al nivel del piso, el lado del edificio (cuya altura “A” es desconocida) forma uno de los lados del ángulo recto, del cual el otro lado sería la distancia a lo largo de la calle (“B” en la figura). En otras palabras, usted puede usar triangulación para determinar la altura “A”...
- Page 39 Fig. 10. Cálculo automático de una altura usando dos entradas Para medir la altura de un objeto usando triangulación con dos entradas: 1. Primero verifique que la línea visual desde el LDM hasta la parte inferior del objeto forme un ángulo recto. 2.
-
Page 40: Midiendo Áreas Y Perímetros
Para medir la altura de un objeto usando triangulación con tres entradas: 1. Use el botón para elegir la parte superior del LDM como referencia de medición. También verifique que el láser esté activado. 2. Presione dos veces el botón . -
Page 41: Midiendo Volúmenes
3. Sosteniendo la parte inferior del LDM contra la pared del cuarto o espacio, apunte el puntero láser a la pared opuesta y mantenga presionado el botón . La distancia medida aparecerá en la línea superior de la pantalla, la MEASURE línea inferior del paralelogramo dejará... -
Page 42: Recuperando Mediciones/Cálculos Almacenados
tercera línea de la pantalla mostrará el área calculada del plano limitado por el largo y el ancho del volumen. 5. Mueva el LDM hasta una pared adyacente del cuarto o espacio y sostenga su parte inferior contra la pared. Apunte el láser a la pared opuesta y presione el botón . -
Page 43: Toolsmart ™ En Un Teléfono Inteligente Apple Ios O Android
6.02 INTELIGENTE APPLE iOS O ANDROID Para descargar mediciones y cálculos del LDM a un teléfono inteligente Apple iOS o Android, comience por descargar la aplicación ToolSmart ™ del iTunes Store o Google Play Store en su dispositivo móvil. Una vez que haya descargado la aplicación, instálela. Luego, acople el LDM y su teléfono activando Bluetooth en su teléfono y presionando el botón... -
Page 44: Especificaciones
ESPECIFICACIONES Rango de medición (interior) 200 mm a 30 m Precisión de la medición ±1,5 mm Resolución 1 mm Opciones de unidades de medición pies con fracciones decimales (por defecto), pies con fracciones de pulgada, pulgadas, metros Tiempo de respuesta 2 segundos máximo Tipo de láser, longitud de onda, potencia Clase 2, 630 a 660 nm, <... -
Page 45: Consejos De Operación Ymantenimiento
CONSEJOS DE OPERACIÓN Y MANTENIMIENTO Como el láser se apaga automáticamente luego de 30 segundos de inactividad mientras que el LDM permanece encendido, le pasará a menudo que cuando MEASURE presiona el botón para hacer una medición, lo que realmente hará es reactivar el láser. -
Page 46: Información De Garantía
Reemplace las baterías (consulte la página 32) cuando el ícono de batería de la pantalla indica que están gastadas. Use baterías alcalinas solamente. Para evitar que las baterías viejas tengan fugas y dañen el LDM, remueva las baterías cuando no piense utilizar el instrumento durante mucho tiempo (varios meses). -
Page 47: Política De Devolución Para Reparaciones
POLÍTICA DE DEVOLUCIÓN PARA REPARACIÓN Se han hecho todos los esfuerzos para proporcionarle un producto confiable de excelente calidad. Sin embargo, si necesitara reparar su equipo, por favor, póngase en contacto con nuestro Servicio de atención al cliente para obtener un número de RGA (Autorización de devolución de mercancía) antes de enviar la unidad utilizando un servicio de transporte prepagado a nuestro Centro de Servicios a la siguiente dirección:... - Page 48 TELÉFONO (212) 431-6100 FAX (212) 431-6499 SIN CARGO (800) 697-8665 Correo electrónico: sales@generaltools.com www.generaltools.com Manual del usuario TS01 Especificaciones sujetas a modificaciones sin previo aviso. ©2016 GENERAL TOOLS & INSTRUMENTS ADVERTENCIA - NO NOS RESPONSABILIZAMOS POR ERRORES TIPOGRÁFICOS. MAN# TS01...
Need help?
Do you have a question about the TS01 and is the answer not in the manual?
Questions and answers