Table of Contents
Advertisement
Advertisement
Table of Contents

Related Manuals for Alfa Network WiFi CampPro 2


Summary of Contents for Alfa Network WiFi CampPro 2
- Page 1 WiFi CampPro 2 User Manual...
-
Page 2: Table Of Contents
Interdiction ................................. 3 Hardware Contents ............................3 Hardware Installation ............................3 Configuration ..............................4 Follow below easy setup steps to setup your WiFi CampPro 2 ..............4 Function Menu Description ..........................8 Easy Setup ............................8 2. Status: ..............................9 3. -
Page 3: Interdiction
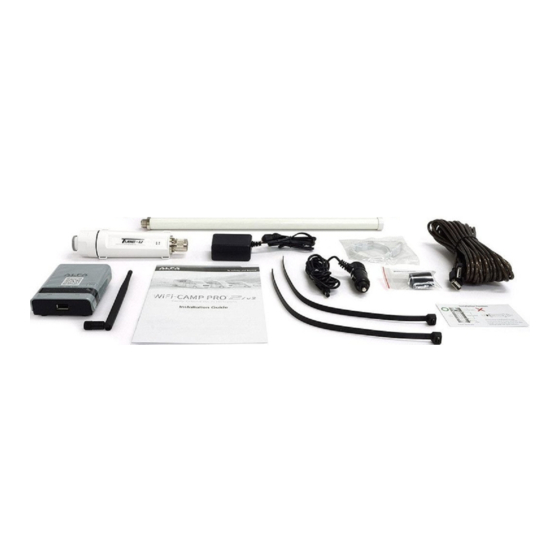
Interdiction The WiFi CampPro 2 is the new innovation solution for WiFi Hotspot extension. It will help to you to extend WiFi Hotspot internet connection to your multiple devices such as pad, smartphone and laptop. Hardware Contents WiFi CampPro 2... -
Page 4: Configuration
Follow below easy setup steps to setup your WiFi CampPro 2 1. Login Page When first time setup your WiFi CampPro 2, you must setup your own password ( for security reason can not allow below 8 characters) to access setup 2. - Page 5 3. When your WiFi CampPro 2 hardware install properly, you should see below network discovery page. Note: if you don’t see this page, please go to troubleshooting section at last section of user manual 4. Pick up the Hotspot AP you wish to connect and click “Select” button...
- Page 6 5. ① Type in Hotspot Password if required by your selected Hotspot ② Also, required to setup your own WiFi CampPro 2 Wireless Password for device to wireless connect your WiFi CampPro 2 Note: ③ If Hotspot has many same Name APs and you want to Lock to specified Hotspot AP, you can select Lock Hotspot MAC button to lock the AP ③...
- Page 7 7. The WiFi CampPro 2 will reboot after finished setup Note: Please reconnect your WiFi with correct SSID and Network Password 8. After successful setup, you will see status page with green “Connected” information...
-
Page 8: Function Menu Description
Function Menu Description 1. Easy Setup Hotspot Name: By click the scan and select the name of the Hotspot AP to connect. Lock Hotspot MAC: When click Only the MAC of this Hotspot AP allow to access internet ... -
Page 9: Status
2. Status: The Hotspot was successfully connected to your WiFiCampPro2 Now you can get the IP address from the Hotspot DHCP Server, RSSI readings and other info. Your local WiFi Network info. -
Page 10: Hotspot Settings
3. HotSpot Settings It contains history of the Profiles that was saved from previous Hotspot connection. You can Enable , Edit , Delete or Add in each profile. Inside the profile you can setup HotSpot MAC, Password/Passkey, Type of Network, IP address, Netmask, Gateway and DNS Server list. -
Page 11: Local Network
4. Local Network Wired Network Wired Network Configuration: You can set Static Address or DHCP Client to log on your CampPro2 Webpage setting menu. Note: The default IP address is 192.168.36.1 DHCP Server: If Enable. You can set the Start IP address, Limit the number and Leased time of subscribers. - Page 12 Wireless 2.4G Wireless Basic Configuration: Radio On/Off, HT Mode(None HT, HT20,HT40 Auto) , Channel selection, Transmit Power (0 to 23 dBm) and Use ISO/IEC 3166 alpha2 Country codes (00 World – ZW Zimbabwe) Wireless AP Mode Configuration: SSID, MAC Address Filter, Hide SSID, and WMM mode. The Encryptions support as follow...
- Page 13 DHCP and DNS Active DHCP Leases: Current active client users list. It shows name, IP, MAC, and lease time remaining. Active DHCPv6 Leases: No Active IPv6 User lease. Static Leases: You can add or delete Static lease.
-
Page 14: Tools: Some Network Utilities For Testing Internet Status
5. Tools: Some Network Utilities for testing Internet status. Ping: IPv4 Trace route: IPv4 Nslookup: ... -
Page 15: System
6. System System Time: System Properties: You can set the Time Zone and Sync with browser. Time Synchronization: Enable NTP Client and Server. Add or delete NTP server candidates. Administration: Login Password: Change login password. ... - Page 16 System Maintenance: System Configuration: Restore to factory default. Export or import system configuration. The restore to default procedure will take about 180 Seconds to erase configuration partition and reboot. After rebooting login 192.168.36.1 and setup the new password again for later Webpage access. Select exported file and import the configuration.
- Page 17 The pre saved configuration will be back after system reboot. Firmware Upgrade. Select the firmware file and upgrade it. You can either keep the current configuration or default setting. It takes about 240 Seconds for system flashing. Note: You don’t have to remove USB WLAN Adapter while upgrading firmware. ...
-
Page 18: Logout
7. Logout: It shows Login required and clicks Login to continue. After Login it shows the whole WiFiCampPro2 Status. -
Page 20: Troubleshooting
Troubleshooting: If you see below screen information, Please insert ALFA USB WLAN adapter on USB port before power on your WifiCampPro2. Otherwise the webpage will show USB device not found.
Need help?
Do you have a question about the WiFi CampPro 2 and is the answer not in the manual?
Questions and answers
I have a Wifi Campground Pro 2. I'm getting message it's connected but no Internet service. My phone shows internet service, so that is not it. Is there a update or something I'm missing?
Your Alfa Network WiFi CampPro 2 may be connected but showing no Internet service due to several possible reasons:
1. DHCP Issues: If the DHCP server is disabled or misconfigured, the device may not be assigning proper IP addresses. Ensure DHCP is enabled in the settings.
2. Firmware Upgrade or System Reboot: If you recently upgraded the firmware or rebooted the system, it may take up to 180 seconds to reconnect properly. Wait and check again.
3. USB WLAN Adapter Not Detected: If the Alfa USB WLAN adapter is not inserted before powering on the device, the system may not detect it, causing a connectivity issue. Ensure the adapter is properly connected.
4. Antenna Positioning: Poor antenna placement can result in weak signal reception. Make sure the antenna is positioned above the roofline and pointing straight up.
5. Incorrect Wireless AP Mode Configuration: Check that the SSID and encryption settings are correctly configured to allow internet access.
6. Network Interference or Weak Signal: If you are in a location with weak Wi-Fi signals or high interference, the connection may be established, but there may be no stable internet access.
7. Internet Source Issues: If the source Wi-Fi network has no internet or is experiencing issues, the CampPro 2 will connect but not provide internet access. Try connecting to another network.
Check these factors and adjust settings accordingly to restore internet access.
This answer is automatically generated