
Related Manuals for BETTY CROCKER BC-2958


Summary of Contents for BETTY CROCKER BC-2958
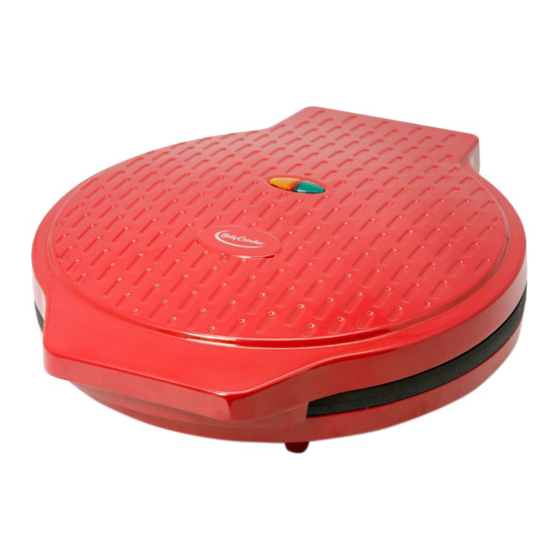
- Page 1 Pizza Maker BC-2958 BC-2958CR Pizza U&C-2017.indd 1 2017-09-25 10:19 AM...
-
Page 2: Table Of Contents
Table of Contents Important Safeguards ........3 Additional Important Safeguards ....4 Power Cord and Plug Information ....5 Before Your First Use ........6 Know the Parts of Your Pizza Maker Plus ..7 Using Your Pizza Maker Plus ......8 Care and Cleaning ........10 Recipes ............11 Limited Warranty .........21 To Return for Service ........22... -
Page 3: Important Safeguards
IMPORTANT SAFEGUARDS When using electrical appliances, basic safety precautions should always be followed to reduce the risk of fire, electric shock and personal injury. 1. READ ALL INSTRUCTIONS CAREFULLY. 2. Do not touch hot surfaces. Use handles or knobs. Parts become hot during use. -
Page 4: Additional Important Safeguards
13. Extreme caution must be used when moving an appliance containing hot oil or other liquids 14. Do not use this appliance for other than its intended use. 15. Do not twist, kink or wrap the power cord around the appliance as this may cause the insulation to weaken and split, particularly in the location where it enters the unit. -
Page 5: Power Cord And Plug Information
POWER CORD INSTRUCTIONS 1. A short power-supply cord is provided to reduce the hazard resulting from entanglement or tripping over a long cord. 2. Extension cords may be used if care is exercised. If it is necessary to use an extension cord, it should be positioned so that it does not drape over the counter or tabletop where it can be pulled on by children or tripped over unintentionally. -
Page 6: Before Your First Use
Before Your First Use Carefully unpack the Pizza Maker Plus and remove all packaging materials from in and around the unit. To remove any dust that may have accumulated during packaging, wipe the cooking plates and the exterior of the unit with a cloth or sponge moistened in warm water. -
Page 7: Know The Parts Of Your Pizza Maker Plus
Know the Parts of Your Pizza Maker Plus Power-On Indicator Light Ready-to-Bake Indicator Light Handle Top Nonstick Baking Plate Bottom Nonstick Baking Plate Cord Wrap RATING: 120V, 60Hz, 1440W, AC ONLY BC-2958CR Pizza U&C-2017.indd 7 2017-09-25 10:19 AM... -
Page 8: Using Your Pizza Maker Plus
Using Your Pizza Maker Plus 1. Place unit on a clean, dry, heat resistant flat surface, such as a table or countertop. 2. To maintain the quality of the nonstick finish on your Pizza Maker Plus we recommend the following: Using a paper towel or silicone basting brush, coat the nonstick surfaces with a small amount of vegetable oil or a nonstick cooking spray. - Page 9 WARNING: The housing of this unit gets hot during use. Always use the handle on the lid to open and close the unit. To prevent burns, never touch baking plates while hot. Always use oven mitts to protect your hands when opening and closing the unit as steam may emit from the sides and can cause burns.
-
Page 10: Care And Cleaning
Baking Additional Pizzas 1. If additional pizzas are required, keep the Pizza Maker Plus lid closed to retain heat. Always wait until the green Ready-to-Bake Indicator Light illuminates before making more pizza. 2. Additional pizza may bake quicker than your first baked pizza as extra heat has been retained inside your Pizza Maker Plus. -
Page 11: Recipes
RECIPES NOTE: Pita and Naan bread can be substituted for pizza crust. WARNING: The housing of this unit gets hot during use. Always use the handle on the lid to open and close the unit. To prevent burns, never touch cooking plates while hot. - Page 12 Rustic Chicken Pizza 1 can (13.8 oz) Pillsbury refrigerated classic pizza crust or Gold Medal dough ¼ cup ranch dressing 2 tablespoons freshly grated Parmesan cheese 2 cups chopped cooked chicken 1 box (9 oz) Green Giant frozen spinach, thawed, squeezed to drain ®...
- Page 13 Mushroom Pita Pizza 8”(20cm) or 12”(30.5cm) Pita bread 2 cups sliced fresh mushrooms (5 oz) 1 small red onion, thinly sliced ¼ cup chopped green bell pepper 2 tablespoons chopped fresh basil leaves or 2 teaspoons dried basil leaves 1 cup finely shredded reduced-fat mozzarella cheese (4 oz) 1 tablespoon grated fat-free Parmesan cheese topping 1.
- Page 14 Cheesy Pizza Quesadilla 2, 8”(20cm) or 12”(30,5cm) flour tortillas 1 package (3.5 oz) sliced pepperoni 2 medium roma (plum) tomatoes, thinly sliced 1 cup shredded pizza cheese blend (4 oz) 1 can (8 oz) pizza sauce, warmed 1. Pre-heat Pizza Maker Plus until the green Ready-to-Bake Indicator Light illuminates.
- Page 15 Treat Pizza 1 package of Betty Crocker™ Chocolate Chip Cookie Mix 2 cups softened chocolate chip ice cream or frozen yogurt 1 cup mini candy-coated baking bits 13” (33cm) circle of parchment paper 1. Pre-heat Pizza Maker Plus until the green Ready-to-Bake Indicator Light illuminates.
- Page 16 Savory Party Mix 1 cup Corn Chex™ cereal 1 cup mini salted pretzels 1 cup popped popcorn 1 cup chow mein noodles 1/2 cup salted peanuts 2 tablespoons butter, melted 1 teaspoon garlic powder 1 teaspoon onion powder 1/2 teaspoon Italian seasoning 1/4 teaspoon cayenne pepper 1.
- Page 17 Sweet Party Mix 1 cup Corn Chex™ cereal 1 cup mini salted pretzels 1 cup popped popcorn 1/2 cup chow mein noodles 1 cup salted peanuts 2 tablespoons butter, melted 2 tablespoons light brown sugar 1 teaspoon cinnamon 1/2 cup mini candy coated baking bits 1.
- Page 18 Oatmeal Butterscotch Chip Cookies Betty Crocker™ oatmeal cookie mix 1/2 cup butter, softened 1 tablespoon water 1 egg 1/2 cup butterscotch baking chips 1. Pre-heat Pizza-Maker-Plus until the Ready-to-Bake Indicator Light illuminates. 2. In medium bowl, stir cookie mix, butter, water and egg until dough forms (dough will be stiff).
- Page 19 S’More Cookie Pizza Pillsbury™ Ready To Bake!™ sugar cookies or Pillsbury Traditional Sugar Cookie 1/2 cup chocolate hazelnut spread 1 cup mini graham cracker squares or 6 graham cracker squares, coursely chopped 1. Pre-heat Pizza-Maker-Plus until the Ready-to-Bake Indicator Light illuminates.
- Page 20 BC-2958CR Pizza U&C-2017.indd 20 2017-09-25 10:19 AM...
-
Page 21: Limited Warranty
You may have other legal rights that vary depending on where you live. Some states or provinces do not allow limitations on implied warranties or special, incidental or consequential damages, so the foregoing limitations may not apply to you. BC-2958 09/2017 BC-2958CR Pizza U&C-2017.indd 21... -
Page 22: To Return For Service
9:00 am and 5:00 pm (EST) Monday to Friday Or write FORMULA BRANDS INC. 45 Mural Street, Unit #7, Richmond Hill, Ontario, Canada L4B 1J4 © General Mills. Betty Crocker and designs are trademarks of General Mills used under license. BC-2958CR Pizza U&C-2017.indd 22 2017-09-25 10:19 AM...
Need help?
Do you have a question about the BC-2958 and is the answer not in the manual?
Questions and answers
I need a thermal fuse for BC-2958CR - where do I get it? Thanks