
Related Manuals for Rauch FS4

Summary of Contents for Rauch FS4
- Page 1 2x ha 100 m ha = 0 START ALARM FS 4 INSTRUCTION MANUAL RAUCH FS4...
-
Page 2: Table Of Contents
TABLE OF CONTENTS Description ........................ 3 System configuration ....................6 C 1 Configuration of the type of seed drill ............6 C 2 Configuring the number of actuators ............7 C 3 Checking the screen ..................8 C 4 Checking sensors ..................8 Setting the seed drill parameters ................ -
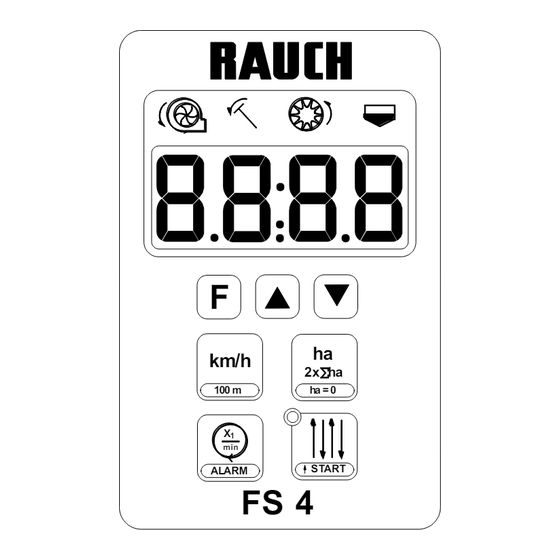
Page 3: Description
A Description 1 – Symbols 2 – Screen 3 – Arrows 4 – Functions key 5 – Area key 6 – Speed key km/h 2x ha 7 – Tramlining display 100 m ha = 0 8 – Tramlining key START ALARM 9 –... - Page 4 8 Marking key Display rhythm and current counter position. Stop counting by pressing this key again. Program rhythm by pressing and holding the key. Start marking at the start of the field (Dual function). 9 Blower key Blower rpm display.
- Page 5 Earth not used B 2 VENTA On the VENTA seed drills, the FS4 computer circuit consists of the control unit (1), the junction box (2), sensors and one or two control actuators. The control unit connects to the junction box via the 7 pin plug (3).
-
Page 6: System Configuration
C System configuration This is carried out by pressing the key and switching on the 12 volt power to the control unit simultaneously. The following settings may be changed or checked: 1) Type of seed drill (VENTA, BS, GC, Integra, etc.) 2) Number of tramlining control linear actuators 3) Checking screen 4) Checking sensors... -
Page 7: C 2 Configuring The Number Of Actuators
The digits displayed below the symbols mean the following: t = Blower sensor (VENTA) d = Distribution sensor (mechanical seed drills: BS, GC, Integra) E = Single seed drills (Planter, Maxima) Side markers 1 = Present 0 = Absent Speed sensor 1 = Present 0 = Absent Level sensor... -
Page 8: C 3 Checking The Screen
To exit the configuration menu, press one of the other keys. C 3 Checking the screen By pressing the key after configuring the actuators, the screen can be checked for 2 seconds. The screen then changes automatically to sensor tests. C 4 Checking sensors This menu appears automatically after the screen test. -
Page 9: Setting The Seed Drill Parameters
D Setting the seed drill parameters The following settings which are specific to the machine are to be carried out: 1) Working width 2) Wheel revolutions 3) Tramlining rhythm 4) Nominal blower rpm 5) Activate/cancel alarms D 1 Width setting 2x ha ha = 0 In order to set the width, the... - Page 10 VENTA Width Value / 100 m 2.5 m 3.0 m 3.5 m 4.0 m 1050 4.5 m 1200 5.0 m 1300 6.0 m 1580 Settings are stored by pressing the key for 3 seconds until the display flashes briefly! 2) Field calibrating a 100 m run The current stored value for a 100 m run can be displayed by pressing the km/h 100 m...
-
Page 11: D 3 Setting The Tramlining Rhythm
D 3 Setting the tramlining rhythm Before starting sowing, the tramlining rhythm needs to be programmed in accordance with the table below. This rhythm will depend on the widths of the seed drill and on the machine. Rhythm Treatment width Seed drill width 12 m 15 m... - Page 12 Rhythm 3, symmetrical Start of sowing: Edge on the left or right Example: 5 m Sowing 15 m Treatment HECR_004 Programming: Rhythm SY 3 Display at start of job: Full seed drill Control actuator: 1 Control actuators: 2 Wheel tracks: Position 3: Both sides Rhythm 3 / Position 3 Rhythm 4, symmetrical...
- Page 13 Rhythm 4, asymmetrical Start of sowing: Edge on the left Example: 3 4 1 2 3 m Sowing 12 m Treatment HE CR_ 0 05 Programming: Rhythm AS 4 Start left Display at start of job: Start left, position 3 Full seed drill Control actuator: 1 Control actuators: 2...
- Page 14 Rhythm 5, symmetrical Start of sowing: Edge on the left or right Example: 3 4 5 1 2 3 m Sowing 15 m Treatment HE CR_ 0 07 Programming: Rhythm SY 5 Display at start of job: Full seed drill Control actuator: 1 Control actuators: 2 Wheel tracks:...
- Page 15 Rhythm 6, asymmetrical Start of sowing: Edge on the left Example: 4 5 6 1 2 3 3 m Sowing 18 m Treatment HE CR_ 0 08 Programming: Rhythm AS 6 Start left Display at start of job: Start left, position 4 Full seed drill Control actuator: 1 Control actuators: 2...
- Page 16 Rhythm 7, symmetrical Start of sowing: Edge on the left or right Example: 4 5 6 7 1 2 3 3 m Sowing 21m Treatment HE CR_ 0 10 Programming: Rhythm SY 7 Display at start of job: Full seed drill Control actuator: 1 Control actuators: 2 Wheel tracks:...
- Page 17 Rhythm 8, asymmetrical Start of sowing: Edge on the left Example: 5 6 7 8 1 2 3 4 3 m Sowing 24 m Treatment HE CR_ 0 11 Programming: Rhythm 8 Start left Display at start of job: Start left, position 5 Full seed drill Control actuator: 1 Control actuators: 2...
- Page 18 Rhythm 9, symmetrical Start of sowing: Edge on the left or right Example: 5 6 7 8 9 1 2 3 4 3 m Sowing 27 m Treatment HE CR_ 0 13 Programming: Rhythm SY 9 Display at start of job: Full seed drill Control actuator:1 Control actuator: 2...
- Page 19 Rhythm 10, asymmetrical Start of sowing: Edge on the left Example: 6 7 8 9 10 1 2 3 4 5 3 m Sowing 30 m Treatment HE CR_ 0 14 Programming: Rhythm AS 10 Start left Display at start of job: Start left, position 6 Full seed drill Control actuator: 1...
- Page 20 Rhythm 11, symmetrical Start of sowing: Edge on the left or right Example: 6 7 8 9 10 11 1 2 3 4 5 3 m Sowing 33 m Treatment HE CR_ 0 16 Programming: Rhythm SY 11 Display at start of job: Full seed drill Control actuator: 1 Control actuators: 2...
- Page 21 Rhythm 12, asymmetrical Start of sowing: Edge on the left Example: 7 8 9 10 11 12 1 2 3 4 5 6 3 m Sowing 36 m Treatment HE CR_ 0 17 Programming: Rhythm AS 12 Start left Display at start of job: Start left, position 7 Full seed drill Control actuator: 1...
- Page 22 Rhythm 50 Start of sowing: Edge on the left Example: 6 m Sowing 15 m Treatment HE CR_ 0 19 Programming: Rhythm 50 Start left Display at start of job: Start left, position 9 Full seed drill Wheel tracks: Position 2 / 5: Left hand side Position 10 / 7: Right hand side Start of sowing: Edge on the right...
- Page 23 Rhythm 52 Start of sowing: Edge on the left Example: 16 17 18 1 9 10 11 12 13 14 15 4 m Sowing 18 m Treatment HE CR_ 0 21 Programming: Rhythm 52 Start left Display at start of job: Start left, position 16 Full seed drill Wheel tracks:...
- Page 24 Rhythm 54 Start of sowing: Edge on the left Example: 6 m Sowing 20 m Treatment HE CR_ 0 23 Programming: Rhythm 54 Start left Display at start of job: Start left, position 9 Full seed drill Wheel tracks: Position 7 / 10: Left hand side Position 3 / 4: Right hand side Start of sowing: Edge on the right...
- Page 25 Rhythm 56 Start of sowing: Edge on the left Example: 6 m Sowing 21 m Treatment HE CR_ 0 25 Programming: Rhythm 56 Start left Display at start of job: Start left, position 13 Full seed drill Wheel tracks: Position 11 / 14: Left hand side Position 4 / 7: Right hand side Start of sowing: Edge on the right...
- Page 26 Rhythm 58 Start of sowing: Edge on the left Example: 4.5 m Sowing 12 m Treatment HE CR_ 0 27 Programming: Rhythm 58 Start left Display at start of job: Start left, position 7 Full seed drill Wheel tracks: Position 8 / 5: Right hand side Position 2 / 3: Left hand side Start of sowing: Edge on the right...
- Page 27 Rhythm 60 Start of sowing: Edge on the left Example: 12 13 14 10 11 4.5 m Sowing 21 m Treatment HE CR_ 0 29 Programming: Rhythm 60 Start left Display at start of job: Start left, position 12 Full seed drill Wheel tracks: Position 14 / 9: Left hand side Position 4 / 5: Right hand side...
- Page 28 Rhythm 62 Start of sowing: Edge on the left Example: 14 15 16 10 11 12 13 4.5 m Sowing 24 m Treatment HECR_ 031 Programming: Rhythm 62 Start left Display at start of job: Start left, position 14 Full seed drill Wheel tracks: Position 16 / 11: Right hand Position 5 / 6: Left hand side...
-
Page 29: D 4 Setting Nominal Blower Rpm
To set the rhythm required, press key START for approximately 3 seconds until the stored rhythm flashes. The list of rhythms can now be scrolled up and down using the key until the desired list is reached. The setting is stored by pressing the key for 3 seconds until the display flashes briefly! Once this setting has been stored and depending on the rhythm chosen, the side on... -
Page 30: D 5 Activating Or Cancelling Alarms
D 5 Activating or cancelling alarms ALA RM The various alarms may activated or cancelled separately. Press the keys simultaneously: the current configuration will be displayed. Use the keys to change the configuration. to go to the next function (the activated one flashes) to change the activation of an alarm (go from 0 to 1 or vice versa) The screen displays the current parameter settings of each alarm under the 4 symbols. -
Page 31: Displays And Settings While Running
E Displays and settings while running The following settings and displays are accessible while running: 1) Daily hectare recorder display 2) Total hectare recorder display 3) Zeroing area recorders 4) Travel speed display 5) Display of the side on which the sowing job is to start 6) Tramlining rhythm display 7) Stop tramlining recording 8) Blower rpm display... -
Page 32: E 5 Starting Tramlining
E 5 Starting tramlining START keys need to be pressed in order to start a sowing job on a plot. The screen will then display the side on which the job is to start (left or right) alternately and whether a full seed drill or half a width is to be used to start up. The tramlining recording mode will be activated by pressing either of the keys, or by manipulating the markers. -
Page 33: E 9 Alarm Messages
E 9 Alarm messages Depending on alarm configuration, the following messages may appear in the event of a fault. Alarms Display Blower alarm The alarm is activated in the event of variation from the stored nominal rpm: at +/- 200 rpm if memorised blower speed is less than 3400 rpm at +/- 400 rpm if memorised blower speed exceeds 3400 Alarm is not activated when drill is off.
Need help?
Do you have a question about the FS4 and is the answer not in the manual?
Questions and answers