Advertisement
Quick Start Guide
Quick Start Guide
Guide de Mise en route
Guide de Mise en route
Guía de inicio rápido
Guía de inicio rápido
Guia de consulta rápida
Guia de consulta rápida
Schnellstart-Anleitung
Schnellstart-Anleitung
Guida rapida
Guida rapida
Licensed Product Produit Autorise
Producto Autorizado Bajo Licencia
Lizenziertes Produkt Prodotti con licenza
The Kodak trademark and trade dress are used under license
from Kodak.
La marque de commerce Kodak et son apparence sont
utilisées sous licence Kodak.
La marca y la imagen comercial Kodak son usadas bajo
licencia de Kodak.
A marca e a imagem comercial Kodak são usadas sob licença
da Kodak.
Kodak und die Kodak-Markenausstattung werden unter
Lizenz von Kodak genutzt.
Il marchio Kodak ed il trade dress Kodak sono usati sotto
licenza di Kodak.
© 2013 by JK Imaging Ltd. All rights reserved.
JK Imaging Ltd. 1411 W. 190th Street, Suite 550, Gardena,
CA 90248, USA
www.kodakcamera.jkiltd.com
VR2 4 2 0 8 0 5 9 9 - 0
Printed in China
1
14
12
15
13
1
11
16
2
10
3
9
4
18
17
8
5
7
6
2
2
1
3
6
5
4
3
1
2
4
Date/Time
Beep
On
English
Power Saver
Français
Date
Normal
Español
Year
Date/Time
01.01.2013 00:00
.
2013 00:00
Hour
World Time
Minute
Home
Italiano
Language
Language
English
English
Select
Save
Select
5
Beep
Format
On
Power Saver
Reset
Normal
Date/Time
Copy To Card
01.01.2013 00:00
World Time
FW Version
Home
Language
English
Set
Exit
Set
Exit
6
7
Quick Start Guide English
1
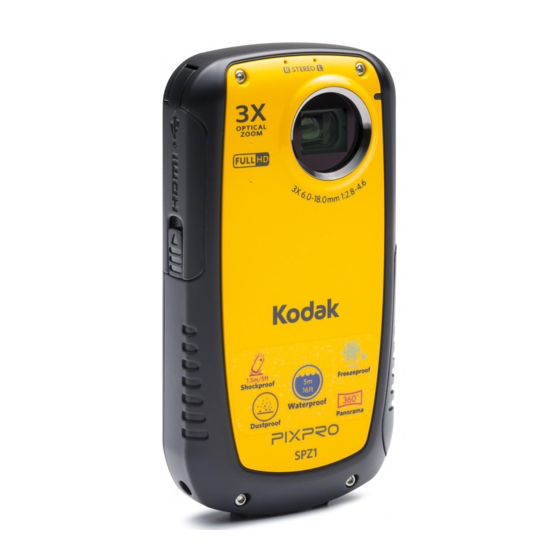
Part Names
1
LCD Screen
10 Menu Button
2
Shooting Button
11 USB/HDMI Card Slot Switch
3
Playback Button
12 Status Indicator
4
Up Button / Zoom In Button
13 Lens
5
Left Button / Image Color
14 Microphone
Down Button
6
15 Power Switch
/ Zoom Out Button
7
Right Button / Image Pixel
16 SD Card Slot Switch
8
OK Button / Record Button
17 Tripod Socket
Panorama Button
9
18 Speaker
/ Delete Button
2
Inserting the Battery
1. Open the battery cover.
2. Insert the battery into the battery slot in the correct position as shown
in the diagram.
3. Close the battery cover.
3
Charging Battery
This digital camcorder can be charged by the following two methods:
1. Use the USB cable to connect the digital camcorder with the adapter.
See figure ①;
2. Use the USB cable to connect the digital camcorder to your computer.
See figure ②;
Setting Language and Date/Time
4
1. When the digital camcorder is turned on for the first time, it will display
the language setting screen.
2. Press
to select a language.
3. After pressing
button to select the desired language, the digital
camcorder will enter the date/time setting screen.
4. Press
to select and choose a field: month, day, year, hour and
minute.
5. Press
to adjust value in the selected field.
6. Press
button to validate all changes, the digital camcorder will
then enter the shooting screen.
5
General Setup
1. Press
button to enter Function Menu.
2. Press
to select
menu.
3. Press
button to enter Setting Interface.
4. Press
to select
menu.
5. Press
to select an option in the menu.
6. Press
button to enter the setting interface of selected option.
7. Press
button to select function option, press
button to
confirm and return to the menu; press
button to return to the menu
or press
button to return to shooting screen.
6
Taking a Picture
1. Hold the camera securely.
2. Use the Zoom Lever to select Tele or Wide positions to zoom in or out on your
subject.
3. Press the Shutter Button completely down to take the picture.
Using quick recording
7
Press Recording button
to begin recording video. When you are finished, press
the Recording button
again. The camera will store the video and return to
shooting mode.
Guide de Mise en route Français
Nom de chaque partie
1
1
Afficheur LCD
10 Touche de Menu
Verrouillage de l'emplacement
2
Touche de prise de vue
11
de la carte USB/HDMI
3
Touche de lecture
12 Voyant de statut
Bouton haut / Bouton
4
13 Objectif (lentille)
d'élargissement
Bouton de direction gauche
5
14 Microphone
/ Couleur d'image
Bouton de direction bas
6
15 Bouton de mise en marche
/ Bouton de diminution
Bouton de direction droit
Verrouillage de l'emplacement
7
16
/ Pixel de l'image
de la carte mémoire
Touche OK / Touche d'
8
17 Embase pour trépied
enregistrement
Bouton de panorama animé
9
18 Haut-parleur
/ Bouton d'effacement
Insérer la batterie
2
1. Ouvrez le couvercle de la batterie.
2. Placez la batterie dans la fente de la batterie en respectant
l'orientation indiquée sur le schéma.
3. Refermez le couvercle de la batterie.
3
Charger la batterie
Cette caméra peut adopter les deux méthodes suivantes pour la charger :
1. Raccordez le caméscope au chargeur à l'aide du câble USB.
(voir figure ①);
2. Raccordez le caméscope à l'ordinateur à l'aide du câble USB.
(voir figure ②);
Réglage de la langue et de la date/heure
4
1. Quand on appuie sur le bouton d'alimentation pour démarrer la
caméra pour la première fois, la caméra entrera dans l'interface de
sélection de la langue.
2. Appuyez sur
pour sélectionner la langue.
3. Après avoir sélectionné la langue par appuyer sur
, la caméra
entrera dans l'interface de sélection de la date/temps.
4. Appuyez sur
pour sélectionner la zone d'ajustement : mois,
date, année, heure, minute.
5. Appuyez sur
pour ajuster la valeur de la zone de sélection.
6. Appuyez sur
pour déterminer le temps, la caméra entrera dans le
mode de prise de vue.
5
Configuration de base
1. Appuyez sur le bouton de
pour entrer dans le menu de Func.
2. Appuyez sur
pour sélectionner le menu de
.
3. Appuyez sur le bouton de
pour entrer dans l'écran de sélection
de paramètres.
4. Appuyez sur
pour sélectionner le menu de
.
5. Appuyez sur
pour sélectionner l'option dans le menu.
6. Appuyez sur le bouton de
pour entrer dans l'écran de sélection
de paramètres.
7. Appuyez sur le bouton de
pour sélection le menu de fonction,
appuyez sur le bouton de
pour confirmer et retourner au menu ;
appuyez sur
pour retourner au menu ou appuyez sur
pour
retourner dans l'écran de prise de vue.
Prendre une photo
6
1. Maintenez fermement l'appareil photo.
2. Cadrez votre image sur l'écran LCD.
3. Appuyez complètement sur le bouton déclencheur pour prendre la photo.
Utilisation de l'enregistrement video rapide
7
Appuyez sur le bouton de raccourci Enregistrement
pour accéder directement
au mode d'enregistrement et enregistrer. Pour terminer l'enregistrement, appuyez
sur le bouton de raccourci Enregistrement
, vous pouvez ainsi sauvegarder la
vidéo et retourner à l'écran de prise de vue.
Advertisement
Table of Contents

Related Manuals for Kodak Pixpro SPZ1


Summary of Contents for Kodak Pixpro SPZ1
- Page 1 Copy To Card 01.01.2013 00:00 licencia de Kodak. Configuration de base World Time A marca e a imagem comercial Kodak são usadas sob licença FW Version General Setup Home 1. Appuyez sur le bouton de pour entrer dans le menu de Func.
- Page 2 Guía de inicio rápido Español Guia de consulta rápida Português Schnellstart-Anleitung Deutsch Guida rapida Italiano Nombre de cada pieza Nome dos componentes Kameraansichten Nome di Ogni Componente Pantalla LCD 10 Botón Menú Tela LCD 10 Botão Menu Schermo LCD 10 Pulsante Menù LCD-Bildschirm 10 Menü-Taste Interruptor da Entrada do...
Need help?
Do you have a question about the Pixpro SPZ1 and is the answer not in the manual?
Questions and answers