Table of Contents
Advertisement
Quick Links
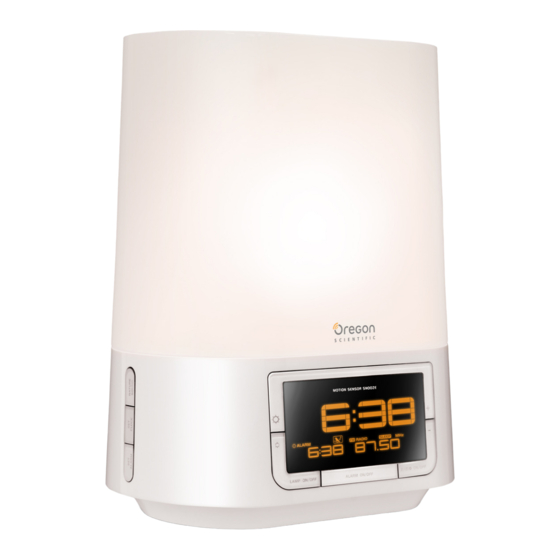
Sunrise Wake-up Clock
Model: WS902
USER MANUAL
EN
WAKE UP THE NATURAL WAY
Our body clock is often not in sync with the demands and
rhythm of modern life.
Our biological clock is affected by external cues, such as
sunlight. Light at dawn stimulates production of cortisol,
which gets the body ready to work and wake up. By
simulating dawn, Oregon Scientific's Sunrise Wake-up Clock
(WS902) prepares the body to wake up by gradually
increasing brightness to the set level in the 20 minutes prior
to desired (set) alarm time.
Start your day better and feel energised to tackle the day.
Wake up as nature intended!
IMPORTANT This device does not reduce the hours of sleep
needed.
OVERVIEW
FRONT VIEW
1. SNOOZE / Motion sensor
2.
/
: Adjust brightness (only when LAMP function has
been activated)
3. NATURE SOUND: Toggle through selection (Forest Birds
/ Brook / Ocean / Rain)
4. SET CLOCK: Enter clock settings
5. SET ALARM: View alarm status; enter alarm settings
6. LAMP: Turn on/off light
7. + / -: Adjust volume (only when radio / soothing sound is
playing); change values of the setting
8. SLEEP: View remaining time; enable radio / soothing
sound / light sleep; set sleep timer
9.
RADIO TUNE
: Enable auto-search for radio
station; adjust radio frequency marginally (by 0.05MHz)
10. RADIO: Turn on / off radio
11. ALARM: Enable / disable alarm function
BOTTOM VIEW
1. Battery compartment
2. WAKE UP LIGHT ON·OFF: Enable / disable light for
alarm sequence
3. DISPLAY BRIGHTNESS HIGH·LOW: Select LCD
display brightness HIGH / LOW
4. AUDIO LINE-IN: Socket for connecting to external music
storage device
5. RESET: Reset unit to default settings
LCD DISPLAY
1. AM/PM
2.
Beep /
Radio /
Rooster crow alarm
selected
3.
Alarm with wake up light enabled
4.
Batteries low / no battery
5. Alarm time
6. Radio Mode is ON and frequency is displayed
7. Volume is displayed
8. Sleep mode is ON and remaining time is displayed
9.
Nature sound selected (1-4)
10.
Sound from external source plugged into unit
GETTING STARTED
REPLACING LAMP
For first time use, take out provided light bulb and go directly
to step 4.
1. Unplug unit from wall socket and allow unit (bulb) to cool
for approx. 15 minutes.
CAUTION Always allow unit to cool for 15 minutes prior to
cleaning, storing, replacing parts as unit can be very hot.
2. Push in OPEN / COVER tab to release lamp cover. Lift
cover off.
3. Unscrew old bulb.
4. Screw in new bulb.
5. Push in OPEN / CLOSE tab and slide lamp cover back in
place.
NOTE This unit uses 75 W light bulbs. The built-in protection
feature will automatically shut down the unit when the
temperature inside the lamp cover is too high. Please allow
this unit to cool until the temperature inside is within a safe
range.
CONNECT TO POWER SOURCE
Memory backup:
1. Remove the battery compartment cover.
2. Insert the batteries (2xAAA), matching the polarities.
3. Replace the battery compartment cover.
NOTE Batteries should not be exposed to excessive heat
such as sunshine or fire.
Before selecting a location to place the unit, consider the
following:
•
Ensure there is approximately 15 cm between unit and
closest object, such as walls or other objects.
•
Ensure there is at least 40 cm space above the top of the
unit for ventilation purposes.
•
Ensure distance between unit and wall socket is not
longer than the power cord itself.
Batteries serve as a back-up power supply. To fully utilize all
features, plug into wall socket.
To completely disconnect from power, the unit should be
disconnected from the wall socket.
NOTE The main unit should not be exposed to wet conditions.
No objects filled with liquid, such as vases, should be placed
on the main unit.
CLOCK
MANUALLY SET CLOCK
1. Press SET CLOCK to enter setting mode.
2. Press + or - to change the settings or press and hold + / –
to rapidly change the settings.
3. Press SET CLOCK to confirm and move to next setting.
The settings order is: 12/24 hr format, time.
RADIO
To activate / deactivate radio:
• Press RADIO to turn radio on / off.
To set radio station:
1. Press RADIO to turn radio on.
2. Press and hold
RADIO TUNE
to auto search or
press
RADIO TUNE
to manually select frequency.
SOOTHING NATURE SOUNDS
NOTE Deactivate radio first. Radio OFF will be displayed on
screen.
To activate / deactivate soothing sounds:
1. Press NATURE SOUND to play sounds.
2. Press NATURE SOUND repeatedly to select desired
sound (1-4) or to turn sound off.
ADJUST VOLUME
To adjust volume:
•
Press + / – when radio or nature sound is turned on.
TIP Press and hold + / – to rapidly adjust volume.
ALARM
To set the alarm:
1. Press SET ALARM to enter setting mode.
2. Press + / - to change the settings or press and hold + / –
to rapidly change the settings.
3. Press SET ALARM to confirm and move to next setting.
4. Repeat steps 2-3 for all setting options.
The settings order is: time, alarm sound (select from
beep/radio/rooster crow)
NOTE If radio alarm is selected, radio will play for 60 minutes
at set alarm time.
For your convenience, the volume and radio frequency will be
stored in memory for the next time radio is turned on.
To activate / deactivate alarm:
• Press ALARM.
To silence the alarm:
•
Wave your hand in front of the unit (motion sensor) to
silence it for 8 minutes
OR
•
Press any button to turn the alarm off and activate it again
after 24 hours.
ALARM WITH WAKE UP LIGHT
To activate / deactivate wake up light:
• Slide WAKE UP LIGHT switch to ON / OFF.
When wake up light has been activated,
will be displayed
next to ALARM on the LCD screen.
NOTE Light will fade-in (gradually increase in brightness) 30
minutes prior to set alarm time. Light will stay on (even after
SNOOZE has been pressed) after set alarm time for 60
minutes.
SLEEP TIMER
To adjust sleep timer setting:
1. Turn on desired option:
OPTION
PRESS:
Radio
RADIO
Light
LAMP
Soothing sound
NATURE SOUND
2. Press SLEEP to activate.
3. Press SLEEP repeatedly to change the sleep timer
setting (120, 90, 60, 30, 15, 0 min).
After 5 seconds of inaction, the timer will automatically be
confirmed and set.
To view time remaining:
•
Press SLEEP.
TIP Press SLEEP again to change sleep timer (120, 90, 60,
30, 15, 0 min).
NOTE Ensure radio or sound and/or light has been selected
to activate sleep timer.
NOTE If light option has been chosen for sleep timer, light
will fade out.
READING LAMP
To turn on / off light:
Advertisement
Table of Contents

Related Manuals for Oregon Scientific WS902


Summary of Contents for Oregon Scientific WS902
- Page 1 The settings order is: time, alarm sound (select from 1. Battery compartment this unit to cool until the temperature inside is within a safe (WS902) prepares the body to wake up by gradually beep/radio/rooster crow) 2. WAKE UP LIGHT ON·OFF: Enable / disable light for range.
- Page 2 Hereby, Oregon Scientific, declares that this Sunrise Wake- • Wave your hand up to 8 cm (3 inches) in front of the Up Clock (model: WS902) is in compliance with the essential SNOOZE IR motion sensor to silence it for 8 mintues...
Need help?
Do you have a question about the WS902 and is the answer not in the manual?
Questions and answers