Table of Contents
Advertisement
E X PE R I M E NT M A N UA L
Franckh-Kosmos Verlags-GmbH & Co. KG, Pfizerstr. 5-7, 70184 Stuttgart, Germany | +49 (0) 711 2191-0 | www.kosmos.de
Thames & Kosmos, 301 Friendship St., Providence, RI, 02903, USA | 1-800-587-2872 | www.thamesandkosmos.com
Thames & Kosmos UK Ltd, Goudhurst, Kent, TN17 2QZ , United Kingdom | 01580 212000 | www.thamesandkosmos.co.uk
CodeGamer manual cover english.indd 1
8/9/16 10:04 AM
Advertisement
Table of Contents

Summary of Contents for Thames & Kosmos Code Gamer
- Page 1 E X PE R I M E NT M A N UA L Franckh-Kosmos Verlags-GmbH & Co. KG, Pfizerstr. 5-7, 70184 Stuttgart, Germany | +49 (0) 711 2191-0 | www.kosmos.de Thames & Kosmos, 301 Friendship St., Providence, RI, 02903, USA | 1-800-587-2872 | www.thamesandkosmos.com Thames &...
- Page 2 1000 1001 1101 101 00 100 10 › › › IMPORTANT INFORMATION 1010 Safety Information Kosmos Quality and Safety WARNING! Only for use by children aged 10 years and older. Instructions for parents or other supervising adults are included and have to be observed. Keep the packaging and instructions as they More than one hundred years of expertise in publishing science contain important information.
-
Page 3: Kit Contents
CodeGamer › › › KIT CONTENTS What’s inside your experiment kit: Checklist: Find – Inspect – Check off Description Quantity Item No. Description Quantity Item No. KosmoDuino 717 982 Housing for motion sensor 717 998 718 002 Interaction board 717 981 Breadboard 717 996 Gamepad housing, top right... -
Page 4: Table Of Contents
1000 1001 1101 101 00 100 10 › › › TABLE OF CONTENTS 1010 Safety Information ..........Inside front cover Kit Contents ....................1 Table of Contents ..................2 How to get started with CodeGamer ............3 Assembling the gamepad and sensors The CodeGamer app The World of the Microcontroller ............. -
Page 5: How To Get Started With Codegamer
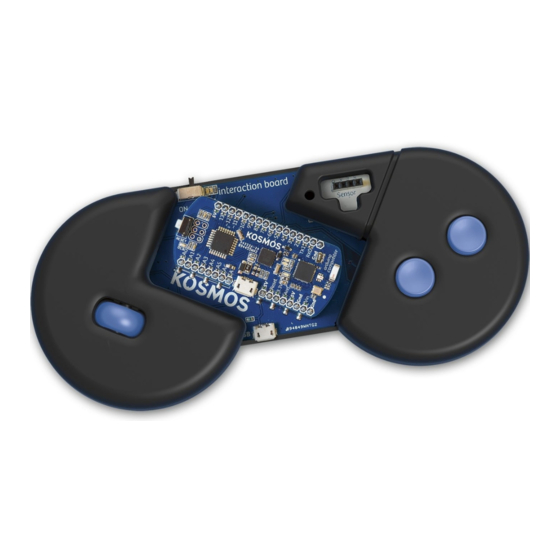
CodeGamer GETTING STARTED How to get started with CodeGamer ASSEMBLING THE GAMEPAD 1. First of all, you will have to insert the little metal spring into its correct location in the left area of the bottom part of the housing. The spring will hold the wheel and ensure that it always returns to its original position. - Page 6 5. Now you can insert the interaction board into the housing. Be sure that the wheel is mounted correctly in the spring (see image in circle). 6. Attach the gray rubber feet onto the bottom of each button. To do this, simply insert the thinner side of the rubber foot into the recess on the bottom of the button.
- Page 7 CodeGamer THE APP To ease your entry into the world of programming, we have developed an app to help you start building experience in this area. The core of the app is a video game in which you have to solve little programming puzzles.
-
Page 8: The World Of The Microcontroller
HOW TO DOWNLOAD THE FREE APP: To install your app, you will need access to Google Play or the Apple App Store. Ask your parents or adult supervisor for help installing the app. If your device runs on Android, open Google Play. Open the App Store with an iPhone or iPad. - Page 9 CodeGamer BUT WHAT IS A MICROCONTROLLER? 2. OUTPUT: A microcontroller is a small (“micro”) computer. But it is also fundamentally different from the computers that you Depending on how it is programmed, the processor can normally deal with: It has no keyboard, no mouse, and no also respond to this information.
-
Page 10: First Steps
Important! You must download and install the Arduino application from: https://www.arduino.cc/en/main/software and you must download and install the Kosmobits libraries and programs from: http://thamesandkosmos.com/codegamer/kosmobits_archive.zip THE KOSMOBITS CONTROLLER After downloading, execute the downloaded file. Since the Arduino software is constantly being revised, there are With your KosmoBits controller, you are holding your very always new versions. -
Page 11: Project 1: Blink
CodeGamer PROJECT 1 PROGRAM CODE EXPLAINED: This is where the explanation for the program code is Here is where the program code is written written. Portions taken from the code are always // Comments on the code are always in gray. highlighted in orange // This text is not a functional part of the... - Page 12 PROJECT 1 Don’t let yourself be intimidated by all the strange terms and brackets! We will go through the program step by step. You will soon see that it isn’t hard to understand at all! But before we can see what the program does, we have to upload it to </>...
- Page 13 CodeGamer PROJECT 1 ERROR MESSAGE? If you see an error message, take a careful look at the program text you entered. Is it possible that you wrote something incorrectly? The place where an error leads to problems in the program text is marked in red in the Arduino environment (see illustration).
- Page 14 PROJECT 1 variable . The way you say it is: “The value 13 is The function setup() , by the way, is a special function. It ledPin assigned to the variable .” is always the first thing that is automatically invoked ledPin whenever you start your KosmoDuino.
- Page 15 CodeGamer PROJECT 1 What happens when loop() is invoked? The first Then we have the instruction instruction in loop() digitalWrite(ledPin, LOW); You can probably understand this one without any help. digitalWrite(ledPin, HIGH); Right — the LED is switched off again! You can use digitalWrite() to control whether voltage...
-
Page 16: Project 2: Off Switch
PROJECT 2 Off switch THE PLAN In your first “blink” sketch, you learned how to use a int ledPin = 13; program to make an LED blink on your KosmoDuino. To do int switchPin = 9; that, you used a pin on your controller as an output pin to int switchValue = HIGH;... -
Page 17: Project 3: On Switch
CodeGamer PROJECT 3 </> This is almost the same as in your first program. The void setup() { is operated as an output pin ( ). Pin 9 pinMode(ledPin, OUTPUT); ledPin OUTPUT ), on the other hand, is operated as an input pinMode(switchPin, INPUT_PULLUP);... - Page 18 PROJECT 3 EXPLANATION </> Let’s just take a look at the loop() function, because that’s the only place where anything was changed relative to the “off switch” program. Just as with the “off switch,” you start by reading out the void loop() { and saving the current value, i.e., switchValue = digitalRead(switchPin);...
-
Page 19: The Interaction Board
CodeGamer INTERACTION BOARD The Interaction Board OK, we admit it. Making a little LED light up is not very To work with the interaction board, you will first have to exciting. Still, it helped to give you a quick introduction to insert your KosmoDuino into the board’s pin socket (see programming your KosmoDuino. -
Page 20: Project 4: Colored Light
PROJECT 4 Multicolored NeoPixel LED Colored light YOU WILL NEED › KosmoDuino in the interaction board THE PLAN On the interaction board, you will find a multicolored LED called a NeoPixel. It’s a kind of LED that lets you decide little project will show you how it works, and how to get </>... - Page 21 CodeGamer </> setup() there will be nothing for you to do this time, void setup() { since the program that you will be linking with the // There is nothing to do here. instruction will already be handling it for you. #include In the main loop, the first thing to do is set the brightness: void loop() {...
- Page 22 PROJECT 4 </> // white red = 255; green = 255; blue = 255; pixel.setColor(red, green, blue, brightness); delay(500); SOFTWARE LIBRARIES To avoid having to reinvent the wheel with every program, there are software libraries. These are not book collections. Instead, they contain reusable program functions and definitions.
- Page 23 CodeGamer CHECK IT OUT In this close-up, you can easily see the three individual LEDs of the NeoPixel. ▶ Additive Color Mixing What you see as white light is actually a mixture of different lights of various colors. Which colors? Take a look at a rainbow and you will see them all. A rainbow is created when the sun’s light is split up into its component colors by raindrops in the air.
-
Page 24: Project 5: At The Push Of A Button
PROJECT 5 At the push of a button First, we want the NeoPixel to stay dark. If you press button 1, the NeoPixel will glow red, while if you press In this project, you will learn how to use the buttons on the button 2 it will glow blue. - Page 25 CodeGamer </> setup() , you use to set the operating void setup() { pinMode() mode for the button pins. Since the buttons are connected pinMode(button1, INPUT); to the pins via a resistor, you will use the pinMode(button2, INPUT); INPUT operating type. In the first instruction digitalRead()
- Page 26 KNOWLEDGE BASE CodeGamer manual inside english.indd 24 7/19/16 12:32 PM...
- Page 27 CodeGamer CodeGamer manual inside english.indd 25 7/19/16 12:32 PM...
-
Page 28: Project 6: A Blinking Die
PROJECT 6 A blinking die THE PLAN: With this project, you will be turning your KosmoDuino • If the controller is ready, the NeoPixel will glow blue. into a simple die. At the push of a button, it will generate a •... - Page 29 CodeGamer PROJECT 6 </> Here’s where you define your own function by the name void roll() { roll() . It will calculate and then output a random // (1) number in the range of 1 to 6. Let’s go through it step by // Light off at first, to show that it is step: // ready to respond to the push of the button.
-
Page 30: Project 7: Serial Monitor
PROJECT 7 The serial monitor THE PLAN With the help of the serial monitor, you can send yourself YOU WILL NEED a brief message from your KosmoDuino and have it appear › KosmoDuino on your computer screen. › Computer To be able to use the serial monitor, proceed as follows: ›... - Page 31 CodeGamer PROJECT 7 </> Now close the serial monitor. In the main loop, replace the void loop() { request Serial.print("Hello!"); with Serial.println("Hello!"); Serial.println("Hello!"); delay(500); Load the changed program to the controller and restart the serial monitor. Each “Hello!” now gets its own line. Senden Hello! Hello!
-
Page 32: The For Loop
THE FOR LOOP The for loop When parts of a program are repeatedly carried out, you i < 20; call that a loop. You already learned about one import This is the test condition: Before each pass through the kind of loop — the main loop, loop() . - Page 33 CodeGamer THE FOR LOOP Here, the loop starts with the starting value of 1. This time, You can actually use any instructions you like in place of instead of testing whether is less than 42, it tests . For example, you can just use even numbers: whether is less than or equal to 42.
-
Page 34: Sensors
SENSORS Sensors Motion sensor So far, you have learned how your KosmoDuino can react to the push of a button. In this experiment kit, though, Temperature you will also find a sensor lot of sensors that can be used to help your microcontroller respond to its... -
Page 35: Project 8: Thermometer
CodeGamer PROJECT 8 Thermometer YOU WILL NEED › KosmoDuino in the interaction board › Temperature sensor PREPARATION Mount the temperature sensor on the interaction board. THE PLAN In this project, you will be turning your KosmoDuino into a thermometer for measuring the temperature with the help of the temperature sensor. - Page 36 PROJECT 8 </> SO CHANGE YOUR PROGRAM LIKE THIS: Close the serial monitor, upload the program, and reopen #include <KosmoBits_Pins.h> the serial monitor. You will see that the current #include <KosmoBits_Thermistor.h> temperature is now being output at regular intervals. const int sensorPin = KOSMOBITS_SENSOR_PIN; void setup() { pinMode(sensorPin, INPUT);...
- Page 37 CodeGamer KNOWLEDGE BASE CodeGamer manual inside english.indd 35 7/19/16 12:32 PM...
-
Page 38: Project 9: Finger Disco
PROJECT 9 Finger disco YOU WILL NEED › KosmoDuino in the interaction board › Motion sensor PREPARATION With the motion sensor, your KosmoDuino will be able to record even the tiniest movements. To develop the proper feel for it, start by inserting the motion sensor into the interaction board. - Page 39 CodeGamer PROJECT 9 </> To determine the resting value, calculate the average of 20 int determineRestingValue() { readings. The number of readings will be saved in the N const int N = 20; // measurement numbers constant, so it can easily be changed. The average is stored float average = 0;...
-
Page 40: Project 10: Cheep
PROJECT 10 Cheep! You can also use the interaction board to produce sounds. This little project will show you how it works. YOU WILL NEED › KosmoDuino in the interaction board THE PLAN So far, the KosmoDuino just beeps at regular intervals. Don’t worry —... -
Page 41: Project 11: Random Sounds
CodeGamer PROJECT 11 Random sounds! You just learned in the “Cheep!” project how to make your KosmoDuino start beeping. But it can get a little boring listening to the same tone over and over. Here’s where you learn how to get random sounds out of your controller. YOU WILL NEED ›... -
Page 42: Project 12: Siren
PROJECT 12 Siren THE PLAN Now it’s time to bring some order to the acoustic chaos. With every pass through the main loop, a new sound will This project will let you make your KosmoDuino howl like be output. Each time, the pitch will be raised a little. Once a siren. - Page 43 CodeGamer KNOWLEDGE BASE An array is sometimes called a Field or Data Field. However the term Array is the much more common name. CodeGamer manual inside english.indd 41 7/19/16 12:32 PM...
- Page 44 KNOWLEDGE BASE CodeGamer manual inside english.indd 42 7/19/16 12:32 PM...
-
Page 45: Project 13: Musical Scale
CodeGamer PROJECT 13 Musical scale YOU WILL NEED › KosmoDuino in the interaction board THE PLAN </> Your KosmoDuino will play a musical scale. THE PROGRAM First you include the KosmoBits_Pins.h file and define #include <KosmoBits_Pins.h> constants. Finally, you freqRoot buzzerPin apply the scale[]... -
Page 46: Project 14: Sensor Organ
PROJECT 14 Sensor organ Now that you have learned how to play musical scales, it’s time to program an actual musical instrument. THE PLAN YOU WILL NEED › KosmoDuino in the interaction board You will produce musical notes at the push of a button. ›... - Page 47 CodeGamer PROJECT 14 </> back to 0. The array is filled from the beginning again. // Raise the index by 1, so the next // value can be saved at the next location Then it’s a matter of determining the average of the last 10 // in the values[] field.
-
Page 48: Project 15: The Serial Plotter
PROJECT 15 The serial plotter YOU WILL NEED › KosmoDuino in the interaction board › Sound sensor THE PLAN The sound sensor is basically a small microphone that you the best thing is to use another cool tool from the Arduino can read via the sensor pin. -
Page 49: Project 16: Clap Switch
CodeGamer PROJECT 16 Clap switch Wouldn’t it be cool if your KosmoDuino could respond to clapping? You can easily program it to do that with the help of your sound sensor. THE PLAN YOU WILL NEED If you clap once, it turns on the NeoPixel on the interaction ›... -
Page 50: Project 17: Drawer Monitor
PROJECT 17 Drawer monitor Have you ever had the suspicion that your brother or sister might be secretly looking through your things when you’re not home? With this drawer monitor, you will be able to catch them! And the best thing about it is that the perpetrator won’t even know that the drawer is under surveillance. - Page 51 CodeGamer PROJECT 17 </> THE MATRIX In this project, we will be using the NeoPixel and both #include <Adafruit_NeoPixel.h> buttons. So we will link to the required libraries here. #include <KosmoBits_Pins.h> #include <KosmoBits_Pixel.h> We are defining three constants for reading the sensor and const int sensorPin = KOSMOBITS_SENSOR_PIN;...
- Page 52 PROJECT 17 </> setup() as usual, we determine the operating modes void setup() { of the pins being used and initialize the output through the pinMode(sensorPin, INPUT); serial interface. Then, is invoked to return the pinMode(button1Pin, INPUT); reset() drawer monitor to its starting state. pinMode(button2Pin, INPUT);...
- Page 53 CodeGamer PROJECT 17 </> IN IDLE When in its idle state, the drawer monitor is waiting for button 1 to be pushed before it starts monitoring. What’s responsible for that is the loopIdle() function, which is invoked by the main loop in mode.
- Page 54 PROJECT 17 </> MONITORING ( CLOSED ) void loopClosed() { The actual monitoring of the drawer happens in Serial.println("In the dark"); CLOSED mode, i.e. in loopClosed() . First, the current level of sensorValue = analogRead(sensorPin); brightness is measured. If it’s dark, it waits one second if (sensorValue <...
-
Page 55: Project 18: Looking Inside The Fridge
CodeGamer PROJECT 18 Looking inside the fridge How can you actually know if the light inside the fridge really does go out when you close the refrigerator door? You can’t exactly check just by looking. You would have to open the door, and then the light would just turn on again. With your KosmoDuino, though, it’s no problem at all! YOU WILL NEED ›... - Page 56 PROJECT 18 </> THE PROGRAM You can probably understand the program without any #include <Adafruit_NeoPixel.h> help. In brief: In setup() you set the sensor pin mode and #include <KosmoBits_Pixel.h> switch off the NeoPixel. In the main loop, you use the light #include <KosmoBits_Pins.h>...
-
Page 57: Project 19: Ghostly Eyes
CodeGamer PROJECT 19 Ghostly eyes THE PLAN How would you like to turn your jack-o’-lantern into Make your jack-o’-lantern’s eyes blink colorfully. On top something even spookier this Halloween? With your of that, you can have it make a gruesome hissing noise at KosmoDuino, you will be able to give it ghostly eyes. - Page 58 PROJECT 19 </> THE PROGRAM The program is extremely simple. First, the constants are #include <KosmoBits_Pins.h> defined for the pins you are using. In setup() , we will give a starting value to the random generator. const int buzzerPin = KOSMOBITS_BUZZER_PIN; const int redPin = 11;...
- Page 59 CodeGamer BREADBOARD The breadboard gives you an easy way to assemble electronic circuits. The outer red- and blue-marked rows are electrically connected to each other. This is where you usually connect the power supply. To do that, you connect one of the microcontroller pins marked with “GND”...
- Page 60 KNOWLEDGE BASE CodeGamer manual inside english.indd 58 7/19/16 12:33 PM...
- Page 61 CodeGamer CHECK IT OUT What is a bug, anyway? ▲ The logbook page with moth When a program doesn’t do what it’s supposed to do, the error is called a bug. You can just call it an error, but the term bug is used much more often. There’s an amazing story behind this term! Earlier computers, such as the Harvard Mark II, completed in 1947, did not yet have any...
- Page 62 CHECK IT OUT At a Maker Faire ▶ Arduino and the Maker Have you ever dreamed of being an inventor? Of thinking up new machines and gadgets and turning them into reality? More and more people are moving beyond merely dreaming, and deciding to actually do it.
- Page 63 CodeGamer ◀ A 3D printer at work 3D Printers What good will the best electronics and the greatest software do you if you can’t find an appropriate housing for your project? This is where a recent maker solution comes in: 3D printers. These are devices that are capable of printing out three-dimensional (3D) objects rather than just two-dimensional (2D) images on paper.
-
Page 64: Common Error Messages
ERROR MESSAGES Common Error Messages error: expected ';' before ')' Here, a semicolon was expected before the closing parenthesis, but it was not found. EXAMPLE: SOLUTION: The comma has to be replaced with a semicolon after In function 'int average2()': DoubleClap:86: error: expected ';' before i <... - Page 65 CodeGamer avrdude: ser_open(): can't open device "\\. \COM4": Access is denied. SOLUTION: You presumably forgot to close the serial monitor before trying to upload the program. Close the serial monitor and re-upload the program. avrdude: ser_open(): can't open device "\\. \COM4": The system cannot find the file specified.
-
Page 66: Notes
NOTES CodeGamer manual inside english.indd 64 7/19/16 12:33 PM...
Need help?
Do you have a question about the Code Gamer and is the answer not in the manual?
Questions and answers