
Related Manuals for Malvern MICROCAL PEAQ-ITC


Summary of Contents for Malvern MICROCAL PEAQ-ITC
- Page 1 MICROCAL PEAQ-ITC LABEL-FREE BINDING ANALYSIS OPERATING INSTRUCTIONS MICROCALORIMETRY LABEL-FREE BINDING ANALYSIS MICROCALORIMETRY...
- Page 3 MICROCAL PEAQ-ITC OPERATING INSTRUCTIONS MAN0572-01-EN-00...
- Page 4 Malvern® and the green “hills” logo are registered trademarks in the UK and/or other countries, and is owned by Malvern Instruments Ltd. MicroCal PEAQ-ITC® is a registered trademark in the UK and /or other countries, and is owned by Malvern Instruments Ltd.
-
Page 5: Table Of Contents
Table of contents CONTENTS Introduction About this manual Important user information Regulatory information Associated documentation Health and safety Safety precautions Labels Emergency procedures Recycling information Declaration of Hazardous Substances (DoHS) System description General introduction System overview Instrument cell unit Washing module Installation Installation precautions Site requirements... - Page 6 Table of contents Clean the instrument Maintenance Maintenance overview Replace the syringe plunger tip Replace the titration syringe Clean the titration syringe Refill the reference cell Troubleshooting Troubleshooting overview Troubleshooting chart Reference MicroCal PEAQ-ITC specifications Chemical resistance guide Wetted materials Index...
-
Page 7: Introduction
INTRODUCTION This section contains important user information, description of safety notices, regulatory information and a general description of the intended use of MicroCal PEAQ-ITC, and a list of associated documentation. The following topics are covered in this section: About this manual... -
Page 8: About This Manual
Software items are identified in the text by bold italic text. A colon separates menu levels, thus Malvern InstrumentsFile:Open refers to the Malvern InstrumentsOpen command in the Malvern InstrumentsFile menu. Hardware items are identified in the text by bold text (for example, Malvern Instru- mentsPower). Important user information Note: All users must read the entire Operating Instructions before installing,... - Page 9 Introducti on MicroCal PEAQ-ITC is intended for research use only and shall not be used in any clinical procedures or for diagnostic purposes. MicroCal PEAQ-ITC is not suitable for operation in a potentially explosive atmosphere or for handling flammable liquids.
-
Page 10: Regulatory Information
Regulatory information Introduction This section lists the directives and standards that the MicroCal PEAQ-ITC system fulfills. Manufacturing information The table below summarizes the required manufacturing information. For further inform- ation, see the EC Declaration of Conformity (EC DoC) document. - Page 11 Malvern Instru- ments, except for alterations described in the user doc- umentation.
-
Page 12: Associated Documentation
CE marked. Associated documentation Introduction This section lists the user documentation that is delivered with MicroCal PEAQ-ITC and related literature that can be downloaded or ordered from Malvern Instruments. User documentation The user documentation for MicroCal PEAQ-ITC consists of:... -
Page 13: Health And Safety
This section provides vital health and safety information which all users of the system must read and understand. It describes safety precautions and emergency shutdown procedures for MicroCal PEAQ-ITC. The labels on the system and information regarding recycling are also described. -
Page 14: Safety Precautions
Warning! Do not operate the product in any other way than described in the MicroCal PEAQ-ITC user documentation. Warning! Do not use MicroCal PEAQ-ITC if it is not working properly, or if it has suffered any damage, for example: damage to the power cord or its plug... - Page 15 If any liquid is spilled on or around the instrument, unplug the instru- ment immediately and wipe up the spilled liquid. If there is any possibility that liquid may have leaked into the instrument case, contact Malvern Instruments immediately. Do not plug the instrument into any electrical outlet until the problem is resolved.
- Page 16 Follow local and/or national regulations for safe operation and maintenance of MicroCal PEAQ-ITC. Installing and moving Warning! The product must be installed and prepared by Malvern Instruments personnel or a third party authorized by Malvern Instruments. Warning! Power cord. Only use power cords with approved plugs delivered or approved by Malvern Instruments.
- Page 17 H ealth and safety System operation Warning! Removal of solutions. All solutions in the cells must be cooled down below 40ºC before removal using the titration syringe. Any higher tem- perature may cause the syringe to break, and the exposure to hazardous sub- stances may increase.
- Page 18 Notice: Never allow liquid in the cells to freeze. The expansion of the liquid can distort the cells and rupture the most critical sensor, causing irreparable dam- age. Notice: The MicroCal PEAQ-ITC should always be moved in its normal oper- ating orientation. Other orientations will subject delicate sensors inside the instrument to stress.
-
Page 19: Labels
Safety Data Sheet. Labels Introduction This section describes the various labels on the MicroCal PEAQ-ITC instrument and their meaning. Instrument label The following illustration shows an example of the identification label that is attached to the MicroCal PEAQ-ITC instrument. - Page 20 H ealth and safety Label text Description The system complies with applicable European directives. Refer to Regulatory inform- ation. This symbol indicates that the product contains hazardous materials in excess of the limits established by the Chinese standard SJ/T11363-2006 Requirements for Con- centration Limits for Certain Hazardous Substances in Electronics.
-
Page 21: Emergency Procedures
The Controller PC shuts down. The washing module shuts down immediately. Restart after emergency shutdown or power failure To restart MicroCal PEAQ-ITC after emergency shutdown or power failure: Step Action Make sure that the condition that caused the power failure or emergency stop is cor- rected. -
Page 22: Recycling Information
Disposal, general instructions When taking MicroCal PEAQ-ITC out of service, the different materials must be separated and recycled according to national and local environmental regulations. Recycling of hazardous substances MicroCal PEAQ-ITC contains hazardous substances. - Page 23 H ealth and safety 根据SJ/T11364-2006《 电子信息产品污染控制标识要求》 特提供如下有关污染 控制 方面的信息 Symbols used in pollution control label 电子信息产品污染控制标志说明 Label Meaning This symbol indicates the product contains hazardous materials in excess of the limits established by the Chinese standard SJ/T11363-2006 Requirements for Concentration Limits for Certain Hazardous Substances in Electronic Information Products.
- Page 24 多 溴 二 苯 铅 汞 镉 铬 苯 醚 MicroCal PEAQ-ITC, cell unit O O O MicroCal PEAQ-ITC, washing mod- O O O MicroCal PEAQ-ITC, controller PC O O O The product has not been tested as per the Chinese standard SJ/T11363-2006 Requirements for Concentration Limits for Certain Hazardous Substances in Elec- tronic Information Product.
-
Page 25: System Description
SYSTEM DESCRIPTION This section provides a description of MicroCal PEAQ-ITC and an overview of its com- ponents. The following topics are covered: General introduction System overview Instrument cell unit Washing module... -
Page 26: General Introduction
Data analysis is performed using MicroCal PEAQ-ITC Analysis Software, wherein the user obtains the stoichiometry (n), dissociation constant (K ), and enthalpy (ΔH) of the inter- action. The MicroCal PEAQ-ITC Analysis Software can also be used to fit more com- plicated models. -
Page 27: System Overview
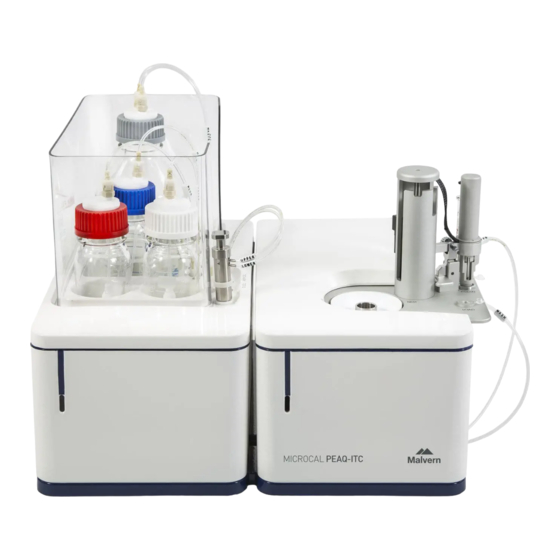
System descri pti on System overview The following illustration shows the MicroCal PEAQ-ITC instrument with the washing module and the Controller PC. Part Description MicroCal PEAQ-ITC washing module MicroCal PEAQ-ITC cell unit Controller PC (not shown) -
Page 28: Instrument Cell Unit
System descri pti on Instrument cell unit The following illustration shows the MicroCal PEAQ-ITC cell unit. Part Description Sample cell Injector tower Pipette Loading syringe Fill Port Adaptor (FPA) FPA Storage Location Wash/load station Titration syringe Titration loading station Clamp... - Page 29 System descri pti on Injector tower (top view) The following illustration shows a top view of the injection tower of the MicroCal PEAQ- ITC cell unit. Part Description Sample cell Reference cell Cell Location Rest Location Load Location Clean Location...
- Page 30 System descri pti on Pipette The following illustration shows the MicroCal PEAQ-ITC pipette unit. Part Function Rotating assembly Plunger tip Pipette housing Syringe glass Retaining nut Syringe paddle stem Syringe tip...
- Page 31 System descri pti on Connections at the rear of the cell unit The following illustration shows the connections at the rear of the MicroCal PEAQ-ITC cell unit. Part Function Power switch 24 VDC input from power supply (AC plug) USB connection to Controller PC...
-
Page 32: Washing Module
System descri pti on Washing module The following illustration shows the MicroCal PEAQ-ITC washing module. Part Function Cell Cleaning Tool Detergent bottle Methanol bottle Water bottle Waste bottle Overflow bottle... - Page 33 System descri pti on Connections at the rear of the washing module The following illustration shows the connections at the rear of the MicroCal PEAQ-ITC washing module. Part Function Power switch 24 VDC input from power supply (AC plug) USB connection to Controller PC...
-
Page 35: Installation
INSTALLATION This section provides brief information about the installation of MicroCal PEAQ-ITC. The following topics are covered in this section: Installation precautions Site requirements Unpacking and transport Set up Note: Any equipment connected to the MicroCal PEAQ-ITC must fulfill applicable... -
Page 36: Installation Precautions
Caution! Disconnect power. To prevent equipment damage, always dis- connect the power from the product before an instrument module is removed or installed, or a cable is connected or disconnected. Note: Lift the product. Lift the MicroCal PEAQ-ITC instrument in the upright position. -
Page 37: Site Requirements
This section outlines the site requirements for MicroCal PEAQ-ITC. Bench space The MicroCal PEAQ-ITC system (instrument and Controller PC) requires about 1.2 meters of bench space (depth approximately 64 cm). For more details, See Site requirements. WARNING! Access to power switch and power cord with plug. Do not block access to the power switch and power cord. - Page 38 WARNING! Protective ground. The product must always be connected to a grounded power outlet. The AC power line should be dedicated to MicroCal PEAQ-ITC and should not share power with additional equipment. Although the power filtering in the MicroCal PEAQ-ITC instrument is adequate for most...
-
Page 39: Unpacking And Transport
Unpack with great care. Document any damage and contact your local Malvern Instruments representative. Moving the system Notice: Lift the product. Lift the MicroCal PEAQ-ITC instrument in the upright position. 1. Disconnect the power cord. 2. Disconnect all cables and tubing connected to peripheral components and liquid containers. -
Page 41: Operation
OPERATION This section provides the information required to safely operate the MicroCal PEAQ-ITC. The following topics are covered in this section: Precautions Prepare the instrument Open a method or an experiment Load the instrument Start the experiment Clean the instrument... -
Page 42: Precautions
Follow local and/or national regulations for safe operation and maintenance of MicroCal PEAQ-ITC. WARNING! Removal of solutions. All solutions in the cells must be cooled down below 40ºC before removal using the titration syringe. Any higher tem- perature may cause the syringe to break, and the exposure to hazardous sub- stances may increase. -
Page 43: Prepare The Instrument
Prepare the instrument Introduction This section describes the procedures needed to prepare the MicroCal PEAQ-ITC for a run. Turn on the MicroCal PEAQ-ITC instrument Once the MicroCal PEAQ-ITC instrument has been connected to the Controller PC, it is ready to use. - Page 44 During frequent operations, the power may be left on as long as the user interface pro- gram, MicroCal PEAQ-ITC Control Software, is running. The software automatically makes sure that the system does not incur any damage and keeps the MicroCal PEAQ-ITC sample cell ready.
-
Page 45: Open A Method Or An Experiment
Operati on close the MicroCal PEAQ-ITC application switch off the power keep both the sample and reference cells filled with deionized water Open a method or an experiment Introduction This section describes how to open a predefined method or experiment in the MicroCal PEAQ-ITC Control Software. - Page 46 For more information, see MicroCal PEAQ-ITC User Manual. Experiment and method files MicroCal PEAQ-ITC Control Software can open calorimetry data files (experiment files) or method files. Method files only contain instrument settings. Experiment files also contain calorimetric data from an experiment run. Parameters from both file types can be used to create new experiment runs.
-
Page 47: Load The Instrument
Operati on Load the instrument Load workspace This workspace is found in the Run Experiment view. Follow the guided workflow that steps the user through loading both the sample cell and the titration syringe. Addi- tionally, the user has the option of watching videos detailing the procedure. Step Action Click Load... -
Page 48: Start The Experiment
Operati on Start the experiment Introduction This section describes how to start an experiment. Experiments are started from the Run workspace. Click Run to enter the Run workspace. Experiment parameters are displayed in the left Experiment Information pane. Real-time experiment status is displayed in the right pane. Experiment information Enter titrant concentration in the [Syr] (M) box. - Page 49 Operati on For more information, see MicroCal PEAQ-ITC User Manual. Run experiment Click Start in the right live pane to start the experiment. The user will be promp- ted to enter a filename and save location for the .itc file.
-
Page 50: Clean The Instrument
Operati on Clean the instrument Clean workspace This workspace is found in the Run Experiment view. Follow the guided workflow that steps the user through cleaning both the sample cell and the titration syringe. Addi- tionally, the user has the option of watching videos detailing the procedure. Step Action Click Clean... - Page 51 Operati on Step Action Note: Software-instrument connection is required to clean the instrument.
-
Page 53: Maintenance
MAINTENANCE This section provides the user with basic information on the proper maintenance of the instrument. For a more detailed description of maintenance procedures, watch the videos provided with the software (in English only). The following topics are covered: Maintenance overview Replace the syringe plunger tip Replace the titration syringe Clean the titration syringe... -
Page 54: Maintenance Overview
Precautions WARNING! Repairs, alterations or modifications must only be carried out by a Malvern Instruments specialist, or with explicit directions from a Malvern Instru- ments technician. Removal or modification of any cover or component could res- ult in an unsafe or easily damaged instrument. - Page 55 When using hazardous chemicals, avoid spillage and wear protective glasses, gloves, and other suitable personal protective equipment as specified in the Safety Data Sheet. Maintenance tools The following tools are used for MicroCal PEAQ-ITC maintenance. Part Function Tweezers Syringe Glass Removal Tool...
- Page 56 Mai ntenance Maintenance workspaces To open a specific maintenance workspace, click Maintenance and the workspace name. The following instruction is an example only, and displays how to open the Change Plun- ger Tip workspace. Step Action Click Maintenance. Click Change Plunger Tip. Result: The Change Plunger Tip workspace is displayed.
-
Page 57: Replace The Syringe Plunger Tip
Move the pipette to the Clean Location To move the pipette to the Clean Location, follow the instruction video and/or the soft- ware guided workflow integrated in the MicroCal PEAQ-ITC Control Software. The software guided workflow is also shown in the following table. - Page 58 Move the pipette to the Load Location To move the pipette to the Load Location, follow the instruction video and/or the soft- ware guided workflow integrated in the MicroCal PEAQ-ITC Control Software. The software guided workflow is also shown in the following table.
- Page 59 Mai ntenance Step Action Carefully remove the syringe glass using the supplied tweezers. If the plunger motion did not expose enough syringe glass, use the Syringe Glass Removal Tool. Insert the Plunger Tip Removal Tool into the empty pipette housing.
- Page 60 Make sure that the tip was removed. Install the plunger tip To install the plunger tip, follow the instruction video and/or the software guided work- flow integrated in the MicroCal PEAQ-ITC Control Software. The software guided workflow is also shown in the following table. Step Action Install a new plunger tip in the Plunger Tip Install Tool.
- Page 61 Mai ntenance Step Action Part Function Plunger tip Plunger Tip Install Tool The plunger tip opening should face out from the tool. Insert the tool into the pipette housing. You will meet resistance as the new plastic tip slides over the plunger. A very soft click...
- Page 62 Remove the tool. Install the syringe glass To install the syringe glass, follow the instruction video and/or the software guided work- flow integrated in the MicroCal PEAQ-ITC Control Software. The software guided workflow is also shown in the following table. Step Action Grasp the pipette's rotating assembly.
- Page 63 Mai ntenance Step Action If aligned properly, the installed syringe glass should leave approximately 2 mm of glass exposed. Leave the retaining nut in the Clean Location, and insert the pipette into the Clean Loca- tion without fully engaging the clamp. Start to reinstall the retaining nut by turning the pipette's rotating assembly with its threads engaged with the retaining nut.
-
Page 64: Replace The Titration Syringe
Move the pipette to the Clean Location To move the pipette to the Clean Location, follow the instruction video and/or the soft- ware guided workflow integrated in the MicroCal PEAQ-ITC Control Software. The software guided workflow is also shown in the following table. - Page 65 Move the pipette to the Load Location To move the pipette to the Load Location, follow the instruction video and/or the soft- ware guided workflow integrated in the MicroCal PEAQ-ITC Control Software. The software guided workflow is also shown in the following table.
- Page 66 Use the syringe glass removal tool if the plunger motion did not expose enough syringe glass. Install the syringe glass To install the syringe glass, follow the instruction video and/or the software guided work- flow integrated in the MicroCal PEAQ-ITC Control Software. The software guided workflow is also shown in the following table.
- Page 67 Mai ntenance Step Action Grasp the pipette's rotating assembly. Gently insert the syringe glass with the syringe's fill port facing the same direction as the hole in the pipette's rotating assembly. If aligned properly, the installed syringe glass should leave approximately 2 mm of glass exposed.
-
Page 68: Clean The Titration Syringe
Move Pipette to Load Location Remove Syringe Glass Clean Syringe Glass Install Syringe Glass Move the pipette to the Clean Location To move the pipette to the Clean Location, follow the instruction video and/or the soft- ware guided workflow integrated in the MicroCal PEAQ-ITC Control Software. - Page 69 Move the pipette to the Load Location To move the pipette to the Load Location, follow the instruction video and/or the soft- ware guided workflow integrated in the MicroCal PEAQ-ITC Control Software. The software guided workflow is also shown in the following table.
- Page 70 Mai ntenance The software guided workflow is also shown in the following table. Step Action Carefully remove the syringe glass using the supplied tweezers. Use the syringe glass removal tool if the plunger motion did not expose enough syringe glass. Clean the syringe glass Clean the glass syringe occasionally by hand, as the instrument does not clean the entire inner diameter of the glass syringe.
- Page 71 Dry the syringe to prevent sample dilution. Install the syringe glass To install the syringe glass, follow the instruction video and/or the software guided work- flow integrated in the MicroCal PEAQ-ITC Control Software. The software guided workflow is also shown in the following table. Step Action Grasp the pipette's rotating assembly.
- Page 72 Mai ntenance Step Action If aligned properly, the installed syringe glass should leave approximately 2 mm of glass exposed. Leave the retaining nut in the Clean Location, and insert the pipette into the Clean Loca- tion without fully engaging the clamp. Start to reinstall the retaining nut by turning the pipette's rotating assembly with its threads engaged with the retaining nut.
-
Page 73: Refill The Reference Cell
Refill the reference cell Introduction The MicroCal PEAQ-ITC instrument has two cells, the sample cell and the reference cell. The reference cell must be refilled manually. An underfilled reference cell can result in a starting baseline position greater than specified in the ITC Method. - Page 74 Mai ntenance Step Action Inject the water solution slowly into the cell until it spills out over the top of the cell stem. Dislodge any trapped bubbles with several abrupt spurts of the water solution. Note: Make sure no bubbles are transported into the reference cell while loading the water solution.
-
Page 75: Troubleshooting
TROUBLESHOOTING This section provides information on how to solve problems that may arise. The following topics are covered: Troubleshooting overview Troubleshooting chart... -
Page 76: Troubleshooting Overview
Run a water into water titration with at least 15 injections of 2μl each. If, after completion of the steps listed above, the MicroCal PEAQ-ITC performance is not corrected, please contact the Malvern Instruments help desk. The water runs should be provided to the Malvern Instruments technician for evaluation. -
Page 77: Troubleshooting Chart
Check that the Fill Port Adapter that con- nects to the titration syringe is not dam- aged. Control software reports initialization Contact your Malvern Instruments service rep- errors, communication problems, or hard- resentative. ware errors not covered in this manual... -
Page 79: Reference
REFERENCE This section provides reference information that may be useful when installing, operating, maintaining and troubleshooting the MicroCal PEAQ-ITC system. The following topics are covered in this section: MicroCal PEAQ-ITC specifications Chemical resistance guide Wetted materials... -
Page 80: Microcal Peaq-Itc Specifications
Reference MicroCal PEAQ-ITC specifications Physical specifications Property Value Cell material Hastelloy Alloy C-276 Weight: Fully assembled 13.6 kg Dimensions: Fully assembled (W x H x D) 43 × 38 × 46 cm Electrical specifications Property Function Electrical ratings: Voltage 100-240 VAC (power adapter), 24 VDC (power supply to the instrument) -
Page 81: Chemical Resistance Guide
Service functions will require an additional 30 cm overhead clearance. Chemical resistance guide Introduction This section specifies the chemical resistance of MicroCal PEAQ-ITC to some of the most commonly used chemicals in isothermal titration calorimetry. List of tested compatible chemicals Note: A user can be exposed to large volumes of chemical substances over a long time period. -
Page 82: Wetted Materials
Ethylene Glycol Contrad 70 Decon 90 Wetted materials Introduction This section specifies the wetted materials of MicroCal PEAQ-ITC. Wetted surface materials The following wetted surface materials are used in MicroCal PEAQ-ITC: Hastelloy C276 316 SST PEEK Kalrez™ PTFE Borosilicate glass EPDM ULTEM™... -
Page 83: Index
Documentation INDEX associated 10 Injection tower downloadable 10 cell unit 27 user 10 Install plunger tip 58 Downloadable content 10 Ambient environment 35 Install syringe glass 60, 64, 69 Associated documentation 10 Installation set up 37 Electrical power 36 site requirements 35 Emergency Bench space 35 unpacking and... - Page 84 procedure before an exper- Remove syringe glass 56, 63, 67 iment 41 Replace plunger tip 55 Maintenance 51 start experiment 46 Replace syringe 62 clean syringe 66 Restart clean syringe glass 68 Personal protection, pre- after emergency install plunger tip 58 cautions 13 shutdown 19 install syringe glass 60, 64,...
- Page 85 Troubleshooting chart 75 Typographical conventions 6 Unpacking 37 User documentation 10 User information, important 6 Washing module 30 connections at the rear 31 Wetted materials 80...
- Page 86 Malvern Instruments Limited Grovewood Road, Malvern Worcestershire, WR14 1XZ, UK Tel +44 1684 892456 Fax +44 1684 892789 www.malvern.com MAN0572 Cover: MRK2157...
Need help?
Do you have a question about the MICROCAL PEAQ-ITC and is the answer not in the manual?
Questions and answers