Table of Contents
Advertisement
Advertisement
Table of Contents

Related Manuals for Comelit 1998A

Summary of Contents for Comelit 1998A
- Page 1 TECHNICAL MANUAL Porter switchboard Art. 1998A Passion.Technology. Design.
-
Page 2: Warning
Warning Intended use This Comelit product was designed for use in the creation of audio and video communication systems in residential, commercial or industrial settings and in public buildings or buildings used by the public. Installation All activities connected to the installation of Comelit products must be carried out by qualified technical personnel, with careful observation of the indications provided in the Manuals / Instruction sheets supplied with those products. -
Page 3: Table Of Contents
Table of contents Warning .................... 2 Settings ..................14 I1 - Change time ................15 Description ..................4 I2 - Change date ................15 Programming keys and display ...............5 I3 - Day/night automatic mode ............15 Alphanumeric keypad ................5 I3.1 - Activation/deactivation ............15 General description ..................6 I3.2 - Set times in auto mode ............15 Technical features ................ -
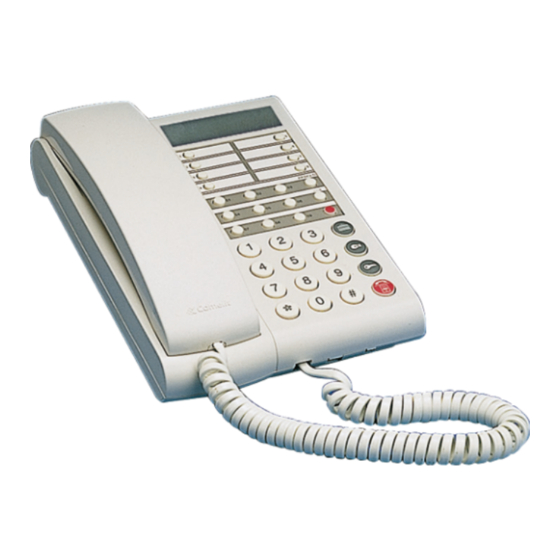
Page 4: Description
Description Porter switchboard in desk version with digital keypad and 32-character alphanumeric display. Allows the code and name of the called and calling users to be displayed, keeping unanswered calls stored in the memory. Day/Night mode and user/ user intercom service. Allows call addressing for up to 120000 users. It also allows call transmission with indirect codes, management of alarm indications originating from users. -
Page 5: Programming Keys And Display
Programming keys and display MENU To enter the programming menus Can be used to select the various menu options Can be used to move the cursor in order to change the entered data Confirm the displayed information or data entered CANC Delete the data entered Cancelling the selected option and exiting the programming menu... -
Page 6: General Description
General description The main functions of the switchboard are as follows: • call an internal unit • receive calls from external units and transfer them to internal units as necessary • receive routine or alarm calls from the internal units •... -
Page 7: Connection
Connection CNO OUTPUT FOR REMOTE CAMERA CONTROL AUDIO ENTRY SYSTEM RISER RS 232 FOR DOWNLOADING NAMES IN DIRECTORY VIA 1249/A 1195 (---) AUTO 14:40 MER 12/03/10 1998A EXTERNAL UNIT Free contact for “CALL REP.” or “ENABLE EXTERNAL MONITOR”... -
Page 8: Operation
Operation The following functions are the main features of the switchboard and its operating mode, these can all be accessed directly, without using the menus. COMMUNICATING U1 How to answer a call from an internal unit TO EXTERNAL UNIT When the switchboard receives a call from an internal unit: »... -
Page 9: U4 How To Transfer A Call From The External Unit To An Internal Unit
U4 How to transfer a call from the external unit to an U5 How to set up communication between 2 internal internal unit units (intercom function) When the switchboard receives a call from an external unit, When the switchboard is communicating with an internal unit directed to an internal unit: (e.g. -
Page 10: U7 How To Use The Directory
If the porter switchboard is in DAY mode, the number of U9 How to find a name in the directory missed calls will appear on the display. If you wish to find a name in the directory: If the switchboard is in NIGHT mode, will appear 1. -
Page 11: U12 How To Use The Lock-Release
f To disable it, repeat the procedure so that the initial screen CHANGE SB CODE 001 appears on the display: (_ _) 14:40 f to confirm the Simplebus code change, press OK; WED 12/03/10 f press ESC to exit. » Once a call has been made, the switchboard will ring until the remote device begins communicating;... -
Page 12: U17 How To Call A Secondary Switchboard From A Main Switchboard (Available From R.i.006)
» If the call has not taken place correctly, if the system is busy or if the main switchboard does not exist, the CAUTION! To use this function, there must be an external display shows: unit and actuators Art. 1256. Contact your usual installer. FUNCTION NOT AVAILABLE U17 How to call a secondary switchboard from a main... -
Page 13: U21 How To Activate (Master) Or Deactivate (Slave) The Main Switchboards (Available From R.i.006)
f to end the conversation, hang up the handset. U21 How to activate (MASTER) or deactivate (SLAVE) the main switchboards (available from R.I.006) When using 2 main switchboards configured in series, use one of the following methods: • press the A/V key on the active switchboard (MASTER), the following screen will appear: * 1- MASTER 2 - SLAVE... -
Page 14: Settings
Settings This section is aimed at qualified technicians who, after installing the product, will program the porter switchboard using guided menus, which can be viewed on the display by navigating the main menu. The user can apply these functions to change some of the switchboard settings (e.g.: language, date/time, delete all names in the directory, etc.). -
Page 15: I1 - Change Time
Example: I1 - Change time You want to configure the switchboard with the following 1. press the MENU key and the 1-CHANGE TIME key: parameters: 1-CHANGE TIME 07:00 – 12:00 Day mode operation 2-CHANGE DATE 13:00 – 22:00 Day mode operation 2. -
Page 16: I4 - Recording Speed Number
MONDAY 1-ITALIAN MODE: AUTO *2-ENGLISH 3. press ESC repeatedly to return to the main screen. MONDAY MODE: DAY MONDAY MODE: NIGHT I6 - Downloard names from pc 4. to confirm and move on to the next day, press OK and You can enter names in the memory by downloading them repeat the procedure for all days of the week;... -
Page 17: Configurations
Configurations Menu 8 screens tree diagram SERVICE ACTIVE *1 - NORMAL MODE 1 - VIDEO MODE 8 - ADVANCED SERVICE NON ACTIVE OPTIONS CONFIGURATION 2 - DIRECT MODE (default) *1 - SB CODE 2 - INDIRECT CODE 2- CALLING MODE 3 - INDIRECT CODE *1 - FILTER OFF WITHOUT NAME... -
Page 18: C8.1 - Video Mode Configuration
To activate the function: C8.1 - Video mode configuration 1. press the MENU key and use the keys to view the (available from R.I.006) 8-ADVANCED OPTIONS menu, then press 8; This is disabled by default. 8-ADVANCED Activating this function will allow you to make a video call to OPTIONS an internal unit. -
Page 19: How To Configure A Main Switchboard
device positioned underneath the LPin-LPin line of display the 3-SERIES CPS menu, then press 3; switching device Art. 1424 as LP-IN. *3- SERIES CPS For the PARALLEL switchboard, switching to NIGHT and the DAY/NIGHT AUTOMATIC function is not f to configure it as MASTER, press 1, possible (see ”I3 - Day/night automatic mode”... -
Page 20: C8.5 - Triple Call On/Off (Available From R.i.006)
» if key 1 has been selected, the CONTACT TIME (closure) C8.5 - Triple call on/off (available from R.I.006) will be requested; use keys to display the selected This is disabled by default. time (1, 3 or 5 sec.); This function can be used to activate or deactivate the triple call made by the switchboard to the internal units. - Page 22 C E R T I F I E D M A N A G E M E N T S Y S T E M S w w w . c o m e l i t g r o u p . c o m Via Don Arrigoni, 5 - 24020 Rovetta (BG) - Italy...
Need help?
Do you have a question about the 1998A and is the answer not in the manual?
Questions and answers