Table of Contents
Advertisement
Quick Links
Advertisement
Table of Contents

Related Manuals for 360Rize 360Penguin

Summary of Contents for 360Rize 360Penguin
- Page 1 Instructions for 360Rize 360Penguin 360° Panoramic Camera...
-
Page 2: Table Of Contents
CONTENTS 2 Camera Specifications........3 3 Product Layout Details ......... 4 4 In The Box ............ 5 5 Button Functions ......... 5 5.1 Power Button ........5 5.2 WiFI Wireless On/Off Button ....6 6 Function Of The LED Lights......6 6.1 Charging With Power Off......6 6.2 Charging With Power On ...... -
Page 3: Camera Specifications
24M (6912 x 3456), 18M (6112 x 3056), Resolution 16M (5760 x 2880), 12M (4896 x 2448), 8M (4000 x 2000) 4M (2880 x 1440) 360Penguin (Android & IOS) APP preview 360° Spherical mode, Google mode Cardboard mode, Little Planet, Mirror... -
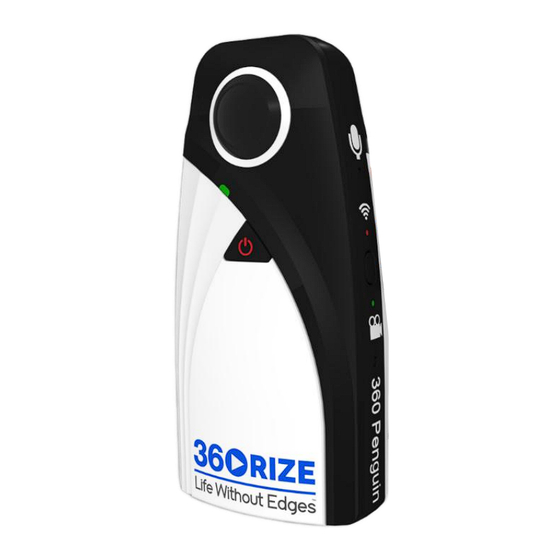
Page 4: Product Layout Details
PRODUCT LAYOUT DETAILS Layout of product buttons and LED lights. -
Page 5: In The Box
IN THE BOX BUTTON FUNCTIONS There are only 2 buttons to understand on the camera. POW ER BU TT ON Power On/Off: Press the button for 3 seconds to turn on/off Restart: Press the button for 10 seconds Switch Mode: Double click the button quickly to switch to photo mode or video mode. -
Page 6: Wifi Wireless On/Off Button
to start video. Record Mode LED flashes when taking video. Press again to stop video. Note: In preparation for taking pictures and video you must have the micro SD card installed. WI FI WI RELE SS ON / OF F BU TT ON Open Wi-Fi: Click the Wi-Fi button and Wi-Fi will open. -
Page 7: Charging With Power On
The blue light flashes fast 25% - 75% charge. The red-light flashes fast 0 – 25% charge. CH A RGI NG WIT H POW ER ON The green light steady more than 95% charge. The green light flashes slow 75% - 95% charge. The blue light flashes slow 25% - 75% charge. -
Page 8: App - Main Screens
360Penguin Site Google Play Store IOS App Store APP – MAIN SCREENS... -
Page 9: App - Camera Settings
Figure 1 Figure 2 Figure 3 Figure 1: Main Startup – Allows the user to access Settings, Edit Files, and connect the Camera. Figure 2: Video Record Screen – Allows the user to record video and toggle multiple camera views. Figure 3: File Manager for Camera SD and Phone –... -
Page 10: App - How To Social Share
Figure 4 Figure 5 Figure 4: Main Startup -Allows the user to access Settings, Edit Files, and connect the camera. Figure 5: Video – 360 Video, 360 Photo, 360 Time Lapse, 360 Live Streaming, Social Media, and SD Card Settings are all available settings. 10 APP –... - Page 11 Figure 6 Figure 7 Figure 8 Figure 6: 360 Screen – Allows the user to Livestream with a simple push of the “GO” button. Allows a direct login into Facebook or YouTube. Figure 7: Live Streaming Facebook – Allows the user to Live Stream to Facebook.
-
Page 12: App - 360 Files On Mobile
11 APP – 360 FILES ON MOBILE Figure 9 Figure 10 Figure 9: Mobile Device Files – Group File Management of Mobile Files. Figure 10: Main Startup – Allows the user to access Settings, Edit Files, and connect the camera. -
Page 13: App - 360 Files On Camera
12 APP – 360 FILES ON CAMERA Figure 11 Figure 12 Figure 11: Camera Files located on Micro SD Card – Group File Management of Camera Files. Figure 12: Main Startup – Allows the user to access Settings, Edit Files, and connect the camera. -
Page 14: Mounting Options
MOUNTING OPTIONS Figure 1 Figure 2 Figure 1: Camera mounted on included tripod. Figure 2: Camera mounted on optional adapter, to allow for constant power via USB-C cable. -
Page 15: Common Problems
COMMON PROBLEMS 1. Image delay/block? 2. Display abnormal image after change to 2176X1088 resolution? 3. Why is the image shared out a dual spherical photo? 4. Share black screen when viewing the link on the PC? 5. Why is the image shared on YouTube not clear? FCC CERTIFICATION FCC STATEMENT :... - Page 16 interference that may cause undesired operation. Warning: Changes or modifications not expressly approved by the party responsible for compliance could void the user's authority to operate the equipment. NOTE: This equipment has been tested and found to comply with the limits for a Class B digital device, pursuant to Part 15 of the FCC Rules.
- Page 17 is encouraged to try to correct the interference by one or more of the following measures: Reorient or relocate the receiving antenna. Increase the separation between the equipment and receiver. Connect the equipment into an outlet on a circuit different from that to which the receiver is connected.
Need help?
Do you have a question about the 360Penguin and is the answer not in the manual?
Questions and answers