Advertisement
Quick Links
Keyboard stand for FP series
※ このスタンドを正しくお使いいただくために、ご使用前に「安全上のご注意」と「使用上のご注意」をよくお読みください。また、取扱
説明書は必要なときにすぐに見ることができるよう、手元に置いてください。
• 組み立て作業は、必ず 2 人以上で行ってください。
• このスタンドを組み立てたり、移動したりする際は、手をはさんだり、足の上に落とさないよ
う、十分に注意してください。
• 安全に作業できるスペースを確保してください。
• 電動工具を使用して組み立てないでください。ネジが空回りする恐れがあります。
• KSC-76 は FP-80 専用です。
部品の確認
組み立てる前に、部品がそろっていることを確認してください。
1
2
A
C
B
3
(KSC-76)
組み立て手順
※ プラス・ドライバーをご用意ください。
※ 各ネジはしっかり締め付け、安定した水平な場所に設置してく
ださい。
※ 作業中、ペダル・コードや電源コードをはさまないように注意
してください。
1
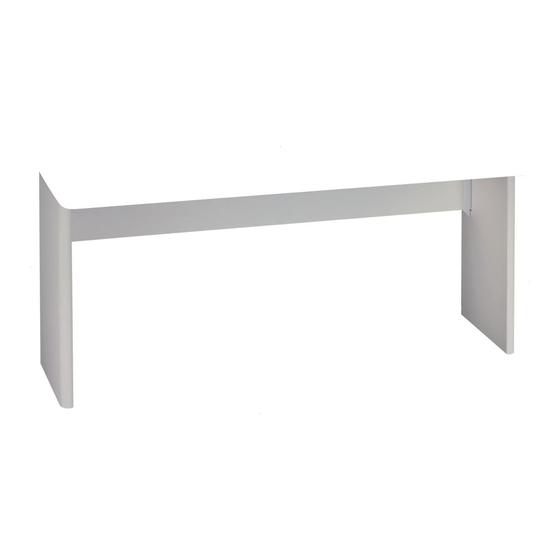
スタンドの組み立て
最初はネジをゆるめに締めて全体を組みます。そして、ゆがみを補
正しながら締め付けるとうまく組み上げることができます。
1.
サイド ・ ボード (右) ( 金具が内側になるように) をネジ a (M6
× 18mm)でセンター・ボードに固定します。
2.
サイド・ボード(左)も同様にネジ a(M6×18mm)で固
定します。
2
1
ネジ a (4 本)
センター・ボード
サイド・ボード(右)
サイド・ボード(左)
2
本体とスタンドの組み立て
1.
ピアノ本体をスタンドの上に載せ、ノブ・ボルトでしっか
りと固定します。
※ 本体を持つときは、手をはさまないように注意してください。
本体底面
ノブ・ボルト(4 本)
手をはさまないように注意!
サイド・ボード
KSC-76
取扱説明書
KSC-44
KS C - 7 6
K S C - 44
4
(KSC-76)
A
サイド・ボード(左)
1 個
A
サイド・ボード(左)
B
サイド・ボード(右)
1 個
B
サイド・ボード(右)
5
C
センター・ボード
1 個
C
センター・ボード
(KSC-44)
1
ネジ a(M6×18mm) 4 本
1
ネジ a(M6×18mm) 4 本
2
ノブ・ボルト
4 本
2
ノブ・ボルト
3
ヘッドホン・フック a
1 個
5
ヘッドホン・フック b
4
ネジ b(M4×16mm) 2 本
3
ヘッ ドホン・フックの取り付け
K S C - 76
1.
ヘッドホン・フック a をネジ b(M4×16mm)で
固定します。
ヘッドホン・
フック a
ネジ b(2 本)
K SC - 44
1.
ヘッドホン・フック b を、本体下にある穴に差し込
みながら回します。
2.
ヘッドホン ・ フック b の蝶ネジを回して、 ヘッドホン ・
フック b を固定します。
ヘッドホン・
フック b
※ 製品の仕様や外観は、改良のため予告なく変更することがあり
ます。
Keyboard stand for FP series
* Before using this stand, carefully read the sections entitled: "USING THE UNIT SAFELY" and "IMPORTANT NOTES. " Additionally, the manual should be saved
and kept on hand as a convenient reference.
Parts Check
Before you begin assembling the stand, check that all the parts were
supplied.
1 個
1 個
1 個
A
C
4 本
1 個
Assembly Procedure
* You will also need to have a Phillips screwdriver.
* Fasten each screw tightly, then place the stand in a stable and horizontal place.
* Do not allow the pedal cord or power cable to get twisted or pinched while
assembling the stand.
1
Stand Assembly
At rst, assemble the entire stand in a temporary fashion, without really
tightening the screws. Then, after checking the overall alignment of the
boards (and gently shifting certain parts where necessary), go around and
tightly fasten each of the screws.
1.
Attach the side board (right) for the right sides to the center
board (so that the metal parts face inside) using screws "a" (M6
x 18 mm).
2.
Use screws "a" (M6 x 18 mm) to attach the side board (left) in
the same way.
2
Center board
Side board (right)
Side board (left)
2
Installing the Piano on the Stand
1.
Set the piano on the stand, then rmly attach the four knob
bolts.
* When handling the piano, rmly grasp it. Be careful, so you do not get your ngers
pinched.
Underneath
the Piano
Knob bolt (x 4)
Please don't get your ngers
Side board
pinched!
KSC-76
KSC-44
•
Make sure that another person is on hand to help with the assembly and setup.
•
Be very careful, when you assemble and move the piano, to make sure that you do not drop it on your
hands or feet.
•
Prepare an area in which you can perform the assembly safely.
•
Do not use a power tool (e.g., an electric screwdriver) to assemble the stand. You risk damaging or
stripping the screws.
•
The KSC-76 is designed speci cally to be used with the FP-80.
KSC-76
A
Side board (left)
1
4
(KSC-76)
B
Side board (right)
C
Center board
1
Screw "a" (M6 x 18 mm)
2
5
(KSC-44)
2
Knob bolt
B
3
Headphone hook "a"
4
Screw "b" (M4 x 16 mm)
3
(KSC-76)
3
Attaching the Headphone Hook
KSC-76
1.
Attach the headphone hook "a" using screws "b" (M4 x
16 mm).
Headphone
hook "a"
Screw "b" (x 2)
1
Screw "a" (x 4)
KSC-44
1.
Press and twist the headphone hook "b" included with
the piano into the hole in the bottom of the piano (refer
to the gure below).
2.
Turn the thumbscrew of the headphone hook "b" to
secure the headphone hook "b".
Headphone
hook "b"
* In the interest of product improvement, the speci cations and/or appearance of this
unit are subject to change without prior notice.
Owner's Manual
KSC-44
1
A
Side board (left)
1
1
B
Side board (right)
1
C
1
Center board
1
4
1
Screw "a" (M6 x 18 mm)
4
4
2
Knob bolt
4
1
5
Headphone hook "b"
1
2
Advertisement

Related Manuals for Roland KSC-76


Summary of Contents for Roland KSC-76
- Page 1 Do not use a power tool (e.g., an electric screwdriver) to assemble the stand. You risk damaging or • 安全に作業できるスペースを確保してください。 stripping the screws. • The KSC-76 is designed speci cally to be used with the FP-80. • 電動工具を使用して組み立てないでください。ネジが空回りする恐れがあります。 • KSC-76 は FP-80 専用です。 Parts Check 部品の確認...
- Page 2 Copyright © 2013 ROLAND CORPORATION © 2013 ローランド株式会社 本書の一部、もしくは全部を無断で複写・転載することを禁じます。 All rights reserved. No part of this publication may be reproduced in any form without the written permission of ROLAND CORPORATION. Roland は、日本国およびその他の国におけるローランド株式会社の商標または登録商標です。 Roland is a registered trademark of Roland Corporation in the United States and/or other countries.
Need help?
Do you have a question about the KSC-76 and is the answer not in the manual?
Questions and answers