Table of Contents
Advertisement
NOTE:
Please read all instructions
carefully before using this
product
Table of Contents
Important Precautions
Components
Assembly
Operation and Adjustment
Maintenance
Parts List
Warranty
Model
JX-651BW
Retain This
Manual for
Reference
161101
OWNER'S
MANUAL
MARCY JX-651BW
Easy Folding Motorized Treadmill
2801 S. Towne Ave, Pomona, CA 91766
support@impex.fitness.com
IMPEX
INC.
®
Tel: (800) 999-8899
www.marcypro.com
Advertisement
Table of Contents

Related Manuals for Impex MARCY JX-651BW

Summary of Contents for Impex MARCY JX-651BW
- Page 1 NOTE: Please read all instructions carefully before using this product Table of Contents Important Precautions Components MARCY JX-651BW Assembly Easy Folding Motorized Treadmill Operation and Adjustment Maintenance Parts List Warranty Model JX-651BW Retain This Manual for Reference 161101 OWNER'S MANUAL IMPEX INC.
-
Page 2: Table Of Contents
Before you Begin Thank you for selecting the MARCY EASY FOLDING MOTORIZED ® TREADMILL JX-651BW by IMPEX INC. For your safety and benefit, read this manual carefully before using the equipment. As a manufacturer, we are committed to provide you complete customer satisfaction. If you have any questions, or find there are missing or damaged parts, we guarantee you complete satisfaction through direct assistance from our factory. -
Page 3: Important Precautions
To reduce the risk of serious injury, read all important precautions and instructions in this manual and all warnings on your treadmill before using your treadmill. Impex assumes no responsibility for personal injury or property damage sustained by or through the use of this product. - Page 4 standing on the walking belt. Always hold make sure that the storage latch is holding the handrails while using the treadmill. the frame securely in the storage position. 19. The treadmill is capable of high speeds. 23. Do not change the incline of the treadmill Adjust the speed in small increments to by placing objects under the treadmill.
-
Page 5: Components-Parts
Components - Parts Lubrication Oil x 2 Main Frame x 1 Power Cord x 1 MP3 Connection x 1 Safety Key x 1... -
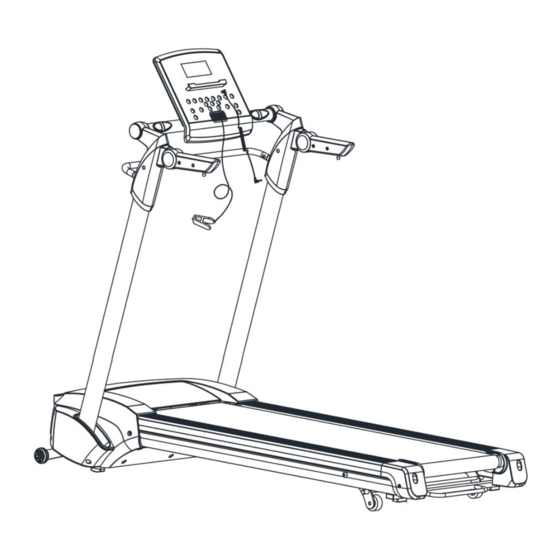
Page 6: Assembly
Assembly This treadmill is shipped completely assembled for your convenience. Folding and Unfolding Mechanism Step 1 Remove the Treadmill from the Carton. Grasp the console rod with one hand, and disengage the lock by pulling the lifting bar with the other hand towards the console rod as shown in the diagram. - Page 7 Step 2 Grasp the lifting bar and lift the console in the direction as shown in the diagram.
- Page 8 Step 3 When the console posts are locked in place, release the lifting bar. You should hear and feel the locking mechanism engage. Flip the console housing and handrail into place as shown in the diagram. Note: the handles can be flipped only after pulling the locking ball pin on the end of the handle.
- Page 9 Folding Mechanism Pull and hold the armrest pin to fold up armrest. Flip down the Console. Grip and hold the Handrail Bar (1) with one hand; hold Lifting Bar (122) in middle and pull the Bar up, and slowly folding down the Uprights.
-
Page 10: Operation And Adjustment
Please unplug the power source and push down the button, and then plug in the power cord and turn on the switch to restart your workout. If the button pops up again, please contact Impex. IMPORTANT NOTICE: SAFETY KEY: The treadmill will only work if the safety key (104) is properly locked in the provided notch of the console. - Page 11 CONSOLE DIAGRAM A Quick Speed Select B Start C Speed- D PRO. E MODE F Speed+ Stop...
- Page 12 FUNCTIONS AND OPERATIONS TECHNICAL SPECIFICATION Time---------------------------------00:00--99:59 Min SAFETY KEY Speed-------------------------------0.0--8.0 mile/h The safety key must be placed into the Distance----------------------------0.00--99.9 mile magnetic recess on the console in order to Calorie------------------------------0.0--999 Kcal operate the treadmill. Always place the Circle -------------------------------0-99 circles safety key on its position and attach the clip to your clothing at your waist before START...
- Page 13 Turn on the treadmill, press the “Mode” key STARTING YOUR TREADMILL Turn on the treadmill, and press “Start” button two times, and the “Dis” (Distance) window flashes and displays “1.00”, which is the on the console. Press “Speed +” or “Speed -” button to adjust pre-set training distance of the treadmill.
- Page 14 Program Workout Model (P01—P10) In this mode, the user has a choice of Program P01 time (the range is: 5:00---99:00). – Program P10. Press “Start” button and the treadmill will count Press the “Prog. ” button, the “Speed” window down three and start operation. The start speed will display “P01”...
-
Page 15: Maitenance
Maintenance Proper maintenance is very important to ensure a STEP 2: Repeat STEP 1 for the right belt tension faultless and operational condition of the treadmill. bolt. You must be sure to turn both bolts the same Improper maintenance can cause damage to the number of turns, so the rear roller will stay square treadmill or shorten the life of the product and relative to the frame. - Page 16 CENTERING THE RUNNING BELT 1. Start the treadmill without anyone on the running belt, press “Speed+” button until speed reaches 4mile/h. 2. Observe whether the running belt is toward the right or left side of the deck. a) If toward the left side of the deck, using 6# Allen Wrench, turn the left adjustment bolt clockwise 1/4 turn and let the running belt find its new position;...
- Page 17 DECK LUBRICATION The treadmill is pre-lubricated. However, it is CLEANING recommended to check the lubrication of the Regular cleaning of the belt ensures a long treadmill regularly, to ensure an optimal operation product life. of the treadmill. Warning: The treadmill must be turned off to avoid electric shocks.
- Page 18 TROUBLE SHOOTING Symptom Cause and Check Solution Safety Key not in position Re-locate the safety key into the front of the console A: Check speed signal wire if connected properly Communication error (controller B: Replace the speed signal wire not receives console signal) C: Replace the driver A: Re-insert the motor wire or replace motor Stalling protection...
-
Page 19: Suggested Stretches
EXERCISE INSTRUCTIONS Each workout should include the following three parts: 1. The Warm Up Phase This stage helps get the blood flowing around the body and the muscles working properly. It will also reduce the risk of cramp and muscle injury. It is advisable to do a few stretching exercises as shown below. - Page 20 3. The Cool Down Phase This stage is to let your Cardio-vascular System and muscles wind down. This is a repeat of the warm up exercise e.g. reduce your tempo, continue for approximately 5 minutes. The stretching exercises should now be repeated, again remembering not to force or jerk your muscles into the stretch.
-
Page 21: Exploded Diagram
EXPLODED DIAGRAM... -
Page 22: Parts List
JX-651BW PARTS LIST PART NO DESCRIPTION SIZE QUANTITY Handrail Bar Left Console Mast Handle Connector Right Console Mast Running Stage Motor Support Base Frame Spring Rod Incline Adjustment Frame Sliding Pin Plate Front Roller Rear Roller Step Bolt Thread Rod Thread Rod Base Ø... - Page 23 Plug Transport Wheel Nylon Sleeve Ø ⅝” x Ø ⅜” Plastic Washer M8 x ⅞” Sunk Bolt M3 x ½” Sunk Bolt M6 x 1 ⅛” Allen Bolt M8 x 1 ⅝” Allen Bolt M6 x ⅝” Allen Bolt M10 x 1 ⅝” Allen Bolt M8 x 1”...
- Page 24 ST4.2 x ⅝” Sunk Screw Motor Base Shock Pad Air Cushion Running Deck Bumper Damper Pad Rubber Cushion Power Cord Short Cord Power Socket Power Switch Over Current Protector Inductor Filter Driving Board Safety Key Handle Grip Insert Switch IPAD Holder Motor Running Deck Running Belt...
-
Page 25: Limited Warranty
IMPEX. IMPEX is not responsible or liable for indirect, special or consequential damages arising out of or in connection with the use or performance of the product or other damages with respect to any economic loss, loss of property, loss of revenues or profits, loss of enjoyments or use, costs of removal, installation or other consequential damages or whatsoever natures.
Need help?
Do you have a question about the MARCY JX-651BW and is the answer not in the manual?
Questions and answers
can i customise the preset programmes to suit my running speed on each programmeas some of the speeds on the programmed workouts are beyond my training ability
No, the preset programs on the Impex MARCY JX-651BW cannot be fully customized. However, during any training segment, you can manually adjust the speed using the “Speed +” or “Speed -” buttons.
This answer is automatically generated