
Subscribe to Our Youtube Channel
Summary of Contents for Power Acoustik DVALT Drive alert
- Page 1 DVALT User Manual Please read this manual carefully before using this device, and please keep it properly for future use.
- Page 3 WARNING: This device is a driver assistant (or driver aid). The driver ultimately is responsible for ensuring the safe operation of the vehicle. This device does not communicate with the vehicle and is only a supplemental warning measure. Road conditions, installation, weather conditions, visibility, and other factors may affect the accuracy of this device.
-
Page 4: Table Of Contents
DVALT User Manual Catalogue Introduction-----Page 5 Notes on Installation-----Page 5 III. Battery warning-----Page 6 Caution-----Page 6 Product Overview----Page 7 Package Contents -----Page 8 VII. Installation-----Page 8 VIII. Buttons Function-----Page 10 Power ON/OFF-----Page 10 Using the Camcorder-----Page 11 LDWS Calibration-----Page 14 Long Press Menu/Mode button to Settings-----Page 17 XII. -
Page 5: Introduction
I.Introduction Thank you for purchasing this advanced camcorder. This camcorder is specically designed for real time video and audio recording when driving. II.Notes on Installation 1. Do NOT setup the camcorder while driving or while the vehicle is in motion.Please stop at a safe place before adjusting or installing. -
Page 6: Iii.battery Warning
9. Do not use this product in places with high humidity or temperature above 70 ℃ or below -20 ℃. 10. Only use the dedicated charger and related accessories compatible with this product. 11. Use TF memory card of Class10 and 8G, or above. III.Battery warning ■... -
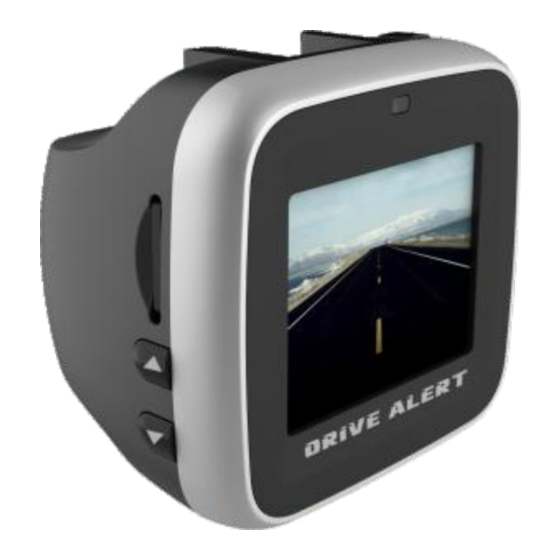
Page 7: Product Overview
■ Power acoustik Company is NOT responsible for the loss of any data/content during operation. V.Product Overview ⑪ ④ ① ⑤ ② ⑥ ③ ⑦ ⑧ ⑨ ⑩ ① RESET Button ② Menu/MODE Button ③ OK Button ④ Indicator Light ⑤... -
Page 8: Package Contents
VI. Package Contents The package contains the following items. If there are any missing or damaged items, contact your dealer immediately. Car Charger Car Camcorder Bracket Warranty Card USB Cable User Manua VII.Installation... - Page 9 1.Use a lint-free cloth to wipe off dust on the location of the windshieldwhere you want to install the product. 2.Please remove the protective lm of bracket suction cup, and attach the camcorder to windshield as picture 1-2. 3.Fix the bracket well and ensure the camcorder doesn't remove, as picture 1-3.
-
Page 10: Buttons Function
VIII.Buttons Function Mode POWER Button UP Button DOWN Button OK Button MENU/MODE Button Long Short Long Short Long Short Long Short Long Short press press press press press press press press press press Video Power-off Emergen ON/OFF Play/ Call up Enter the recording recordi... -
Page 11: Using The Camcorder
② Please conrm the DVR has power supply by car charger, and the DVR are used in conventional vehicle environment. 3. Indicator light A) Power on: the machine boot indicator light. B) Video: The machine video indicator is ashing continuously. X.Using the Camcorder 1. - Page 12 1) Emergency recording a. Manual Emergency recording: In the recording mode, short press the POWER button,the current video and the previous video of the current video and the next video of the current video are locked into emergency video. (Note: the length of the current video is the length of loop recording) b.
- Page 13 1) Press the MODE key to switch mode in the recording mode interface or the playback mode interface. Press OK to enter the camera interface, press the POWER button briey to take pictures. 2) Adjust the focal length of the camera by pressing the UP / DOWN button.
-
Page 14: Ldws Calibration
XI:LDWS Calibration Long Press Menu/Mode button to Settings. 1. Movie Clip Time The time of loop video recording: Click the UP or DOWN button to move up or down to set the recording time: 5min ,3min or 1min for choosing.And then short press OK button to conrm. 2. - Page 15 Optional volume is from 1 to 10 and then short press OK button to conrm. 5. Delete Click the UP/DOWN button to move up or down to delete single le or all les, and then short press OK button to conrm. 1.
- Page 16 8. Beep Press UP/DOWN button to select click status: open / close, shortly press OK button to nish selecting. 9. Clock Setting Press UP/DOWN button to select time and shortly press OK button to nish time setting ,shortly press OK button to exit setting.
- Page 17 17. Reset Setup Return the unit back to factory default setting. Press UP/DOWN button to select reset status: Yes / No; Shortly press OK button to nished selecting. 18. Format SD Card. Press UP/DOWN button set format SD card status: Yes / No, Shortly press OK button to nished selecting.
- Page 18 2.Set Green Line to Car Hood. Set Green Line to Car Hood Adjust Menu Exit OK Next Adjust the DVR position till match the horizon line,press the DVR “up”and “down'' buttons,till the lines match. Press “O”button to conrm when nish,will go to next calibration.
-
Page 19: Xii.main SpeciCations And Parameters
XII.Main specications and parameters LCD Panel 1.5 inch TFT Lens 143°A+HD wide Angle lens Language selection English/Spanish Video resolution 1920*1080p/30fps Video format Photo format JEPG Memory card Micro SD Max 64GB TF card Microphone /Speaker Support G-Sensor Support Frequency 50HZ/60HZ USB interface USB2.0 Power input...
Need help?
Do you have a question about the DVALT Drive alert and is the answer not in the manual?
Questions and answers