Table of Contents

Related Manuals for Dinsafer DHW01O

Summary of Contents for Dinsafer DHW01O
-
Page 1: User Manual
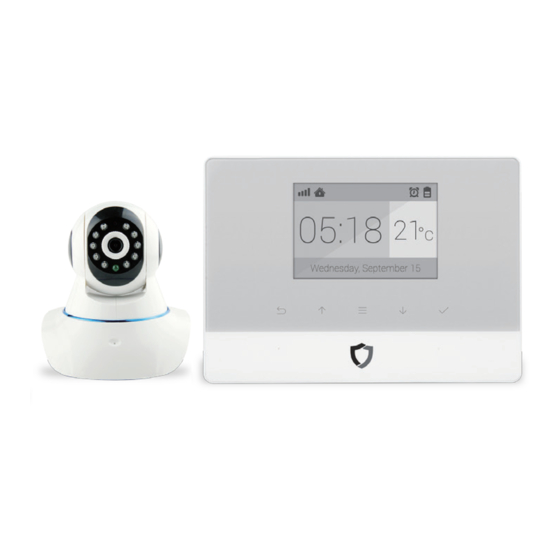
Smart Alarm System & App User Manual Security Products User Manual World famous expert of smart alarm system Designed for home and business security. Easy to setup and use with App. Perfectly match all Android® and iOS smart phones. - Page 2 Meet the New Great Smart Alarm System. We make things different.
- Page 3 MENU The screenshots and texts might be different from the version you’re using. Please refer to the latest one. ● Get Ready and Power On Work with the Main Panel ● App Manual [Setting by Smartphone] ● ● Appendix 1 : Accessory Installing ●...
-
Page 4: Get Ready And Power On
Get Ready and Power On 1/3 • When alarm is triggered, users can cancel the alarm by pressing down the DISARM button on the remote controller, or by sending SMS commands via the mobile App. • It’s recommended to pair the remote controller with the system first so users could test the system easily. During the installation of the alarm system, you might trigger the alarm by DISARM accident. - Page 5 Get Ready and Power On 2/3 Power Outlet Connect the power cable and insert sim card • Remove the battery cover on the back of the panel. Insert the power cable to the power outlet first. Then open the SIM card slot to insert the SIM card. For those micro or nano SIM cards, please use sim adapter to fit the card slot.
- Page 6 Get Ready and Power On 3/3 Standard SIM Card Micro SIM Card Nano SIM Card Appendix: step by step guiding. Nano-SIM Micro-SIM Mini-SIM • Please use the Mini-SIM card (Standard-SIM card) for the alarm system. Card adapter is required when using nano or micro SIM card. 1.
-
Page 7: Lcd Monitor
Work with the Main Panel 1/3 Control Button Press to enter the settings menu. Press to select. LCD Monitor Press to navigate. Press to go back. Child Lock Lock: Long-press for 6 seconds until the lock icon shows on screen. Unlock: Long-press for 6 seconds until the lock icon disappears. - Page 8 Work with the Main Panel 2/3 Battery Life Indicate the remain battery life when AC power is OFF. 08:18 AC Power °c External power is available. All active sensors can trigger alarm. Wednesday, September 15 Disarm Stop trigger alarm, except those on 24-hours mode. Home Arm Only those on Home mode stop trigger alarm.
-
Page 9: Alarm Clock
Work with the Main Panel 3/3 Alarm Clock Check all working alarm clocks set by App. ºC / ºF Switch Screen Timeout Switch the temperature scale between Fahrenheit and Celsius. Set the screen saving time. - Page 10 App User Manual Setting by smartphone...
- Page 11 Initializing by App • Scan the QRCode or visit the website from your phone to download the latest App for both Android and iOS phones. Smart Alarm System • All operations and settings of the system could be easily done via App. •...
- Page 12 Add a New Main Panel • The App is a great tool to control main panel. main panel should be added to App before using, which we call binding. One App can handle more than one main panel. The phone number of main panel and the password would be asked during binding. Different role has its default password.
- Page 13 Switch Between One/Two Hands Mode One/two hands mode • There are different sizes of smart phones with Android or iOS systems, which bring operation- al inconvenience for users. • We bring convenience by offering one/two hands modes for both small sizes phones (3.5 inches including under) and big sizes phones and tablet PC (4 inches including above) •...
- Page 14 How to Use the Control Panel of App Enable it to receive reports for each SMS command. Renew it when Admin or User password is changed. Navigator Swap to switch between menus. The other two menus are [Information] [Settings] Easy Control Panel Arm, Disarm, Home Arm, SOS, Etc.
- Page 15 How to Add Emergency Contacts Strongly recommend to set it when using main panel the first time. • Slide softly on Main Panel, switch to [SETTINGS] menu. • Click [Emergency contacts]. Up to 6 emergency contacts are for settings. Tap any of them for editing. •...
- Page 16 Operations During the Emergency Call Appendix: operation instructions when receiving emergency calls Press to monitor and talk via phone to main panel. MONITOR Press ## to cancel SOS. CANCEL SOS Press 88 to listen again. LISTEN AGAIN Hang up to call the next emergency contact.
- Page 17 How to Add Accessories • Click + on top-right of the screen. Tips: • Scan the bar code or QR code printed on accessories with phone’s camera. When pairing with Smart Plug or Wireless Siren, please power it up • Name the accessory. before saving pairing settings.
- Page 18 Manage and Operate Smart Camera 1/3 • Like adding accessories, tap + to scan QR code on camera then name it. • If you want to be informed to check the real-time video (like the camera facing the door) when alarm is trigger by certain accessory (like the door/window sensor installed on the front door), you can use [inform when …...
- Page 19 Manage and Operate Smart Camera 2/3 Show | Share Current Code: Show the current QRCode of Smart Camera, you can share it via MMS or other apps. Generate New QR Code: Generate a new QRCode of Smart Camera, us- ers who is still using the old QRCode would fail when visiting this Smart Camera.
- Page 20 Manage and Operate Smart Camera 3/3 Appendix: How Smart Camera works when alarm occurs? ATTENTION: An alarm message is received. Check the live video from your Smart Camera now? 1. If a thief intrudes and triggers some 2. The App captures the informing SMS right 3.
- Page 21 Advanced Settings and Other Features 1/3 Emergency Contact: Up to 6 contacts for setting. Alarm Clock Setting: Up to 4 clocks for setting, with 4 modes each. Temperature Setting: An informing SMS would be received when surrounding temperature is out of the safe range you set.
- Page 22 Advanced Settings and Other Features 2/3 Arming Schedule: Up to 6 groups of settings for daily arming. (Disarm is not supported for security consideration) Exit Delay: Waiting time before going into ARM status. It can be 90 seconds longest. Entry Delay: If some sensors in delay mode trigger alarm, system will wait few seconds before activating alarm.
-
Page 23: System Status
Advanced Settings and Other Features 3/3 Logs & Events: Main panel sends SMS to reply your inquiry here. List recent arm, disarm and alarm records. System Status: Check current time, arm status, etc. Arming Time: Check delay settings for Entry Delay and Exit Delay. Smart Camera List &... - Page 24 Can I use other branded accessories with the main panel? Sorry, main panel only supports official accessories. 1. The official accessories use encrypted communication protocols with patented technology. This makes them safer and more stable. 2. The official accessories are easily paired with the system just by scanning QR codes or barcodes. Most of our accessories support low-battery warning.
-
Page 25: Appendix 1: Accessory Installing
Appendix 1: Accessory Installing 10-30 6.5-7.5 feet • Remember to pull out the battery insulating pieces before use. • Use App for pairing acces- sories before installing. • It’s recommended to take pictures for the QR codes or barcodes printed on the accessories and save them Less than 0.4 inches. -
Page 26: Appendix 2: Smart Camera Settings
Appendix 2: Smart Camera Settings 1/3 Pairing with Main Panel • Please use App to scan the QR code to pairing Smart Camera. • The QR code is printed on the bottom of Smart Camera. Insert LAN Cable and Power On Audio Out SD Card Reset... - Page 27 Appendix 2: Smart Camera Settings 2/3 Show | Share Current Code: Show the current QRCode of Smart Camera, you can share it via MMS or other apps. Generate New QR Code: Generate a new QRCode of Smart Camera, users who is still using the old QRCode would fail when visiting this Smart Camera.
- Page 28 Appendix 2: Smart Camera Settings 3/3 - FAQ I’ve Already Connect My Smart Camera with LAN, but I Can’t Connect It in App. Please make sure your router has successfully connected to Internet. DHCP Server/Service should be Enable on the router. UPNP should be Enable too. Your phone’s data plan should be available.
-
Page 29: Appendix3: Product Specification Lists
Appendix3: Product specification lists Main Panel • Wireless Range 200 meter / 656 feet, free air • CPU ARM7 Cortex -M3 72MHz ™ • External Flash • Working Voltage and Current 5V/2A • Transmission Frequency 433 MHz±0.5MHz • GSM Mode 850/900/1800/1900 MHz quad-band 99 Sensors •... -
Page 30: Wireless Motion Sensor
DHW01O Wireless Motion Sensor The wireless motion sensor is an accessory of smart alarm system, mainly for indoor use. With high performance infrared sensor, works under digital dual-core fuzzy logic operative programming and intelligent analysis, it accurately detects human body movement and effectively avoids false alarms. Featured with automatic temperature compensation technology, it en- sures high intelligence, sensitivity, and stability. -
Page 31: Pcb Layout
Appearance PCB Layout Magnetic Slice Infrared Sensor Detection Window Stainless-steel Bead Detective Interval Time Setting Switch (every 5s. or 5min.) On/Off Switch LED Indicator Bracket Operating Instructions 1. Working principle with digital dual-core fuzzy logic operative programming and intelligent analysis, it accurately detects human body movement with infrared sensor and sends signal to main panel. -
Page 32: Installation & Notice
Installation & Notice • Open the case and remove the battery insulative strip. • Pairing with main panel by App before installing. • Fix the bracket with double-side sticky tape or screws on wall, connect the sensor to bracket, adjust a proper angle. 360° angle adjustment is easily available with connection of bead and magnetic slice. -
Page 33: Trigger Mode
Trigger Mode Clarification Trigger Mode Clarification Close Deactivated when triggered Instant Activated when ARM/HOME ARM 24 Hours Activated even when DISARM Home Deactivated when DISARM/HOME ARM Door Chime No alarm but clanking Battery Replacement Instructions If the LED indicator stays on, please replace the battery. ①Press down the hook on sensor ②Replace with 2x AA battery. - Page 34 DMC01O Wireless Contact Sensor The wireless contact sensor is an accessory of smart alarm system. It's fashion design, energy saving, and low battery warning supported. The main panel will send a SMS to user for battery replacement when needed. It's easy to setup and works well with most doors and windows. When transmitter and magnet are apart, the sensor triggers alarm.
-
Page 35: Led Indication
Appearance PCB Layout Transmitter Magnet LED Indication LED flashes once: Door/window is opened and transmitter sends signal to the main panel. LED lights stays on: Low batter y, please replace the battery immediately. LED Indicator Operating Instructions 1. Working principle The transmitter sends trigger signal to main panel paired when the magnet mounted near is moved apart. - Page 36 Installation & Notice • Open the case and remove the battery insulative strip. • Pairing to main panel by App before installing. • Attach the transmitter and magnet seperately on door/window and its frame with double-side sticky tape or fix with screws. Transmitter can be put on either of magnet's left or right side.
- Page 37 Trigger Mode Clarification Trigger Mode Clarification Close Deactivated when triggered Instant Activated when ARM/HOME ARM 24 Hours Activated even when DISARM Home Deactivated when DISARM/HOME ARM Door Chime No alarm but clanking Battery Replacement Instructions ①Insert the flat blade of a small screwdriver ②Replace with 1xCR2032 battery.
-
Page 38: Remote Controller
DYK01O Remote Controller The remote controller is an accessory of series smart alarm system. It helps you quickly arm/disarm/home arm/trigger SOS the system. It’s small and exquisite, convenient for carrying out on keychain or in pocket/bag. • Working Voltage DC 3V •... - Page 39 Appearance PCB Layout LED Indicator Disarm Home Arm 1 × CR2032 Cover for Battery Button Battery Keychain Operating Instructions ①Scan the QR code printed on the controller. ②The pairing result would be confirmed by SMS sent from main panel.
- Page 40 Operating Clarification • Arm Press , the LED indicator lights on, the system enters armed status. • Home Arm Press , the LED indicator lights on, the system enters home armed status. • Disarm Press , the LED indicator lights on, the system enters disarmed status. •...
Need help?
Do you have a question about the DHW01O and is the answer not in the manual?
Questions and answers