
Related Manuals for Tristar Products Power Quick Pot Y4D-36

Summary of Contents for Tristar Products Power Quick Pot Y4D-36
- Page 1 Owner’s Manual Save These Instructions – For Household Use Only MODELS: Y4D-36 (4 qt.) - Y6D-36 (6 qt.) - Y8D-36 (8 qt.) - Y10D-36 (10 qt.) Warranty Information Inside...
- Page 2 Power Quick Pot BEFORE YOU BEGIN The Power Quick Pot will provide you many years of delicious family meals and memories around the dinner table. But before you begin, it's very important that you read this entire manual, making certain that you are totally familiar with this appliance's operation and precautions.
-
Page 3: Table Of Contents
Table of Contents IMPORTANT SAFEGUARDS Parts & Accessories Attaching the Power Cord Assembly Instructions Features & Benefits Instructions for Use A. Built-In Safety Devices A. Preparing for Use · Check Parts & Accessories 1. Lid Safety Device · Conduct Test Run with Water Only 2. -
Page 4: Important Safeguards
IMPORTANT SAFEGUARDS WARNING 5. Lid should rotate freely and any resistance indicates that the Lid is improperly placed or under pressure. PREVENT INJURIES! – CAREFULLY READ ALL INSTRUCTIONS BEFORE USE! 6. Always attach plug to appliance first, then plug cord into the wall outlet. -
Page 5: Attaching The Power Cord
IMPORTANT SAFEGUARDS and spaghetti, expand and create foam when 22. Do not operate if the cord or plug are damaged. cooking and need special cooking instructions. If appliance begins to malfunction during use, Pay particular attention to liquid quantities. Do not immediately unplug cord from power source. -
Page 6: Features & Benefits
Features & Benefits A. BUILT-IN SAFETY DEVICES 1. SAFETY LID LOCK: The Lid tabs connect under 7. EXCESS PRESSURE RELEASE SYSTEM: the Base tabs to lock the Lid to the Base when The Pressure Release Valve is weighted, which fully closed. maintains a pressure level and only allows the Unit to build pressure at a certain level. -
Page 7: Special Features
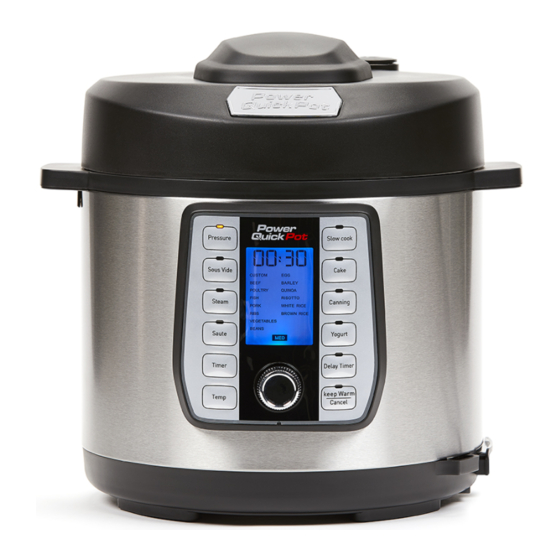
Features & Benefits B. SPECIAL FEATURES 1. LCD DISPLAY: The LCD Display on 4. ONE-TOUCH TECHNOLOGY: With 37 your Power Quick Pot offers a wide range preprogrammed default settings, your family’s of 37 preprogrammed choices. Cooking time favorite homemade meals can be quickly may be adjusted to suit any recipe or personal and easily cooked to perfection in a single preference or delayed to meet required... -
Page 8: Releasing Pressure
Releasing Pressure NATURAL RELEASE AND RAPID RELEASE The Power Quick Pot has a safety mechanism that Natural release and rapid release are two common methods used to depressurize a pressure cooker prevents the Lid from opening until the pressure has once active cooking is complete. -
Page 9: How Rapid Release Works And When To Use It
Releasing Pressure HOW RAPID RELEASE WORKS AND WHEN TO USE IT To use rapid release ,once the active cooking ingredients that do not benefit from any extra cycle is complete, cancel the cooking cycle cooking time. This method is also helpful when by pressing the Cancel Button. -
Page 10: Parts & Accessories
Parts & Accessories LID – TOP VIEW LID – UNDERSIDE (WITHOUT INNER LID) Locking Pins Float Valve Pressure Release Valve Steam Release Switch Lid Handle Center Knob Pressure Release Float Valve Valve (underside) Rubber Gasket Steam Pressure Caution Label (Do Not Remove) Release Switch Float Valve Release Valve... - Page 11 Parts & Accessories FRONT STAINLESS STEEL INNER POT 8 QT. 6 QT. Program Dial The Max Fill Line in the Inner Pot is represented by "FULL LCD Display Base CUP" on some models and "MAX" on other models. Lid Underside Inner Lid Center Gasket Inner Lid Outer Gasket Glass Lid...
-
Page 12: Assembly Instructions
Assembly Instructions INNER LID ASSEMBLY FIG. i REMOVING LID 1. Hold the Knob on the underside of the Inner Lid and pull to remove the Inner Lid (see Fig. i). INSERTING INNER LID FIG. ii-a FIG. ii-b 1. Ensure that the Knob on the underside of the Inner Lid is facing outward, away from the Lid. - Page 13 Assembly Instructions FIG. vi FLOAT VALVE ASSEMBLY 1. Remove the Lid from the Unit and remove the Inner Lid (see INNER LID ASSEMBLY, p. 12). 2. Pull off the Rubber Gasket at the bottom of the Float Valve (see Fig. vi). The Float Valve will be loose in its chamber. 3.
-
Page 14: Instructions For Use
Instructions for Use A. PREPARING FOR USE CHECK PARTS & ACCESSORIES 1. Before using, remove parts and accessories from Inner Lid, see INNER LID ASSEMBLY, from package and be sure all parts have been p. 12. Wash Inner Lid, Rubber Gasket, Inner included before discarding any packaging Pot, and other loose accessories with warm, materials. - Page 15 Instructions for Use 8. The Magnetic Safety Sensor assures Lid is Pressure Release Valve while pressure is being properly closed before the Unit can pressurize. released (see Fig. H). If Lid is not on correctly when starting a cooking cycle, a beeping noise will occur and the word WARNING: Keep body (face, arms, torso) “LID”...
-
Page 16: Operation Instructions
Instructions for Use B. OPERATING INSTRUCTIONS handle and twist the Lid clockwise to open the Lid see OPEN LID in PREPARING FOR USE. 6. Place the Inner Pot in the Base. Add ingredients to Inner Pot. NEVER LOAD INNER POT ABOVE THE FULL CUP LINE. - Page 17 Instructions for Use 12. Once a cooking time and temperature have been 15. At completion of the cooking cycle, the Unit will confirmed, the LCD Display will turn orange (see “beep” and enter Keep Warm mode until manually Fig. J). cancelled by selecting the Cancel Button.
-
Page 18: Pressure Cooking Programs
Preset Cooking Programs PRESET HIGH COOK TIME TEMP Default Cook Time Default Cook Time Default Cook Time Adjust Range (Increments) Adjust Range (Increments) Pressure CUSTOM 10 mins. 30 mins. 60 mins. 1–120 mins. (1 min.) BEEF 15 mins. 30 mins. 90 mins. - Page 19 Preset Cooking Programs PRESET HIGH COOK TIME TEMP Default Cook Time Default Cook Time Default Cook Time Adjust Range (Increments) Adjust Range (Increments) Steam FISH 5 mins. 10 mins. 15 mins. 1–59 mins. (1 min.) EGGS (poach) 3 mins. 9 mins. 15 mins.
-
Page 20: Sous Vide
Sous Vide Using traditional cooking methods, heat is through any other cooking technique. Simply set transferred from a hot burner or oven to a pan up the Power Quick Pot as shown in this manual; and then to your food, where it heats from the place your seasoned food in a slider, snap shut, outside to the middle. - Page 21 Sous Vide SOUS VIDE TIPS SUGGESTED TIMES & TEMPERATURES NOTE: Do not place food in the water without FOOD TEMP. TIME placing it in a sealable bag. Beef • You may add seasonings and rubs to food before bagging. Rare 125°...
-
Page 22: Yogurt
Yogurt THE YOGURT-MAKING PROCESS 1. Place the Inner Pot in the Base. 6. Press the Yogurt Button. Use the Program Dial and the Timer Button to adjust the time 2. Pour 2 qts. of whole or 2% milk into the Power if needed. -
Page 23: General Pressure Cooking Time Charts
General Pressure Cooking Time Charts Meat Liquid Amount Approx. NOTE: All pressure cooking modes require the addition of liquid in some form (water, stock, (cups) Time (min.) etc.). Unless you are familiar with the pressure cooking process, follow recipes carefully for liquid Beef/veal, roast or brisket 3–4 35–40... -
Page 24: Frequently Asked Questions
Frequently Asked Questions 1. What is the material of construction? 6. Can you leave the Unit on while not at home? This appliance has a stainless steel housing The Power Quick Pot has a delayed start and Inner Pot. function, but leaving the Unit on while not at home is not recommended. -
Page 25: Care & Cleaning
Care & Cleaning CAUTION Any leftover food or debris remaining in the Unit could prevent safety devices from operating correctly during subsequent use! FOLLOW THESE CLEANING INSTRUCTIONS AFTER EACH USE. 1. Allow Unit to cool to room temperature before 6. Rinse upper and underside of Lid with warm cleaning. -
Page 26: Troubleshooting
Troubleshooting Symptom Possible Cause Solution Cannot Open Lid DO NOT FORCE OPEN Inner Lid Rubber Gasket is not properly Lid Does Not Lock Reinstall Inner Lid Rubber Gasket installed Ensure the Pressure Release Valve is open, the Steam Release Switch Cannot Open Lid after Float Valve and Pressure Release Valve is in the Open position, and you have let go of the Steam Release Switch. - Page 27 Troubleshooting DISPLAY ERROR INDICATOR Error Code Cause of Error Solution Bottom sensor open Contact Customer Service* Bottom sensor short circuit Contact Customer Service* Unit has overheated Let the Unit cool down before use Pressure switch malfunction Contact Customer Service* Wrong Lid Attach the correct Lid before use NOTE: DO NOT use or attempt to repair a malfunctioning appliance.
-
Page 28: Canning Guide
Canning Guide CAUTION The canning process allows for preparation and preservation of all your family’s favorites, including Improper canning can lead to serious health fresh and cooked fruits, vegetables, meats, jams consequences. It is important to read this guide and jellies. Canning is a great way to bring “out-of- carefully and follow all steps to ensure that food season”... - Page 29 Canning Guide PROCESSING TIME, PRESSURE, ALTITUDE Food Canning Item Time Do not use above 2,000 ft. above sea level. The chart on the right indicates style of packing Asparagus 30 mins. and proper processing time (with pint-sized jars) for various foods using the Power Quick Pot. Beans (green) 20 mins.
- Page 30 Canning Guide B. SAFE CANNING TIPS • Do not use over-ripe fruit. Bad quality fruit • Do not add butter or fat. Fats don’t store well degrades with storage. and may increase the rate of spoilage. • • Do not add more low-acid ingredients (such as Use only USDA recommended thickeners –...
- Page 31 Canning Guide D. THE CANNING PROCESS 1. Select a pretested pressure canning recipe. 6. Place the Inner Pot in the Unit Base (see Fig. Q). Although ingredients may vary, foods will be Place a wire rack (not included) in bottom of Inner generally processed as instructed in this manual.
- Page 32 Canning Guide 11. Using canning tongs (not included), carefully the self-sealing lid firmly against the jar to form remove hot jars and place them on a-resistant a high vacuum. surface. Allow to cool to room temperature. NOTE: Screw bands are not needed on stored CAUTION: Jars are hot! If not handled properly jars.
-
Page 33: Manufacturer's 60-Day Warranty
Place the information inside an envelope inside the package with the unit and mail to the following address: Tristar Products, Inc. 500 Returns Road Wallingford, CT 06495... - Page 34 4-, 6-, 8-, 10-Quart Power Quick Pot™...
- Page 35 4-, 6-, 8-, 10-Quart Power Quick Pot™...
- Page 36 Should you have any problem, our friendly customer service staff is here to help you. Call us at 973-287-5145 or visit us at www.TristarCares.com Distributed by: Tristar Products, Inc. Fairfield, NJ 07004 © 2018 Tristar Products, Inc. Made in China PQP_4-6-8-10QT_IB_TP_ENG_V4_180626...
Need help?
Do you have a question about the Power Quick Pot Y4D-36 and is the answer not in the manual?
Questions and answers
I was given a quick **** and it doesn’t have a manual and the condensation cup. Where can I get them ?
You can find the manual for the Tristar Products Power Quick Pot Y4D-36 at the following link:
http://demo.webandcrafts.com/tristar/wp/wp-content/uploads/2020/03/PQP_4-6-8-10QT_IB_TP_ENG_V6_180720-1.pdf
For a replacement condensation cup, you may need to contact Tristar customer service directly, as specific parts like the condensation cup are not widely available online.
This answer is automatically generated
My power Quick **** goes to keep warm and will not go to other settings when plugged in
The Power Quick Pot Y4D-36 stays on the Keep Warm setting after cooking is complete to maintain food temperature. It does not automatically switch to other settings because the user must manually select and confirm a new cooking time and temperature using the controls. The unit requires manual input to change settings.
This answer is automatically generated
I **** unable to get the lid to seal
To fix the lid sealing issue on the Tristar Products Power Quick Pot Y4D-36, follow these steps:
1. Check the Inner Lid Rubber Gasket – Ensure it is properly installed, clean, flexible, and not torn. If it is damaged, replace it before using the unit.
2. Reinstall the Inner Lid Rubber Gasket – If not properly positioned, remove and reattach it securely.
3. Adjust the Lid Position – If the lid is not fully closed or positioned incorrectly, adjust it following the "ATTACHING LID" instructions in the manual.
4. Ensure the Correct Lid is Used – Non-pressure programs require the Glass Lid instead of the main lid.
5. Avoid Forcing the Lid Open – If the lid does not open or lock properly, unplug the unit and allow it to cool before attempting to adjust or remove the lid.
If the issue persists, contact Customer Service for further assistance.
This answer is automatically generated
what size inner ring sealer to purchase for a 16 cup instant **** y8d-36 how many quarts is thi ****
The Tristar Products Power Quick Pot Y4D-36 has a capacity of 4 quarts. The size of the inner ring sealer is not specified in the provided information.
This answer is automatically generated
CAN SOMEONE PLEASE TELL ME WHAT YOU CAN ACTUALLY BAKE USING THE BAKE BUTTON ON THE POWER QUICK **** PLEASE? LIKE CAN I COOK FROZEN BATTERED FISH IN IT...LIKE YOU CAN IN THE OVEN? OR IS IT ONLY FOR THINGS LIKE CAKES? TY
I need to replace my ring/seal model # Y8D-36 where can I find this part
I need to replace 2- inner-lids for my 6qt Power Quick Pots. Where may I find them to purchase? Thanks!
whtat size inner ring to purchase for a 12 cups y8d-36 tristar products
The Tristar Products Power Quick Pot Y4D-36 comes in sizes up to 10 quarts, not 12 cups. Therefore, there is no specification for a 12-cup model. The inner ring (gasket) size would correspond to the quart size of the model. For the Y4D-36, which is a 4-quart model, the appropriate inner ring is for a 4-quart unit.
This answer is automatically generated
Need to replace ring/seal inside of **** lid
To replace the ring/seal (Rubber Gasket) inside the lid of the Tristar Products Power Quick Pot Y4D-36:
1. Remove the Inner Lid: Pull the metal knob to detach the Inner Lid from the main lid.
2. Remove the Old Rubber Gasket: Carefully take out the existing Rubber Gasket from the Inner Lid.
3. Install the New Rubber Gasket:
- Place the Outer Gasket around the outer edge of the Inner Lid.
- Insert the Center Gasket into the center hole of the Inner Lid.
4. Ensure Proper Installation: Make sure the float valve and gasket are correctly positioned in the lid.
5. Reattach the Inner Lid: Secure the Inner Lid back into place before reassembling the lid.
Refer to the CHANGING THE INNER LID RUBBER GASKETS AND FLOAT VALVE ASSEMBLY section for further guidance.
This answer is automatically generated