Table of Contents
Advertisement
562000 Rev2.qxp_Layout 1 19/01/2015 09:24 Page 1
MC562000 MUK Rev 2
Please read and keep these instructions for future use
For competitions, product hints and tips
and more join us at
www.morphyrichards.co.uk/blog
* Register online for your 2 year guarantee. See the back of this instruction book for details (UK and Ireland customers only).
www.facebook.com/morphyrichardsuk
@loveyourmorphy
1
Advertisement
Table of Contents

Related Manuals for Morphy Richards Supreme Precision 10 in 1 Multicooker


Summary of Contents for Morphy Richards Supreme Precision 10 in 1 Multicooker
- Page 1 562000 Rev2.qxp_Layout 1 19/01/2015 09:24 Page 1 MC562000 MUK Rev 2 Please read and keep these instructions for future use For competitions, product hints and tips www.facebook.com/morphyrichardsuk and more join us at www.morphyrichards.co.uk/blog @loveyourmorphy * Register online for your 2 year guarantee. See the back of this instruction book for details (UK and Ireland customers only).
-
Page 2: Health And Safety
Other Safety Considerations • If the mains lead of this appliance is damaged do not use it. Location Telephone Morphy Richards helpline for advice. • Always locate your appliance away from the edge of a • The use of accessory attachments not recommended by the worktop. -
Page 3: Table Of Contents
562000 Rev2.qxp_Layout 1 19/01/2015 09:24 Page 3 Introduction Thank you for your recent purchase of the Morphy Richards Supreme Precision 10 in 1 Multicooker. Please read this instruction booklet carefully before you use your new Multicooker for the first time. -
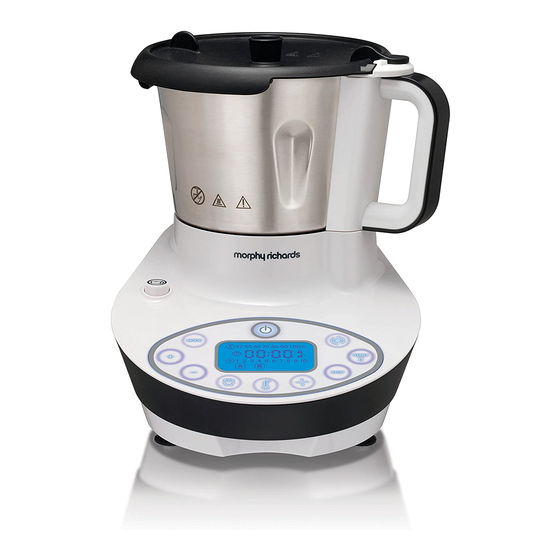
Page 4: Product Overview
562000 Rev2.qxp_Layout 1 19/01/2015 09:24 Page 4 Product overview Features Measuring Cap (10) Steaming Basket (19) Mains Lead (not shown) (11) Mixing Paddle (20) Cleaning Brush Handle (12) Serrator Blade (not shown) (13) Chopping Blade Main Unit (14) Drive Shaft Jug Release Button (15) Lock Ring... -
Page 5: Control Panel
562000 Rev2.qxp_Layout 1 19/01/2015 09:24 Page 5 Control Panel Features (21) Mode Button (31) Temperature Icon(s) (22) Standby Button (32) Timer Icon (23) Pulse Button (33) Lid Lock Icon(s) (24) Start Button (34) Mixing Speed Icon(s) (25) Increase Button (35) Automatic Programme A Icon (26) -
Page 6: Before First Use
562000 Rev2.qxp_Layout 1 19/01/2015 09:24 Page 6 Before First Use Cookbook • It is important to clean your Multicooker before • The cookbook supplied with your new first use or if it has not been used for a long Multicooker contains recipes for both the period of time. -
Page 7: To Set-Up Before Use
562000 Rev2.qxp_Layout 1 19/01/2015 09:24 Page 7 To Set-Up Before Use Place the Main Unit on a flat, stable Ensure the Drive Shaft (14) is correctly locked surface away from the worktop edge. Ensure into the Jug using the Lock Ring (15) your Multicooker is secure and stable before located on the base of the Jug. -
Page 8: Quick Start Recipes
562000 Rev2.qxp_Layout 1 19/01/2015 09:24 Page 8 Quick Start Recipe Automatic - Mushroom Risotto We understand that using a product that appears complicated for the first time can often be a daunting experience. Using your new product ‘hands on’ can often be the best way to learn how to use it. - Page 9 562000 Rev2.qxp_Layout 1 19/01/2015 09:24 Page 9 Manual - Bechamel Sauce Your new Multicooker utilises 2 main processes, mixing and heating. Coupled with a timer this allows you to use your Multicooker for a wide range of processes within your kitchen. How to set up your Multicooker for the different processes are detailed on pages 12-24.
-
Page 10: Using Automatic Programmes
562000 Rev2.qxp_Layout 1 19/01/2015 09:24 Page 10 Using Automatic Programmes Follow the steps in ‘To Set-Up Before Use’ to Refer to the selected recipe and add the first set-up your Multicooker. Place the Mixing set of ingredients to the Jug (4). Paddle (11) onto the Drive Shaft (14). - Page 11 562000 Rev2.qxp_Layout 1 19/01/2015 09:24 Page 11 Press the Start Button (24), your Multicooker After 5 minutes your Multicooker will beep will begin to cook. twice, this is the first prompt to add the next set of ingredients listed in the recipe. Remove the Lid, add the Ingredients and replace the lid.
-
Page 12: Using Manually
562000 Rev2.qxp_Layout 1 19/01/2015 09:24 Page 12 Using Manually • The 10 main functions are explained here, frying/sautéing, steaming, boiling, fast stewing, mixing, blending, chopping, emulsifying, melting and stirring. • When you have used your Multicooker a few times, you will be able to adapt recipes and create your own delicious dishes. -
Page 13: Steam
562000 Rev2.qxp_Layout 1 19/01/2015 09:24 Page 13 Press the Temperature Button (28), the Press the Start Button (24). Your Multicooker Temperature Icon (31) will flash. Use the will sound and begin the cooking process. Increase and Decrease Buttons to adjust the temperature in celsius up to 100°C. - Page 14 562000 Rev2.qxp_Layout 1 19/01/2015 09:24 Page 14 Press the Timer Button (27) and use the Press the Start Button (24). Your Multicooker Increase and Decrease buttons to adjust the will begin to heat the water, bringing it to a timer. Set your Multicooker to 10 minutes to boil.
-
Page 15: Boil
562000 Rev2.qxp_Layout 1 19/01/2015 09:24 Page 15 Boil For use in recipes like pasta & borlotti beans. Follow the steps in ‘To Set-Up Before Use’ to Add your ingredients and water to the Jug set-up your Multicooker. Place the Mixing and attach the Lid. -
Page 16: Fast Stew
562000 Rev2.qxp_Layout 1 19/01/2015 09:24 Page 16 When finished, your Multicooker will sound Remove the Lid by twisting anticlockwise and and display ‘END’. If you are using a mixing then lifting away from the Jug. Angle the Lid function, your Multicooker will slow to speed away from you when lifting, the contents will 1 and continue mixing to prevent food from be hot. - Page 17 562000 Rev2.qxp_Layout 1 19/01/2015 09:24 Page 17 Press the Temperature Button (28), the Icon Press the Timer Button (27) (if using), the first (31) will flash. Use the Increase and Decrease half of the Timer (32) will flash. Use the Buttons to adjust the temperature in celsius Increase and Decrease Buttons to adjust the to 100°C.
-
Page 18: Mix
562000 Rev2.qxp_Layout 1 19/01/2015 09:24 Page 18 For use in recipes like buttercream. Follow the steps in ‘To Set-Up Before Use’ to Add your ingredients to the Jug set-up your Multicooker. Place the Chopping attach the Lid (2). Blade (13) onto the Drive Shaft (14). -
Page 19: Blend
562000 Rev2.qxp_Layout 1 19/01/2015 09:24 Page 19 When finished, your Multicooker will sound If required, remove the Lid and add the next and display ‘END’. Press the Stop Button (30) set of ingredients to the Jug before repeating the process. Blend For use in recipes like raspberry smoothie. -
Page 20: Chop
562000 Rev2.qxp_Layout 1 19/01/2015 09:24 Page 20 To Set the Timing Function, (if using) Press the Start Button (24). Your Multicooker Press the Timer Button (27) and the first half will sound and begin to blend. of the Timer (32) will flash. - Page 21 562000 Rev2.qxp_Layout 1 19/01/2015 09:24 Page 21 Press the Mixing Speed Button (29), the Icon Insert the Measuring Cap into the space (34) will flash. Use the Increase and Decrease in the Lid. Buttons (25),(26) to adjust the speed setting. Use a high speed (7-8).
-
Page 22: Emulsify
562000 Rev2.qxp_Layout 1 19/01/2015 09:24 Page 22 Emulsify For use in recipes like salad dressing. Follow the steps in ‘To Set-Up Before Use’ to Add your ingredients to the Jug set-up your Multicooker. Place the Chopping attach the Lid (2). Blade (13) onto the Drive Shaft (14). - Page 23 562000 Rev2.qxp_Layout 1 19/01/2015 09:25 Page 23 Press the Mixing Speed Button (29), the Icon Press the Temperature Button (28), the Icon (34) will flash. Use the Increase and Decrease (31) will flash. Use the Increase and Decrease Buttons (25),(26) to adjust the speed setting.
-
Page 24: Stir
562000 Rev2.qxp_Layout 1 19/01/2015 09:25 Page 24 Stir For use in recipes like rice pudding. Follow the steps in ‘To Set-Up Before Use’ to Add your ingredients to the Jug set-up your Multicooker. Place the Mixing attach the Lid (2). Paddle (11) onto the Drive Shaft (14). -
Page 25: Jug
562000 Rev2.qxp_Layout 1 19/01/2015 09:25 Page 25 Remove the Lid by twisting anticlockwise and then lifting away from the Jug. If using the heating element, angle the Lid away from you when lifting, the contents will be hot. Allow the water collected on the inside of the Lid to fall back into the Jug, to avoid drips onto your Multicooker. -
Page 26: Accessories
562000 Rev2.qxp_Layout 1 19/01/2015 09:25 Page 26 Heating Accessories • The heating element within your Multicooker can heat the Jug from 37°C to 100°C. Your Your Multicooker comes with a Measuring Cap, Multicooker is not suitable for deep frying. Steaming Basket, Mixing Paddle, 2 Blades and º... -
Page 27: Lock Ring
562000 Rev2.qxp_Layout 1 19/01/2015 09:25 Page 27 Chopping Blade (13) Care And Cleaning The Chopping Blade is ideal for use with a wider range of foods than the Serrator blade, at higher • Allow the Jug and any accessories used to speeds it should be used with the Measuring Cap cool completely before cleaning. -
Page 28: Error Codes
• Check the Lid Gasket on the attached correctly. underneath of the Lid is in place and correctly attached. The Lid Gasket in the Lid is Contact Morphy Richards. • • damaged The Lid is open but the Lid There is some food in the Remove any food residue left •... -
Page 29: Contact Us
562000 Rev2.qxp_Layout 1 19/01/2015 09:25 Page 29 Contact us Helpline If you are having a problem with your appliance, please call our Helpline, as we are more likely to be able to help than the retailer you purchased the item from. Please have the product name, model number and serial number to hand when you call to help us deal with your enquiry. -
Page 30: Notes
562000 Rev2.qxp_Layout 1 19/01/2015 09:25 Page 30 Notes... - Page 31 562000 Rev2.qxp_Layout 1 19/01/2015 09:25 Page 31 Notes...
-
Page 32: Guarantee
Registering your 2 year Exclusions guarantee Morphy Richards shall not be liable to replace or repair the Your standard one year guarantee is extended for an goods under the terms of the guarantee where: additional 12 months when you register the product within The fault has been caused or is attributable to accidental 28 days of purchase with Morphy Richards.
Need help?
Do you have a question about the Supreme Precision 10 in 1 Multicooker and is the answer not in the manual?
Questions and answers