
Related Manuals for SOMMER TQ-S Tracer


Summary of Contents for SOMMER TQ-S Tracer
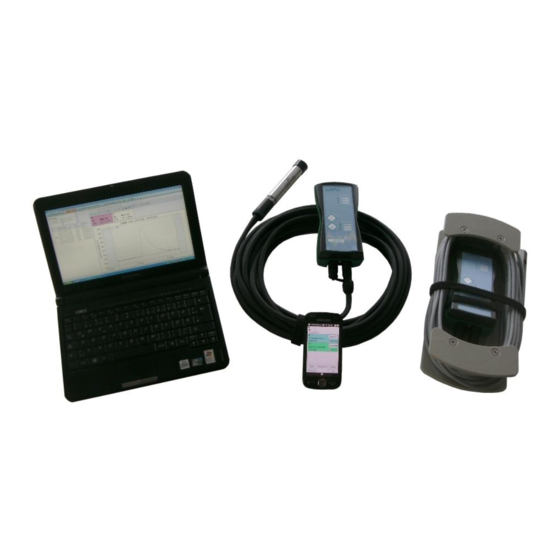
- Page 1 TQ-S Tracer Mobile Discharge Measurement System Based on the Tracer Dilution Method User Manual Manual version: V03 2014-12-09 Sommer GmbH | Strassenhäuser 27 | AT-6842 Koblach | Austria | +43 5523/55989 All rights reserved.
-
Page 2: Table Of Contents
Table of contents Introduction .............................. 1 Contents of assortment .......................... 1 2.1. TQ-Commander Versions ........................1 2.2. Scope of delivery ..........................2 2.3. USB Bluetooth adapter ........................6 Technical specifications ......................... 7 Charging and operation of the TQ-Amp ....................8 Tracer dilution method .......................... -
Page 3: Introduction
- Microsoft .net Framework 2.0 or higher - Microsoft Installer 3.0 or higher o Windows Vista, Windows 7, Windows 8: No additional installations required Mobile version: o Windows Mobile 5 to 6.5, required: - Microsoft.net Compact-Framework 2.0 or higher Sommer GmbH... -
Page 4: Scope Of Delivery
2.2. Scope of delivery TQ-S Tracer for conductivity measurement - Versions: o Conductivity sensor(s) and accessories separated in two cases o Conductivity sensor(s) and accessories together in one case (execution for normal base conductivity) o Conductivity sensor(s) with heavy armor and 25 m cable spool Conductivity measurement 2.2.1. - Page 5 Conductivity probe with heavy armor on cable spool: Cable spool for conductivity measurement: Conductivity One piece conductivity sensor with heavy armor and one TQ.Amp each per sensors cable spool. Cable spool with one conductivity sensor with Conductivity probe with heavy armor heavy armor (unscrewed) Sommer GmbH...
- Page 6 USB flash drive (documentation and software) USB Bluetooth adapter class 1 Charger for every TQ-Amp Quick start guide Letter stickers for individual labeling of the conductivity sensors Blue transport case with accessories (2 case version) Sommer GmbH...
- Page 7 Measuring cup with handle 600 ml Other: USB flash drive (documentation + software) USB Bluetooth dongle (Class 1) Chargers for every TQ-Amp Quick start guide Blue transport case with conductivity sensors and accessories (1 case version) Sommer GmbH...
-
Page 8: Usb Bluetooth Adapter
100 m (see chapter 9.2). Bluetooth dongle normally installed automatically and does not require a manual driver installation. If you are asked to manually choose a driver during the automatic installation, select “automatically search for drivers online”. Sommer GmbH... -
Page 9: Technical Specifications
Working temperature Energy supply 3 x 1.5 V batteries size AA or 3 x 1.2 V / 2500 mAh NiMH accumulators size AA Operation time with 50 h 3 x 2500 mAh accumulators Recharge time ca. 10 h Sommer GmbH... -
Page 10: Charging And Operation Of The Tq-Amp
Meaning 12 V power supply not connected or charging process completed yellow Charging process active An error occurred during the charging process, charging aborted. orange An error occurred during the charging process, the charging process nevertheless is continued. Sommer GmbH... -
Page 11: Tracer Dilution Method
(k). This calibration factor is not only depending on the used tracer substance and the probes but also on the river’s or canal’s water. Therefore Sommer Messtechnik strongly recommends performing a calibration of the probes prior to every measurement. -
Page 12: Requirements
(with swift rinsing of tracer remains) into the main stream. There should be not vegetation present at the injection site. Important: Always take care of your own safety at the tracer input location Sommer GmbH... - Page 13 Stable position of the probes o Probes have to lie on the bottom of the river bed in high turbulent flows or hang in the water in low tortuous flows. Attention: Safety and accessibility at the measurement location must be considered! Sommer GmbH...
- Page 14 (> 200 µS/cm and/or 100% of the base value). After the tracer passage the measured values should decrease to the base value. Sommer GmbH...
-
Page 15: Before You Start
Before you plug in the supplied USB Bluetooth dongle (from now on called “BT dongle”) please follow the steps listed below and check if an internal Bluetooth module is available. Sommer Messtechnik strongly suggests not to use an internal BT module and the supplied BT dongle at the same time to avoid problems caused by incompatibilities. - Page 16 TQ- Amp ID. The first part of the TQ-Amp ID may be different to the ones shown in this example. This part of the ID can be disregarded. Every TQ-Amp is labeled with its ID. Sommer GmbH...
-
Page 17: Removing A Sensor
Next (F2). 6.4. Removing a sensor If a sensor is not needed any more, it can be disconnected by deactivating “Autoconnect” (see above screenshot). To remove a sensor, please proceed as described below: Sensor Menu Data (F10) Sommer GmbH... - Page 18 Select the sensor to be removed. On the right side of the program window the sensor details are listed. To deactivate the “Autoconnect” this feature will be disabled for the selected sensor. To delete the sensor click the waste bin symbol. Sommer GmbH...
-
Page 19: Measurements With Tq-Commander
Estimation of the tracer amount needed and injection of the tracer solution into the river. It is important that the complete tracer amount is injected. In most cases the tracer solution is prepared in a bucket for an easy and complete injection. o Placing the sensors in the water body ( 5.3) Sommer GmbH... - Page 20 Injecting the tracer solution, performing the measurement and report issuing ( Fehler! Verweisquelle konnte nicht gefunden werden.) Sommer GmbH...
-
Page 21: Connection Of The Conductivity Sensors
Select an ID from the drop down menu. The listed IDs can be filtered by choosing a “Location” and/ or “Site”. Or define a new measurement site New Station: Click New Station (F5) Input the station information Save (F2) Sommer GmbH... -
Page 22: Calibration Of The Conductivity Sensors
The accessories to perform a calibration are included in the supplied assortment. Input the calibration parameters: The correct values for the included accessories are set by default. The standard values can be changed in the Options (F12) menu. Sommer GmbH... - Page 23 Place the probes in the measurement cup. Confirm the first calibration point without (!) adding any calibration solution. * In case the base conductivity is lower than 200 µS/cm use a bigger measurement cup and add exactly 500 ml of river water. Sommer GmbH...
- Page 24 Dispense the liquid into the receiving vessel by gently pressing the operating button to the first stop and then press the operating button to the second stop. Sommer GmbH...
- Page 25 The calibration should cover at least the range from 400 µS/cm to 600 µS/cm. The result of the calibration is displayed. For a good calibration all calibration points are connected by a straight line with a correlation of 0.9998 or higher. Sommer GmbH...
-
Page 26: Measurement And Discharge Calculation
With Next (F2) the measured values are already displayed: If the measurement is performed by one single operator only, recording the measured data should be started at this point. Afterwards the prepared tracer solution is injected. Sommer GmbH... - Page 27 As soon as the complete tracer has passed the probes and the measured values have dropped to the base value the measurement can be stopped. The resulting curves and discharges will be displayed in a Sommer GmbH...
- Page 28 Measurement parameters menu. There you can input all parameters again (optionally) and repeat the measurement. By clicking on Stop (F2) the measurement will be saved automatically. You can view the results by clicking on Data (F10) and Measurement. Sommer GmbH...
- Page 29 First depict with Data (F10) Measurement the available data sets. Then change into the tab Report, where a printable report is shown: Sommer GmbH...
-
Page 30: Post Processing
Then choose the tab Measurement on the right side, which will make a set of tools available: Calculation begin In following situation the measurement was started too early (the position of a the sensor had been changed, which caused the downward peak): Sommer GmbH... - Page 31 This can be considered with the change of the base line. First choose a measurement curve by a click on the field with its discharge value. Then click on the symbol ”Define base line“ and move the end point with the mouse: Sommer GmbH...
- Page 32 Result: The use of the zoom tools is recommended: Sommer GmbH...
-
Page 33: Import / Export Of Data
By clicking on Export the measurement data can be exported. The following formats are available for the export of the measurement data: Excel Biber-XML 8.2. Import data In the menu bar click on Synchronization (F11) Choose the file with the data you want to import and click on Open Sommer GmbH... - Page 34 Click on the green arrow to import the selected data set. Sommer GmbH...
-
Page 35: Appendix
The internal Bluetooth Radio is deactivated (hardware switch, FN-shortcut; please refer to the laptop manual). In both cases Sommer Messtechnik suggests using the supplied Class 1 Bluetooth dongle with a range of up to 100 meters. Plug in the supplied Bluetooth dongle in an available USB port and wait until the automatic installation process is completed. -
Page 36: Deactivating The Internal Bluetooth Module And Enabling The Bluetooth Dongle
In case Microsoft Bluetooth Stack is not used the name and color of the entry may vary from above screenshot. In that case please look for similar entries. o By performing a right-click on the entry a menu is displayed via which the BT module can be deactivated. Sommer GmbH... - Page 37 After deactivating the BT adapter the entry should look like this: The entry „Microsoft Bluetooth Enumerator“ disappears from the list after the BT module was deactivated. Sommer GmbH...
-
Page 38: Mixing The Calibration Solution
Lie down a sheet of paper on the precision scale and adjust the offset so that the scale shows a zero for the weight. Dump the salt on the sheet of paper and weigh 10 g Important: Use a precision scale with an absolute error of +/- 0.1 g or less. Sommer GmbH... - Page 39 Take the sheet of paper with the salt from the scale and dump the salt into the reservoir with the distilled water. Shake the distilled water to mix it with the salt. Sommer GmbH...
-
Page 40: Tables
With high background conductivities the notice of following table can increase the quality of the measurement result: Salt requirement [kg] Estimated ≥ 1000µS/cm < 250 µS/cm < 500 µS/cm <1000 µS/cm discharge [l/s] 0,25 1000 Table: Salt amount in kg in dependence of the base conductance and the estimated discharge Sommer GmbH...
Need help?
Do you have a question about the TQ-S Tracer and is the answer not in the manual?
Questions and answers