Table of Contents
Advertisement
Advertisement
Table of Contents

Subscribe to Our Youtube Channel
Related Manuals for CED CED7000T

Summary of Contents for CED CED7000T
- Page 1 Competitive Edge Dynamics Ltd. Printed in China...
-
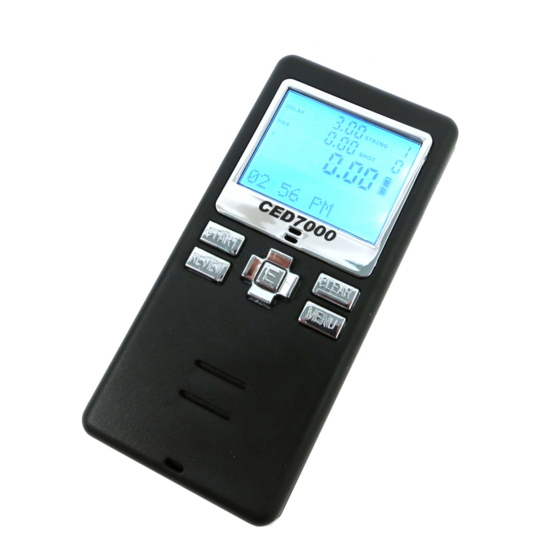
Page 2: Location And Function Of Key Parts & Controls
AUX Jack In keeping with Competitive Edge Dynamics policy of continuous improvement and development, CED reserves the right to make any changes or modifications in the specifications deemed necessary, without prior notice. Therefore, the above photographs and descriptions may vary slightly in detail from the actual product. -
Page 3: Introduction
This manual covers features and functions of the following CED7000 timers CED7000 Timer - Standard model featuring chrome buttons and trim plate. CED7000T Tactical Timer - All black design featuring black buttons and trim plate. CED7000A Airsoft Timer - a modified microphone and buzzer system. -
Page 4: Table Of Contents
TABLE OF CONTENTS PAGE * LOCATION AND FUNCTION OF KEY PARTS & CONTROLS Cover * INTRODUCTION Preparation * BATTERY 4 - 5 Performance Details Changing battery Low Battery Indicator * OPTIONAL BATTERY PACK Operation * BASIC FUNCTIONS 5 - 6 Power On / Off Automatic Shut-Off mode Automatic Comstock Mode function Using Start / Review * LCD DISPLAY Display features / Illumination * MENU / MODES * PROGRAMMING THE TIMER * DAY / DATE / TIME SETTING... - Page 5 TABLE OF CONTENTS (Continued) PAGE * REPETITIVE MODE Use & function of mode * COMBINED COMSTOCK MODE Use & function of mode * SPY MODE Use & function of mode * STOP WATCH MODE * COUNTDOWN MODE * ALARM CLOCK * SELF-CHECK DIAGNOSTIC TEST SYSTEM Use / Function * AUXILIARY JACKS (AUX) Location / Function * SHOT DETECTION MICROPHONE 15 - 16 Microphone - Sensitivity adjustment * FILTER * BUZZER VOLUME * RESET FUNCTION * RFID SETTING (on RF models only) RF remote capability * FCC & R&TTE CERTIFICATION * AIRSOFT TIMER FEATURES Guarantee Warranty Contact Us Accessories 19 - 20 Related Products Cover...
-
Page 6: Preparation
CED or Double-Alpha Academy for a battery replacement. Contact us for prices or visit our web sites for more details. To charge the battery, connect the lead from the charger to the DC socket on the bottom of the timer. -
Page 7: Optional Battery Pack
BATTERY: (Continued….) The timer continues to consume a trickle amount of power, even when turned off in order to keep the internal clock (date / time) functioning and the memory storage intact. A newly charged battery will provide over 25 hours of normal use and up to 33 days in stand-by or stored capacity. -
Page 8: Lcd Display
BASIC FUNCTIONS: (Continued….) To review the time each shot was fired, press either the “REVIEW” button located on the top end of the timer or the one on the front center console and the LCD display will return to the first shot and time recorded in the current string. This procedure can be continued throughout all shots recorded. The RE- VIEW function can be viewed in forward or reverse progression by using the UP/DOWN Directional keys. The memory stores ten strings with up to 39 shots per string at all times. If a string contains more than 39 shots, when stored to memory, the timer will retain the first 38 shots and then the 39th shot time will be the actual last shot fired in the string. (Example – If the string contains 44 shots ending at 21.23 seconds, when the string is stored into memory, shot 38 will appear as fired and shot 39 will appear as 21.23). By pressing the LEFT/RIGHT Directional keys (when in REVIEW function), the user can move from one string to another. There are always the most recent 10 strings maintained in memory. In addition to the shot number and cumulative time, the split time (difference) between the most re- cently recorded shot and the preceding shot time will appear on the LCD display. -
Page 9: Menu / Modes
MENU / MODES: The CED7000 Timer has a complete menu of functions / features many of which offer custom pro- grams, settings, and capabilities that no other timer on the market today provides. Below is a list of the Menu options: PROGRAMMING THE TIMER: Press the “MENU” button to display the full range of settings & features of the CED7000 Timer. In the center of the timer there are four directional keys with raised edges that provide directional move- ment within the Menu selection. In the center of these keys is the “ENTER” button, which is marked with an “E”. The “UP & DOWN” keys allow the user to select a setting or function from the Menu, by moving the highlight up or down. The “LEFT & RIGHT” keys allow the user to select a setting... -
Page 10: Memory Storage
DAY/DATE/TIME SETTING: (Continued….) The program allows the user to select time or date only, or to set both which in turn displays each on a 5 second rotational basis at the bottom of the LCD display window. In setting the time, the user is given options of either AM / PM and either 12 or 24 hour clock. -
Page 11: Custom Programmed Features / Functions
CUSTOM PROGRAMMED FEATURES / FUNCTIONS: The CED7000 Timer has a large range of custom programmable features and functions. The timer is designed to retain all customized settings even after being shut off. The user can reset the timer to the original default settings, by selecting from the menu “DEFAULT SETTINGS” and then selecting “YES”, which will return the timer to the original factory settings. -
Page 12: Programmable Par Time Selection
PROGRAMMABLE PAR TIME SELECTION: A single PAR time can be set allowing the user to create a fixed interval of time. Selection of a “Par time” from 0.60 to 999.99 seconds can be accomplished with the CED7000. (Note: Par time can be set to the 1/100th sec level) Since the START buzzer duration beeps for 0.50 seconds, the minimum PAR time accepted by the timer is 0.60 seconds. To select a PAR time, press MENU. Scroll down to select the “PAR” mode, highlight it, and press ENTER to confirm it. Select Par (for a single Par setting), Custom Par (for up to 11 Par times to be activated one after the next each timer the START is pressed), Auto Par (for up to 11 Par times and 11 delay times to be run automatically from one activa- tion), or Multiple Par (to run up to 5 Par times from one single activation) and press ENTER again. Press the “right” key to highlight the first column and then scroll up or down to select a value from 0 to 9 and then press the “right” key to highlight the second column and select a value for it and so on until all five value columns are set. Once the desired Par time is displayed, then confirm the time set by pressing ENTER. -
Page 13: Multi-Par Time Selection
PROGRAMMABLE PAR TIME SELECTION: (Continued….) The example above shows that three Par strings were programmed to function consecutively, each with a different Par time and a different delay between each Par setting. The timer will begin after the preset delay, with the first Par time of 3.0 seconds, followed by a 2 second delay. Each new Par time string will begin with the buzzer and clock counting from ZERO and the buzzer resounding at the end of selected Par time, followed by the given delay (if any is set) and then the starting of the next Par string and so on until the last Par time string programmed has been completed. The user MUST select both a Par & Delay time before pressing the ENTER to store the data. No Delay time should be set... -
Page 14: R.o. (Range Officer) Mode
MULTI- PAR TIME SELECTION: (Continued….) (The above example shows three Par times being activated by a single start beep. A total of four beeps will be emitted from the timer. One START beep and three PAR beeps at the intervals selected. Each PAR time entered will be based from the previous one. Therefore in the above example, from the timer activation (start beep), the next beep will begin at 1.0 second, followed by another beep starting at 2.25 seconds, with the final beep starting at 3.45 seconds.) To activate the timer and the selected “Par times”, simply press the START button. A second “stop”... -
Page 15: Repetitive Mode
REPETITIVE MODE: This advanced feature of the CED7000 is ideal for PPC, UIT, Police, & Military qualification type courses where a series of simulated “exposures” at fixed intervals are required. This function simulates the effect of a turning target system where the “Face” and “Edge” times are selected by the user, as well as the desired number of times it is to be repeated. Select MODE from the MENU and then the REPETITIVE Mode. The user then selects a given PAR time, followed by a specified EDGE time and then the number of times it is to be repeated. Use the right/left directional keys to move forward or backward and the up/down directional keys to select value for each setting. Keep in mind that the selected number of REPEATS is added to the first activation. Therefore, if 3 repeats are selected, the timer will run the first Par time and then repeat it three times, making a total of FOUR Par (Face) times. The start of the selected “Face” period is indicated by the pressing of the “Start” button and the sound- ing of the buzzer. If the Auxiliary jack is in use, a 5.0 volt D.C. impulse will be emitted in direct syn- chronization with the buzzer, which allows the user to activate a real turning target replay if so desired. At the end of the set Par time, the buzzer (and 5.0 volt impulse if in use) will beep for 0.30 seconds indicating the end of the “Face” period, and the beginning of the “Edge” period. After the selected EDGE time expires, the sequence will start again, and continue doing so until it has completed the full... -
Page 16: Spy Mode
SPY MODE: Designed to allow the user to SPY on and to learn from other shooters. When the “Spy Mode” is se- lected, the timer will switch automatically to “Instant Start” activation, and will turn up the sensitivity to level 7. Additionally, the buzzer will not sound when the timer is activated. When in this mode, the Par function is disabled since there is no beep sound, Pressing the START button will silently and instantly activate the timer, allowing the recording of shots fired in local proximity of the timer. The higher sensitivity level setting will enable the timer to pick up shots from a greater distance enabling the user to record (monitor) another shooter’s performance. If the user decides a greater or lesser level of sensitivity is needed, the setting can be manually changed by following the directions outlined in the “SHOT DETECTION MICROPHONE” section of this instruction manual. -
Page 17: Alarm Clock
ALARM CLOCK: The CED7000 allows the user to program a set time to be awakened or notified at. No need to be late for a scheduled appointment, or in returning to a match stage after lunch. To program the ALARM CLOCK on the CED7000, the “DAY/DATE/TIME SETTING” must first be programmed and active. See that section of this instruction manual for details. Select MENU, and then scroll down to ALARM CLOCK and press ENTER. Four segments will ap- pear “00.00” representing hour & minute. Press the right diagonal button moving the cursor to each segment. Press the up/down diagonal button to select a given time. Continue pressing the right direc- tional button after the time has been set to advance to AM / PM. Highlight either AM or PM and press ENTER to set the time selected. If the time has been set in a 24-hour format, no AM/PM will appear. -
Page 18: Shot Detection Microphone
SHOT DETECTION MICROPHONE: (Continued….) The digital numbered settings (1 to 8), provide a flexible range of adjustment of the microphone when needed, depending on the shooting location and conditions. (1 = least sensitive / 8 = most sensitive). To adjust the sensitivity, select MENU, then SENSITIVITY, and then scroll up or down using the Di- rectional buttons to select the desired sensitivity level The CED7000 shot-detecting microphone is software designed and factory preset at a mid level range (4) that provides accurate function under most normal types of outdoor conditions. -
Page 19: Rfid Setting (On Rf Models Only)
Europe and Africa and as a result of this, the RF frequency allowed for use in these regions is different. All CED7000RF Timers, CED Time Keepers and CED BigBoard Displays sold in North America are sold with 314 MHz frequency chips. Those sold in Europe come with 434 MHz. -
Page 20: Airsoft Timer Features
Central, Hong Kong GSM: (31) 652 661 442 Phone: (610) 366-9752 Phone (852) 2866-6802 FAX: (31) 416 392040 Fax: (610) 366-9680 Fax: (852) 2866-6505 Email: info@doublealpha.biz Email: info@CEDhk.com Visit CED Web Site at: www.cedhk.com Visit Double-Alpha Academy’s website at: www.doublealpha.biz... -
Page 21: Accessories
Accessories Color Skins Protect and personalize your CED7000 Shot Timer with custom made Silicone skins in a wide array of bright colors, that give your timer a rubbery finish. This makes it more com- fortable to grip and protects the timer from scratches and dam- age in case of falls. - Page 22 Retractable Neck Lanyard Set A retractable cylinder adds 76 cm (30”) of additional length to the CED7000 Neck Lanyard. Perfect for extending the timer toward the shooter to arm’s length and then retracting it safely back to your chest area while scoring targets, cleaning weapons, or loading mag- azines.
- Page 23 Perfect for “Man vs. Man” events or training large groups. Designed for use with CED Timers, the CED2000 External Horn can function independently as well.
Need help?
Do you have a question about the CED7000T and is the answer not in the manual?
Questions and answers