Table of Contents
Advertisement
Advertisement
Table of Contents

Related Manuals for Powerhorse 750122


Summary of Contents for Powerhorse 750122
- Page 1 420cc OHV Horizontal Gas Engine Owner’s Manual WARNING: Read carefully and understand all ASSEMBLY AND OPERATION INSTRUCTIONS before operating. Failure to follow the safety rules and other basic safety precautions may result in serious personal injury. Item #750122 SAVE THESE INSTRUCTIONS...
- Page 2 ® Thank you very much for choosing a Powerhorse product! For future reference, please complete the owner’s record below: Serial Number/Lot Date Code: ________________________________ Purchase Date: ____________________________________________ Save the receipt, warranty, and this manual. It is important that you read the entire manual to become familiar with this product before you begin using it.
-
Page 3: Table Of Contents
Table of Contents Technical Specifications ........................4 Important Safety Information ....................... 4 Specific Operation Warnings ....................... 6 Safety Labels ............................8 Main Engine Parts ..........................9 Before Each Use ..........................10 Operating Instructions ........................11 Maintenance ............................16 Troubleshooting ..........................25 Storage .............................. -
Page 4: Technical Specifications
Technical Specifications Property Specification Model DH420 Displacement 420cc Bore 3.54 inches Stroke 2.60 inches Oil Capacity 0.29 gal.(1.1L) Net Weight 68.89 lbs. Important Safety Information SAFETY REFERENCES The safety alert symbol is used to identify safety information about hazards that can result in personal injury. - Page 5 WARNING WORK AREA SAFETY Inspect the work area before each use. Keep work area clean, dry, free of clutter, and well-lit. Cluttered, wet, or dark work areas can result in injury. Using the engine in confined work areas may put you dangerously close to other cutting tools and rotating parts. ...
-
Page 6: Specific Operation Warnings
and perform its intended function. Replace damaged or worn parts immediately. Never operate the engine with a damaged part. Specific Operation Warnings WARNING Gasoline and its vapors are extremely flammable and explosive. Fire or an explosion can cause severe burns or death. When Adding Fuel ... - Page 7 WARNING Rapid retraction of starter cord (kickback) will pull hand and arm toward engine faster than you can let go. Broken bones, fractures, bruises or sprains could result. When starting engine, pull cord slowly until resistance is felt, then pull rapidly. ...
-
Page 8: Safety Labels
Safety Labels Page 8 of 35... -
Page 9: Main Engine Parts
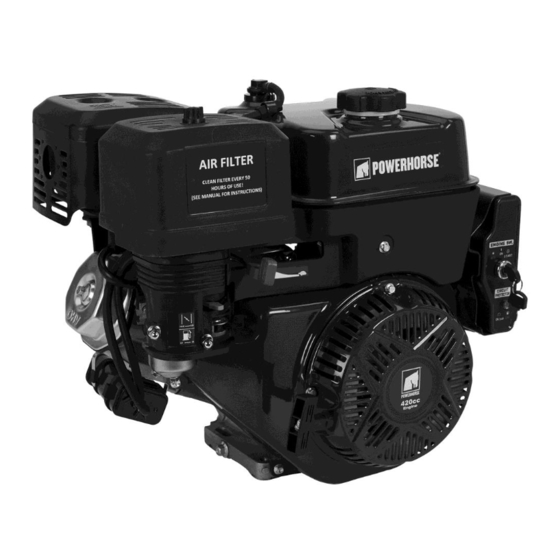
Main Engine Parts Reference Subassembly Air Cleaner Muffler Spark Plug Throttle Lever Recoil Starter Starting Handle Fuel Shut-off Choke Lever Fuel Filler Cap Fuel Tank Oil Dipstick Drain Plug Control Box Page 9 of 35... -
Page 10: Before Each Use
Before Each Use ⚠WARNING Improperly maintaining this engine, or failure to correct a problem before operation, can cause a malfunction in which you can be seriously hurt or killed. Always perform a pre-operation inspection before each operation, and correct any problem. Pre-Operation Checks For your safety, and to maximize the service life of your equipment, it is very important to take a few moments before you operate the engine to check its condition. -
Page 11: Operating Instructions
Operating Instructions ⚠WARNING Gasoline and its vapors are extremely flammable and explosive. Fire or explosion can cause severe burns or death. Engines give off carbon monoxide, an odorless colorless, poison gas. Breathing carbon monoxide can cause nausea, fainting or death. ... - Page 12 2. To start a cold engine, move the choke lever to the CHOKE position. To restart a warm engine, leave the choke lever in the RUN position. 3. Move the throttle lever away from the MIN. position, about 1/3 of the way toward the MAX. position.
- Page 13 5. Operate the starter. Recoil Start Pull the starter grip lightly until you feel resistance, then pull briskly in the direction of the arrow as shown below. Return the starter grip gently. ⚠WARNING Do not allow the starter grip to snap back against the engine. Return it gently to prevent damage to the starter.
- Page 14 When the engine starts, release the key, allowing it to return to the ON position. ⚠WARNING Using the electric starter for more than 5 seconds at a time will overheat the starter motor and can damage it. 6. If the choke lever has been moved to the CHOKE position to start the engine, gradually move it to the RUN position as the engine warms up.
- Page 15 1. Move the throttle lever to the MIN. position. Some engine applications use a remote-mounted throttle control rather than the engine-mounted throttle lever shown here. 2. Turn the engine switch to the OFF position. 3. Turn the fuel shutoff to the OFF position. Page 15 of 35...
-
Page 16: Maintenance
Setting Engine Speed Position the throttle lever for the desired engine speed. Some engine applications use a remote-mounted throttle control rather than the engine-mounted throttle lever shown here. Refer to the instructions provided by the equipment manufacturer. For engine speed recommendations, refer to the instructions provided with the equipment powered by this engine. - Page 17 When Testing for Spark Use an approved spark plug tester. Maintenance Schedule REGULAR SERVICE PERIOD (3) First Every 3 Every Perform at every indicated month Every 6 Each Month Months or Months or or operating hour interval, Year or 100 Hrs 50 Hrs 300 Hrs whichever comes first.
- Page 18 Engine Oil Oil is a major factor affecting performance and service life. Use 4-stroke automotive detergent oil. Recommended Oil Use 4-stroke motor oil that meets or exceeds the requirements for API service category SJ or later (or equivalent). Always check the API service label on the oil container to be sure it includes the letters SJ or later (or equivalent).
- Page 19 1. Remove the oil dipstick and wipe with a clean cloth. 2. Insert the oil dipstick into the filler neck without screwing it in. 3. Remove the oil dipstick and check the oil level. Make sure the oil is at the FULL mark on the dipstick.
- Page 20 For refueling, refer to the manufacturer’s instructions provided with the equipment. See the following for a Powerhorse supplied standard fuel tank refueling instruction 1. With the engine stopped and on a level surface, remove the fuel filler cap and check the fuel level.
- Page 21 ⚠CAUTION The manufacturer of the equipment on which this engine is installed specifies the top speed at which the engine will be operated. Do not exceed this speed. How to Replace the Spark Plug If the engine has been running, let it cool before servicing the spark plug.
- Page 22 Severe thermal burns can occur on contact. Combustible debris, such as leaves, grass, brush, etc. can catch fire. 1. Allow muffler, engine cylinder, and fins to cool before touching. 2. Remove accumulated debris from muffler area and cylinder area. 3. Replacement parts must be the same and installed in the same position as the original parts or fire could result.
- Page 23 3. Inspect the air filter. Clean dirty air filter with warm water and mild soap. Allow air filter to dry thoroughly before re-installation 4. Install the air filter assembly onto the carburetor and secure with screw. Note: Do not use pressurized air or solvents to clean the filter. Pressurized air can damage the filter and solvents will dissolve the filter.
- Page 24 Removing Oil The oil must be drained from the Oil Drain Plug. (See figure 2.) 1. Remove the dipstick (C) 2. Please an approved container below the oil drain plug. 3. Remove the Oil drain plug (D) and allow oil to the drain into the approved container. 4.
-
Page 25: Troubleshooting
Troubleshooting ⚠WARNING Do not crank engine with spark plug removed. Failure Possible Cause Corrective Action If engine is cold, ensure choke lever is set Out of fuel correctly. Add fuel. Engine flooded Set choke lever to open/run position. Remove spark plug and clean it. Check the spacing on the electrode and set the gap to If engine will not the .correct dimension. - Page 26 ** Engine power will decrease 3.5% for each 1,000 feet (300 meters) above sea level and 1% for each 10°F (5.6°C) above 77°F (25°C). The engine will operate satisfactorily at an angle up to 15°. Refer to the equipment operator’s manual for safe allowable operating limits on slopes. We recommend that you see an authorized service center for all maintenance and service of the engine and engine parts.
-
Page 27: Parts Diagram
Parts Diagram Page 27 of 35... -
Page 28: Parts List
Parts List Code Part Description Code Part Description CRANKCASE SHROUD 260213 260502 BALL BEARING BOLT M6X12 93029 91325 COVER COMP, OIL SEAL 93511 261104 CYLINDER HEAD SEAL, GOVERNOR ARM PACKING, HEADCOVER 93516 SHAFT 96075 SHAFT, GOVERNOR ARM LOCK BOLT 263901 91819 WASHER, GOVERNOR SHROUD ASSY, UPPER... -
Page 29: Replacement Parts
Code Part Description Code Part Description CLIP, FUEL LINE 7.5 94403 262603 BRACKET GOVERNOR ARM 264001 97210 CHARGE COIL BOLT, GOVERNOR ARM 91822 260802 LOCKING FLAPS NUT M6 90016 94409 CLIP, FUEL LINE 9.5 MUFFLER COMP 263718 94408 CLIP, FUEL LINE 10 STARTING MOTOR 97406 ASSEMBLY... -
Page 30: Limited Warranty
Northern Tool and Equipment Company, Inc. ("We'' or "Us'') warrants to the original purchaser only ("You'' or “Your”) that the Powerhorse product purchased will be free from material defects in both materials and workmanship, normal wear and tear excepted, for a period of two years from date of purchase. - Page 31 U.S EPA AND CALIFORNIA EMISSION CONTROL WARRANTY STATEMENT YOUR WARRANTY RIGHTS AND OBLIGATIONS The California Air Resources Board, The United States Environmental Protection Agency (US EPA) and Northern Tool & Equipment Company, Inc. are pleased to explain the emission control system warranty on your 2016 and later model year small off-road engine.
- Page 32 DEFECTS WARRANTY COVERAGE Adopted by the Air Resources Board, Northern Tool & Equipment Company, Inc. warrants to the ultimate purchaser and each subsequent purchaser that the small off-road engine (1) has been designed, built and equipped so as to conform with all applicable regulations; and (2) is free from defects in materials and workmanship that cause the failure of a warranted part to conform with those regulations as may be applicable to the terms and conditions stated below: (a) The warranty period begins on the date the engine is delivered to an ultimate purchaser or first...
- Page 33 Air Resources Board. ENGINE INFORMATION Brand: Powerhorse Engine Family: GCDPS.2121DJ, GCDPS.4572DJ EMISSION WARRANTY PARTS LIST The repair or replacement of any warranted part otherwise eligible for warranty coverage may be excluded from such warranty coverage if Northern Tool &...
- Page 34 (e) Air Injection System: (1) Air pump or pulse valve. (2) Valves affecting distribution of flow. (3) Distribution manifold. (f) Catalyst or Thermal Reactor System: (1) Catalytic converter. (2) Thermal reactor. (3) Exhaust manifold. (g) Particulate Controls: (1) Traps, filters, precipitators, and any other device used to capture particulate emissions. (h) Miscellaneous Items Used in Above Systems: (1) Electronic controls.
- Page 35 Distributed by: Northern Tool & Equipment Company, Inc. Burnsville, Minnesota 55306 www.northerntool.com Made in China Page 35 of 35...
Need help?
Do you have a question about the 750122 and is the answer not in the manual?
Questions and answers