Advertisement
Table of Contents
- 1 Engine Specifications
- 2 Safety References
- 3 Features and Controls
- 4 How to Start the Engine
- 5 How to Stop the Engine
- 6 Troubleshooting
- 7 Oil Recommendations
- 8 How to Check/Add Oil
- 9 High Altitude
- 10 How to Add Fuel
- 11 Maintenance Chart
- 12 Carburetor Adjustment
- 13 Inspect Muffler and Spark Arrester
- 14 Manufacturer's Warranty Coverage
- Download this manual
Advertisement
Table of Contents

Related Manuals for Powerhorse 45749


Summary of Contents for Powerhorse 45749
- Page 1 208CC ENGINE OWNER’S MANUAL 45749...
-
Page 2: Engine Specifications
Thank you very much for choosing a Powerhorse product! For future reference, please complete the owner’s record below: Model: Purchase Date: Save the receipt, warranty and these instructions. It is important that you read the entire manual to become familiar with this product before you begin using it. -
Page 3: Safety References
SYMBOLS ASSOCIATED Safety References WITH THIS ENGINE: The safety alert symbol is used to identify safety information about hazards that can result in personal injury. Read Fire A signal word (DANGER, WARNING, or CAUTION) is Manual used with the alert symbol to indicate the likelihood and the potential severity of injury. -
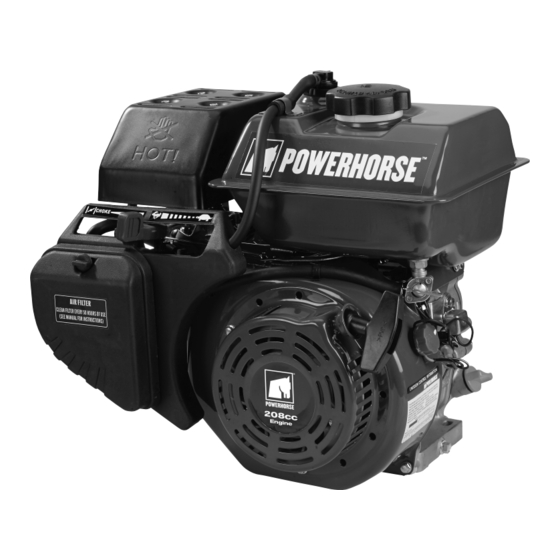
Page 4: Features And Controls
Features and Controls Compare the illustration with your engine to familiarize yourself with the location of various features and controls. Air cleaner Muffler Spark plug Throttle lever Recoil starter Starting handle Fuel shutoff Choke lever Fuel filler cap Fuel tank Engine identification Dipstick Drain plug... - Page 5 Safety CAUTION WARNING This engine is shipped from us without oil. If you start Rapid retraction of starter cord (kickback) the engine without oil, the engine will be damaged will pull hand and arm toward engine beyond repair and will not be covered under warranty. faster than you can let go.
-
Page 6: How To Start The Engine
How to Start the Engine WARNING Gasoline and its vapors are extremely flammable and explosive. Fire or explosion can cause severe burns or death. When Starting Engine · Ensure that spark plug, muffler, fuel cap and air cleaner are in place and secured. ·... -
Page 7: Troubleshooting
Move Throttle lever (D) to MIN. position. Turn Engine switch (F) to the OFF position. Turn Fuel shutoff (I) to the OFF position. Troubleshooting If Engine will not start Out of fuel If engine is cold, ensure choke lever is set correctly. . Add fuel Engine flooded . -
Page 8: How To Check/Add Oil
How to Check/Add Oil Figure 1 1. Remove the dipstick (O) and swipe with a clean cloth (Figure 1). 2. Insert the dipstick into the filler neck without screwing it in. 3. Remove the dipstick and check the oil level. Make sure the oil is at the FULL mark (B) on the dipstick. 4. To add oil, pour the oil slowly into the engine oil fill (A). -
Page 9: Maintenance Chart
· Keep gasoline away from sparks, open flames, pilot lights, heat, and other ignition sources. Check fuel lines, tank, cap, and fittings frequently for cracks or leaks. Replace if necessary. If fuel spills, wait until it evaporates before starting engine. Clean the fuel cap area of dirt and debris. -
Page 10: Inspect Muffler And Spark Arrester
How to Replace the Spark Plug Check the gap (A) with a wire gauge (B). If necessary, reset the gap. Install and tighten the spark plug to the recommended torque. For gap setting or torque, see the Specifications section. Note: In some areas, local law requires using a resistor spark plug to suppress ignition signals. If this engine was originally equipped with a resistor spark plug, use the same type for replacement. - Page 11 How to Remove Oil Caution: Used oil is a hazardous waste product and must be disposed of properly. Do not discard with household waste. Check with your local authorities, service center, or dealer for safe disposal/recycling facilities. Removing Oil The oil must be drained from the Oil Drain Plug (See figure 4) Remove the dipstick (C) Please an approved container below the oil drain plug.
- Page 12 The following precautions should be taken if storing your engine for a period exceeding 30 days, or for seasonal storage. • While engine is still warm, change oil. • Clean engine of surface debris, chaff or grass. • Drain all fuel from fuel tank into proper receptacle for storage. •...
-
Page 13: Manufacturer's Warranty Coverage
U.S EPA AND CALIFORNIA EMISSION CONTROL WARRANTY STATEMENT YOUR WARRANTY RIGHTS AND OBLIGATIONS The California Air Resources Board, The United States Environmental Protection Agency(US EPA) and Northern Tool and Equipment Company Inc. , are pleased to explain the emission control system warranty on your 2015/2016 and later model year small off-road engine. - Page 14 Tell: 1-866-443-2576 Email: Customercare@northerntool.com Brand: Powerhorse Address or Website : www.northerntool.com This telephone number is only for the engines which the company name Northern Tool and Equipment Company Inc. on the emission label. Defects warranty requirements: (a) The warranty period begins on the date the engine or equipment is delivered to an ultimate purchaser.
- Page 15 (4) Repair or replacement of any warranted part under the warranty must be performed at no charge to the owner at a warranty station. (5)Notwithstanding the provisions of Subsection (4) above, warranty services or repairs must be provided at all Northern Tool and Equipment Company Inc. distribution centers that are franchised to service the subject engines.
- Page 16 (ii) Intake manifolds. (iii) Air filter. (3) Ignition System (i) Spark Plugs. (ii) Magneto or electronic ignition system. (iii) Spark advance/retard system. (4) Exhaust Gas Recirculation (EGR) System (i) EGR valve body,and carburetor spacer if applicable. (ii) EGR rate feedback and control system. (5) Air Injection System (i) Air pump or pulse valve.
- Page 17 The distributor shall warranty any piece of equipment manufactured, or parts of equipment manufactured, to be free from defects in material or workmanship for a period of 2 years for noncommercial/nonrental use and a period of 90 days for commercial/rental use from the date of purchase by user. This warranty applies to the original purchaser of the equipment and is non transferable.
Need help?
Do you have a question about the 45749 and is the answer not in the manual?
Questions and answers