
Related Manuals for Holystone HS100

Summary of Contents for Holystone HS100
- Page 1 INSTRUCTIONS FOR USE Navigator HS100 usa@holystone.com (America) +1(855) 888-6699 ca@holystone.com (Canada) eu@holystone.com (Europe) jp@holystone.com (Japan) www.holystone.com...
-
Page 2: Table Of Contents
Table of Contents Preface ................1 Warnings ................2 Maintenance ..............3 Package Contents ............. 4 Drone and Battery ............6 Assemble the Propeller............. 7 Assemble the Propeller Guard ........8 Fly Safe Information ............9 Transmitter Functions ............10 Download the Application ..........14 Charging the Battery ............ -
Page 3: Preface
< PREFACE> To make your experience with this drone as straightforward and convenient as possible, please read this instructions for use carefully before operation. Keep it safe for future reference and to ensure continued, safe and enjoyable use of your drone. Important Statement 1. -
Page 4: Warnings
<WARNINGS> 1. The information and guidance within this package and instructions for use is important for the safe operation and maintenance of your drone. Please keep it safe for future reference. 2. You accept sole responsibility for any injury, loss or damage that result from your operation of the device. -
Page 5: Maintenance
<MAINTENANCE> 1. Clear the product after each use with a clean, soft cloth. 2. Avoid prolonged exposure to direct sunlight and avoid heat buildup in the drone. 3. This device is not waterproof and must not be submerged in water under any circumstance. Failure to maintain the device completely dry will result in the failure of the unit. -
Page 6: Package Contents
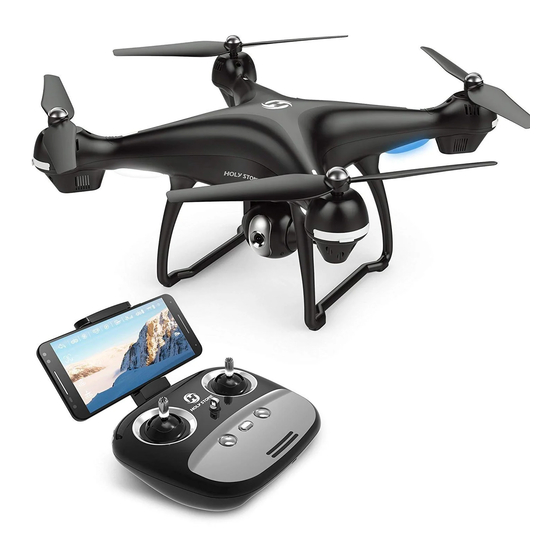
Package Contents Card Reader 8G TF Card+ Card Reader HS100 DRONE with Camera Battery x 1 Propeller X 8 USB Charging Cable Landing Gear Screw driver X 1 Screw X16 Cap X 8 Propeller Guard X 6... - Page 7 Drone 1. HD Camera 3. Propeller”A” 5. Propeller Guard 2. Landing Gear 4. Propeller”B” Battery of Drone High Electricity Low 1. Battery Level Indicators 2. Micro USB Charging Port 3. Power Switch Press the Power Switch shortly to turn on; hold the Power Switch 2 seconds to turn off.
-
Page 8: Drone And Battery
Parts Details 6. Fixed Ring 1. Battery 7. Spacer Ring 2. Body Frame 3. Camera 8. Propeller 4. Landing Gear 9. Dust Cover 5. Cap 10.Propeller Guard... -
Page 9: Assemble The Propeller
Assemble the Propeller Please note that the letter “A ” or “ B ” is printed on each propeller, and make sure all the propellers are attached in the correct motor position. Attach the propellers with the ring mark to the motor cover with ring marks. -
Page 10: Assemble The Propeller Guard
Assemble the Propeller Guard To prevent accidents or injuries, we suggest the pilot to install the propeller guards 1)Take out the Dust Cover from the motor cover. 2)Attach the Propeller Guard to the motor cover. 1st. Pull out the Dust Cover 2nd. -
Page 11: Fly Safe Information
Fly Safe Fly in Open Areas Strong GPS Signal Maintain Line Fly Below of Sight 400 feet (120 m) Avoid flying over or near obstacles, crowds, high voltage power lines, trees, airport or bodies of water. DO NOT fly near strong electromagnetic sources such as power lines and base stations as it may affect the onboard compass. -
Page 12: Transmitter Functions
Transmitter Functions Throttle Joystick. Direction Joystick. - Page 13 Return To Home(RTH) Smart RTH: Press this button, the drone will return to the Point which you set as TAKE OFF, and hover at an altitude which you set in the app. (This function only can work in GPS mode) Power Button.
- Page 14 7. Dial to the right to accelerate; Dial to the left to decelerate. 8. Click to enter Follow-me mode; Click again to cancel the follow-me mode. (For more details, please check page21#) Hold this button for 3 secs to enter Trim mode. Click again to cancel Trim mode.
- Page 15 Fly Safe 1. Fly in Open Areas: Always fly in locations that are free and clear of buildings, trees, power lines, and other obstacles. Do not fly above or near people or animals. 2. Maintain Control at All Times: Even when using autopilot functions such as Auto-Takeoff, Auto-Landing, and Return to Home, always keep your hands on the Transmitter and maintain control of your drone when it is in flight.
-
Page 16: Download The Application
Flight 1. Download the APP Google Play Connect to the App Store™ or Google Play™ and download the “HS GPS PRO” application for free. 2. Check the Battery Level High Electricity Low 3. Charging the Battery and Transmitter Phone adapter: Press the buckle and Pull out Charging time: Charging time... -
Page 17: Prepare For Take Off
4. Prepare for Take-off ① Power on the Transmitter. ② Plug the Battery into Drone and Power on. Front Back ③ Place the Drone on an flat and ④ Push the left joystick up then dry surface and in a unobstr- down to pair with drone. -
Page 18: Safe To Fly With Gps
5. Flight Safe to Fly (GPS) The Default GPS Mode is BEGINNER MODE, Under BEGINNER MODE: 1.Flight Distance is limited between 0-30 M/0-98.4 Feet. 2.Flight Altitude is limited between 0-30 M/0-98.4 Feet. 3.RTH Altitude is under 25 M/82 Feet. You can Turn-off the BEGINNER MODE to modify the parameters in the APP on your phone. - Page 19 Compass Calibration Part 1 —Hold the drone horizontally; Rotate the drone 360° on its center axis until the Back LED Flight Indicators switch to solid Purple. Compass Calibration Part 2 —Hold the drone vertically and battery point to sky; rotate the drone 360°...
- Page 20 Front Back GPS Searching ③ (DO NOT use GPS Mode indoor ) — Place the Drone on a flat and dry surface and in an unobstructed and lit area. — LED Flight Indicators return to Blink Blue (Back) and White (Front). This meaning the drone is Seaching the GPS Signal.
-
Page 21: App Functions
APP Functions VR Split Screen Back to Main Menu Media Gallery Controls ON/OFF Flight Record Flip Screen Transmitter Battery Drone Battery Take Photo Auto Take-off Follow Me Auto Land Take Video Return Home Speed(Meter/Sec.) Height (Meters) Drone Status Distance (Meters) -
Page 22: Take-Off
Take-off/Landing/Emergency Stop Head about 5 feet Rotating propellers can be dangerous. Do not start the motors when there are people nearby. Press , the propellers will spin and the drone will take off at an altitude of about 5 feet. (Always keep the head of drone facing forward) Press... -
Page 23: Follow Me
Follow Me When the Follow Me function is active, the drone will follow to the GPS in your smartphone to follow you wherever you go. Follow Me Mode: 1. Set drone at least 10 feet high and 100 feet distance position. 2. -
Page 24: Return To Home
Return-to-Home (RTH) The Return to Home (RTH) function brings the drone back to the last recorded Home Point. There are three types of RTH: Smart RTH / Low--Battery RTH / Failsafe RTH. 1.Smart Return To Home RTH Button The app’s RTH Button Press the Return to Home Button on your Transmitter or tap on the App of your smart phone, and the transmitter will start beeping. -
Page 25: Headless Mode
Headless Mode Press the on the transmitter to enter Headless Mode. Hold the on the transmitter for 3 secs to exit GPS MODE. The direction of control when the drone is paired. Don’t turn your direction. Don’t turn your direction. Under Headless Mode, the forward direction is the direction the pilot faces where the pilot pairs the drone with the transmitter. -
Page 26: Assemble The Camera
Assemble the Camera 1) Plug the camera wires accordingly into the connection ports on the bottom of the drone.(Smaller wire connects to small port while the Bigger wire connects to big port . Wire connector Pic.1 has two sides A/B , A side of the small interface faces drone’s Pic.2 Head and A side of Bigger interface faces drone’s Tail direction. -
Page 27: Camera Functions
Camera Functions Take Photo Take Video ICON on APP Press on the Transmitter or tap on APP, the red indicator on camera will flash once, indicating the camera takes one photo. Press on the Transmitter or tap on APP, the red indicator will keep flashing, indicating the camera is taking video. -
Page 28: Replace The Landing Gear
Replace the Landing Gear 1)Letter “L” and “R” is printed on each side of landing gear shell. “L” is the mark of left landing gear as “R” is right landing gear. 2)There are two locks on the bottom; Press and hold down the lock, and pull the lock-side landing gear out. -
Page 29: Specifications
Specifications Drone ● MODEL:HS100 Weight (Including Battery) :700 g / 24.7 oz Flight Time:12-15 minutes WIFI Distance:492 feet/150m(Outdoor And Unobstructed) Motor Model:180 Hovering:Enabled Operating Temperature Range :32° to 104° F ( 0° to 40° C ) Satellite Systems GPS / GLONASS Dimensions:500*500*175mm... - Page 30 APP / Live View ● Mobile App: HS GPS PRO Live View Working Frequency: 2.4 GHz ISM Live View Quality: 720P @ 20fps Latency: Low Latency Video (depend on conditions and mobile device) Required Operating Systems: iOS 8.0 or later / Android 4.1.2 or later Recommended Devices: 4.7″...
-
Page 31: Trouble Shooting
Restart and re-calibrate the sensor loses it’s balance crashing. drone. after crashing. For more further technical support, please do not hesitate to contact us via Email or Hot Line Phone Call. usa@holystone.com (America) +1(855) 888-6699 ca@holystone.com (Canada) eu@holystone.com (Europe) jp@holystone.com (Japan) -
Page 32: General Information
General Information FCC Notice: This device complies with Part 15 of the FCC Rules. Operation is subject to the following two conditions: (1) This device may not cause harmful interference. (2) This device must accept any interference received, including interference that may cause undesired operation. - Page 33 IC Notice: This device complies with Canada Industry licence-exempt RSS standard(s). Operation is subject to the following two conditions: (1) this device may not cause interference; and (2) this device must accept any interference. Including interference that may cause undesired operation of the device. CAN ICES-3 (B) Avis d’Industrie Canada Le présent appareil est conforme aux CNR d'industrie Canada applicables...
- Page 34 HOW TO RECYCLE THIS PRODUCT This symbol on the product or its documentation indicates that it must not be disposedof with household waste. Uncontrolled waste disposal may harm the environment or human health. Please separate your device from other types of waste to recycle it responsibly. This will help to foster the sustainable re-use of material resources.
- Page 35 11.Non-rechargeable batteries are not to be recharged. Rechargeable batteries are only to be charged under adult supervision. 12.Different types of batteries or new and used batteries are not to be mixed. 13.Batteries are to be inserted with the correct polarity. 14.The supply terminals are not to be short-circuited.
Need help?
Do you have a question about the HS100 and is the answer not in the manual?
Questions and answers