Table of Contents
Advertisement
Quick Links
MANUAL MODE
Turn the dial from 1 to 10 for total control of blending speed. Press START/STOP to begin
and end blending.
OTHER MODES
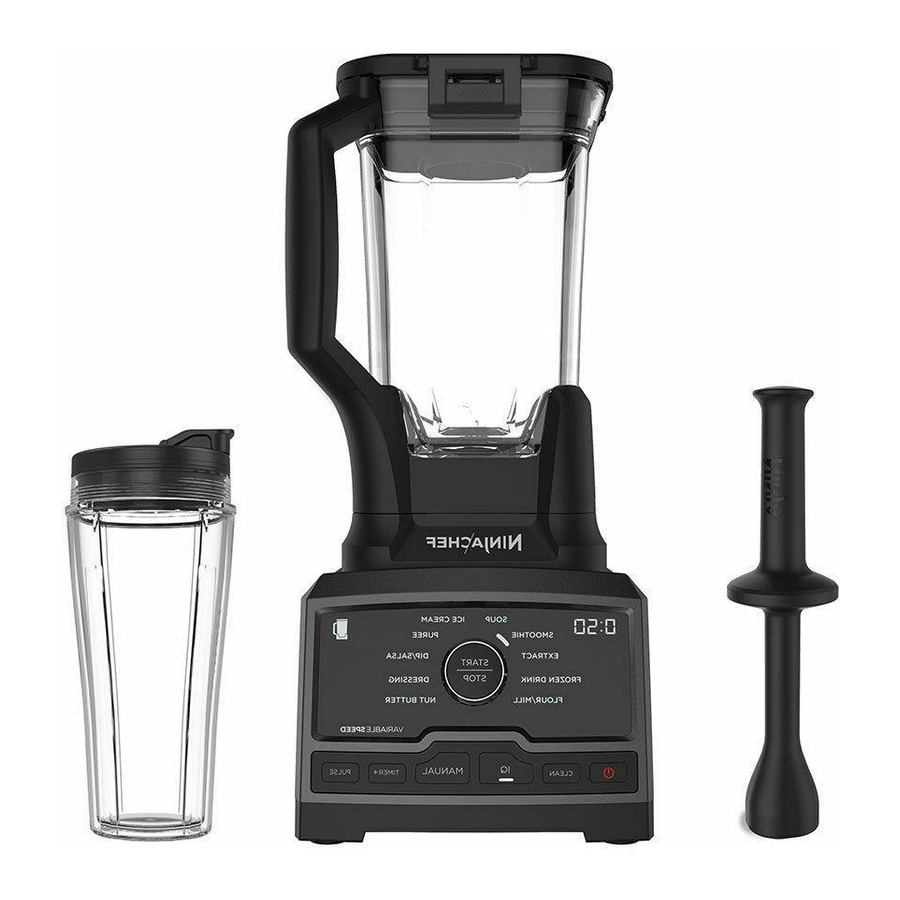
CLEAN
• Pitcher: To run the self-cleaning program with the pitcher, first add warm water to the MAX CLEAN
line and two drops of dishwashing soap to the pitcher. Secure pitcher lid and lid cap in place. Select
CLEAN mode, then press START/STOP to begin. The unit will shut down when the self-cleaning cycle
is complete. Make sure to thoroughly rinse and air-dry the pitcher.
• Cup: When using CLEAN mode for the blender cup, fill the cup halfway with warm water and add one
drop of dishwashing soap. Secure the Pro Extractor Blades® Assembly to the blender cup, then install
cup onto motor base. Select CLEAN mode, then press START/STOP to begin. The unit will shut down
when the self-cleaning cycle is complete. Make sure to thoroughly rinse and air-dry the cup.
TIMER+
Use TIMER+ mode to set a countdown timer. Select TIMER+ and add blend time in 10-second intervals
by repeatedly pressing the TIMER+ button. Set the speed by rotating the dial to the desired setting.
Press START/STOP to activate the unit. Blending will stop automatically when countdown is complete.
PULSE
Select PULSE and turn dial to desired speed. Press the START/STOP button in short bursts to pulse.
The unit will blend only while button is pressed.
CLEANING
Dishwasher: All attachments are dishwasher safe.
It is recommended that the tamper, lid, and cap be
placed on the top rack of the dishwasher. Exercise
care when washing Pro-Extractor Blades Assembly
and pitcher, as the blade assemblies are sharp.
WARNING: Handle the Pro Extractor Blades Assembly and the pitcher's bottom blades
with care, as they are sharp. Contact with the blades' edges can result in laceration.
QUESTIONS? We're here to help. Call 1-877-646-5288 or visit ninjakitchen.com
Hand-washing: Wash pitcher in warm, soapy
water using a dishwashing utensil with a handle
to avoid direct contact with the blades. Exercise
care when washing Pro-Extractor Blades
Assembly and pitcher, as the blade assemblies
are sharp. Thoroughly rinse and air-dry all parts.
Please make sure to read the enclosed Ninja® Owner's Guide prior to using your unit.
PITCHER
PITCHER
PITCHER LID
MAX
1.
2.
Lower pitcher
Add ingredients to pitcher,
onto motor
making sure not to exceed
base, then rotate
Max Liquid line. Hot ingredients
clockwise until it
cannot exceed the Max Hot
Liquid line.
clicks into place.
WARNING: Pitcher's bottom blades are sharp. Contact with the blades can result in laceration.
BLENDING
Press the power button.
The base defaults to
Auto-iQ® Mode. Select the
desired program and press
START/STOP, or press
MANUAL to switch modes
and use the dial to select
blending speed.
QUESTIONS? We're here to help. Call 1-877-646-5288 or visit ninjakitchen.com
DUO™
QUICK ASSEMBLY
LID CAP
ASSEMBLY
MAX
HOT
3.
4.
Place lid onto pitcher,
Insert lid cap
then press down firmly,
into lid and
making sure that both
turn clockwise
side clips on lid fully
to lock.
snap onto lip of pitcher.
IN USE
TAMPER
If unmixed ingredients are sticking
to the pitcher, remove lid cap and
use tamper to push ingredients
closer to the blades.
CT815 SERIES
TAMPER
Advertisement
Table of Contents

Related Manuals for Ninja DUO CT815A


Summary of Contents for Ninja DUO CT815A
- Page 1 CT815 SERIES Please make sure to read the enclosed Ninja® Owner’s Guide prior to using your unit. MANUAL MODE DUO™ QUICK ASSEMBLY PITCHER PARTS Turn the dial from 1 to 10 for total control of blending speed. Press START/STOP to begin and end blending.
- Page 2 SINGLE-SERVE CUP AUTO-IQ® MODE PARTS AUTO-IQ TECHNOLOGY Auto-iQ’s unique timed programs are customized to take the guesswork out of making great drinks and meals. Turn dial to select the desired program, then press START/STOP to begin. As the program runs, the timer will count down. When the countdown ends, blending will stop automatically.
Need help?
Do you have a question about the DUO CT815A and is the answer not in the manual?
Questions and answers