Table of Contents
Advertisement
Quick Links
• Bluetooth wireless technology operates within 10 meters
(33 ft) range and varies if there are physical obstacles, such
as a thick wall in between your smart device and CIR600.
LISTEN TO THE MUSIC
Bluetooth Music Clock
1. Press
to select BT or Aux in music.
2. Press
or
to control sound volume, max volume is 16.
Model: CIR600
3. Press and hold
for 3 seconds to mute, volume is 0.
User Manual
LISTEN TO AN ExTERNAL AUDIO SOURCE
EN
1. Use a 1/8 (3.5 mm) audio cable (not supplied) to connect
the audio source's headphone jack to the Aux in jack on
Thank you for selecting the Oregon Scientific
Bluetooth
TM
your unit.
Music Clock (CIR600).
2. Press
to enter AUX IN mode.
NOTE
Please keep this manual handy as you use your new
3. Use the controls on your connected device to play.
product. It contains practical step-by-step instructions, as
well as technical specifications and warning you should know
SPECIFICATIONS
about.
Input power
12 V, 2.0 A AC/DC power
PACKAGE CONTENTS
adapter
• Main unit x 1
Output power
2 x 10 W RMS
• CR2025 battery x 1
• AC/DC Power adapter x1
USB charging output port
5 V, 1 A
• User manual x 1
Battery
CR2025 (for back-up source)
OVERVIEW
Bluetooth
Version 4.0
MAIN UNIT
L x W x H
200 x 89 x 72,9 mm
(7,9 x 3,5 x 2,9 in)
1
2
3
4
5
Weight
628g (1,4 lb)
PRECAUTIONS
• Use only fresh battery of the required size and type.
6
• Do not dispose old batteries as unsorted municipal waste.
Collection of such waste separately for special treatment is
necessary.
7
8
9
10
11
• If you do not plan to use the unit for a long time, remove
the battery. Battery can leak chemicals that can damage
electronic parts.
• Do not subject the device to excessive force, shock, dust,
temperature or humidity.
• Do not immerse the device in water. If you spill liquid over it,
dry it immediately with a soft, lint-free cloth.
• Do not clean the device with abrasive or corrosive materials.
• Do not tamper with the device's internal components.
1.
Volume up; Increase a value in setting mode.
Doing so invalidates the warranty.
2.
Volume down; Decrease a value in setting mode;
• Images shown in this manual may differ from the actual dis-
3.
Set the alarm; Activate/Cancel the alarm;
play.
4.
Activate Bluetooth pairing mode; Toggle between
Bluetooth and Aux in audio mode.
• When disposing of this product, ensure it is collected
5.
Toggle display mode between time and calendar;
separately for special treatment.
Set the time/calendar.
• The contents of this manual may not be reproduced without
6. SNOOZE Snooze the alarm.
the permission of the manufacturer.
7. DC 12 V, 2.0 A jack Connect AC/DC adapter.
8. 5 V, 1A USB port Charge smart device; Firmware update.
NOTE
The technical specifications for this product and the
9. Aux in Connect to external audio source.
contents of the user manual are subject to change without
10. RESET Returns all settings to factory defaults.
notice.
11. Battery compartment: for back-up power source.
NOTE
Features and accessories will not be available in all
countries. For more information, please contact your local
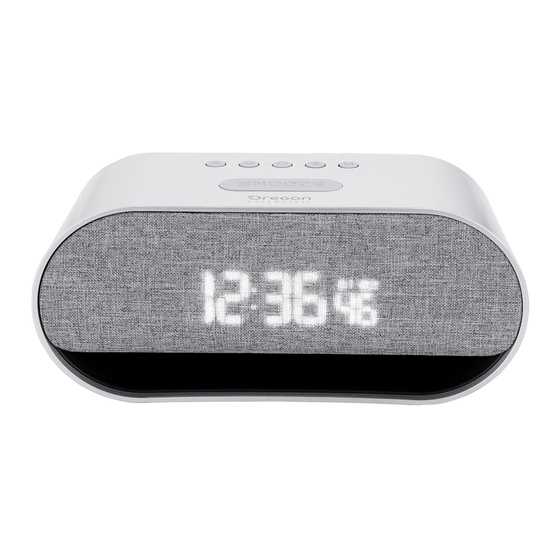
LCD DISPLAY
retailer. To download an electronic version of the user manual,
please visit
http://global.oregonscientific.com/customerSupport.php.
ABOUT OREGON SCIENTIFIC
B
Visit our website www.oregonscientific.com to learn more
about Oregon Scientific products.
For any inquiry, please contact our Customer Services at
info@oregonscientific.com.
A
Oregon Scientific Global Distribution Limited reserves the
A. Time / Calendar display.
right to interpret and construe any contents, terms and
B. Second / Weekday display.
provisions in this user manual and to amend it, at its sole
discretion, at any time without prior notice. To the extent that
Symbol
Description
there is any inconsistency between the English version and
any other language versions, the English version shall prevail.
Low battery indicator
EU-DECLARATION OF CONFORMITY
Alarm indicator
Hereby the manufacturer, IDT Technology Limited, declares
Bluetooth icon
that the radio equipment type Bluetooth Music Clock
(Model: CIR600) is in compliance with 2014/53/EU Directive.
Aux in
The full text of the EU Declaration of Conformity is available
at the following internet address : www.oregonscientific.com.
POWER YOUR CLOCK
INSTALL BATTERY
The device comes with a back-up battery installed. Remove
the plastic tab before using the clock. Replace the battery
when
displays.
COUNTRIES RED APPROVED COMPLIED
1. Screw off the battery compartment cover.
All EU countries, Switzerland
CH
and Norway
N
2. Insert a new CR2025 3 V battery, positive (+) side up, and
replace the battery compartment cover.
FCC STATEMENT
3. Press RESET.
This device complies with Part 15 of the FCC Rules. Operation
NOTE
is subject to the following two conditions: (1) This device may
• Keep button-cell battery away from children. Swallowing
not cause harmful interference, and (2) This device must
a button-cell battery can be fatal.
accept any interference received, including interference that
may cause undesired operation.
CONNECT POWER ADAPTER
WARNING
Changes or modifications not expressly
Connect the supplied AC/DC power adapter to the DC 12 V,
approved by the party responsible for compliance could void
2.0 A jack on the rear of the unit and plug into a standard
the user's authority to operate the equipment.
outlet.
This equipment has been tested and found to comply
NOTE
with the limits for a Class B digital device, pursuant to Part
15 of the FCC Rules. These limits are designed to provide
• The battery is only for back-up use. Always connect the unit
reasonable protection against harmful interference in a
to the power grid source via power adapter.
residential installation.
• When the clock is connected to AC power source, it can
This equipment generates, uses and can radiate radio
charge your smart device via the USB port.
frequency energy and, if not installed and used in accordance
• Make sure the adapter is not obstructed and is easily
with the instructions, may cause harmful interference to
accessible to the unit.
radio communications. However, there is no guarantee
that interference will not occur in a particular installation. If
• To completely disconnect from power, unplug adapter from
this equipment does cause harmful interference to radio or
the mains.
television reception, which can be determined by turning the
equipment off and on, the user is encouraged to try to correct
SET THE CLOCK TIME
the interference by one or more of the following measures:
•
Reorient or relocate the receiving antenna.
1. Press and hold
for 3 seconds to enter the clock time
setting mode.
•
Increase the separation between the equipment and
receiver.
2. Press
or
repeatedly to adjust settings; press and hold
•
Connect the equipment into an outlet on a circuit different
or
to quickly setting.
from that to which the receiver is connected.
3. Press
to confirm and go to the next setting.
•
Consult the dealer or an experienced radio / TV technician
for help.
• The setting order is 12/24 hour format > Hour > Minute >
Year > Calendar format (MD/DM) > Month > Day >
DECLARATION OF CONFORMITY
Weekday language.
• Complete each step with 60 seconds or the device will exit
The following information is not to be used as contact for
the clock setting mode.
support or sales. Please call our customer service number
(listed on our website at www.oregonscientific.com), or on the
• The language options are English (EN), German (GER),
French (FR), Italian (IT) and Spanish (SP).
warranty card for this product) for all inquiries instead.
We
ALARM
Name:
Oregon Scientific, Inc.
SETTING THE ALARMS
Address:
Brea Corporate Park
1. Press and hold
for 2 seconds to enter alarm setting
3020 Saturn St. Suite 200
Brea, CA 92821
mode. The time digits flash.
Telephone No.:
1-800-853-8883
2. Press
or
repeatedly to adjust settings; press and hold
or
to quickly setting.
declare that the product
3. Press
to confirm and go to the next setting.
Product No.
CIR600
ACTIVATING / DEACTIVATING THE ALARM
Product Name:
Bluetooth Music Clock
Manufacturer:
IDT Technology Limited
Press
accordingly for desired option:
Address:
Block C, 9/F, Kaiser Estate,
Time pressing
Alarm on/off
Operation
Phase 1, 41 Man Yue St.,
Hung Hom, Kowloon,
1
Set Alarm 1
Alarm 1
on
Hong Kong
2
Set Alarm 2
Alarm 2
on
INFORMATION FOR USERS
Both alarms
Set Alarm 1
3
and 2
Pursuant to and in accordance with Article 14 of
on
the
Directive
2012/19/EU
of
the
European
Turn off Alarm 1
Parliament on waste electrical and electronic
4
Both alarms off
and 2
equipment (WEEE), and pursuant to and in
accordance with Article 20 of the Directive 2013/56/EU of
Press
and
together to review Alarm 1 time.
the European Parliament on batteries and accumulators
and waste batteries.
Press
and
together to review alarm 2 time.
The barred symbol of the rubbish bin shown on the equipment
indicates that, at the end of its useful life, the product must be
SNOOZE / STOP THE ALARM
collected separately from other waste.
• Press SNOOZE to stop the alarm for 8 minutes. The alarm
Please note that the batteries/rechargeable batteries must be
indicator will flash.
removed from the equipment before it is given as waste. To
remove the batteries/accumulators refer to the specifications
• Press
to cancel snooze function during snooze status.
in the user manual. Therefore, any products that have
• When the alarm sounds, press any key except SNOOZE to
reached the end of their useful life must be given to waste
stop the alarm. The alarm will reactivate the next scheduled
disposal centers specializing in separate collection of waste
alarm time unless deactivated.
electrical and electronic equipment, or given back to the dealer
when purchasing a new WEEE, pursuant to and in accordance
with Article 14 as implemented in the country.
DIMMER
The adequate separate collection for the subsequent start-up
Turn off all the alarms, press SNOOZE to adjust the backlight:
of the equipment sent to be recycled, treated and disposal
of in an environmentally compatible way contributes to
normal mid dim
preventing possible negative effects on the environment and
health and optimizes the recycling and reuse of components
BLUETOOTH PAIRING
making up the apparatus.Abusive disposal of the product by
1. Turn on Bluetooth on your smart device.
the user involves application of the administrative sanctions
according to the laws in force.
2. Open the Bluetooth pairing list on your smart device and
select to connect CIR600. The Bluetooth icon displays
steady.
3. If pairing failure, press and hold
on the unit for 2 seconds
to enter the Bluetooth pairing mode. The Bluetooth icon
flashes and re-pair.
NOTE
• If the unit is not connected to a device within 5 mintues, the
Bluetooth
will automatically turn off.
• To disconnect the unit from your smart device, disconnect it
in the Bluetooth menu of your device.
SINCRONIZZAZIONE BLUETOOTH
1. Accendi il Bluetooth sul tuo dispositivo smart.
2. Apri la lista sincronizzazione Bluetooth sul tuo dispositivo
smart e seleziona connessione a CIR600. L'icona
Bluetooth apparirà fissa.
Orologio Musicale Bluetooth
3. Se la sincronizzazione fallisce, premi e mantieni premuto
sull'unità per 2 secondi per accedere alla modalità
Modello: CIR600
sincronizzazione Bluetooth. L'icona Bluetooth
lampeggerà e sincronizzerà nuovamente i dispositivi.
Manuale d'uso
NOTA
IT
• Se l'unità non è connessa al dispositivo entro 5 minuti,
Grazie per aver scelto l'Orologio Musicale Bluetooth della
Oregon Scientific
TM
(CIR600).
il Bluetooth
si spegnerà automaticamente.
NOTA
Ti preghiamo di tenere a portata di mano questo
• Per disconnettere l'unità dal tuo dispositivo smart,
manuale quando fai uso del tuo nuovo prodotto. Esso contiene
disconnettila sul menu Bluetooth del tuo dispositivo smart.
istruzioni pratiche passo-passo, specifiche tecniche e
• La tecnologia wireless Bluetooth funziona entro un raggio
avvertenze che dovresti conoscere.
di 10 metri (33 piedi) e varia se ci sono ostacoli fisici, come
un muro spesso tra il tuo dispositivo smart e l'unità CIR600.
CONTENUTI DEL PACCHETTO
ASCOLTA LA MUSICA
• Unità principale x 1
• Batteria CR2025 x 1
1. Premi
per selezionare BT o Aux in musica.
• Adattatore AC/DC x 1
2. Premi
o
per controllare il volume del suono, il
• Manuale d'uso x 1
volume massimo è 16.
RIEPILOGO
3. Premi e mantieni premuto
per 3 secondi per impostar
muto, il volume è 0.
UNITA' PRINCIPALE
ASCOLTA UNA SORGENTE AUDIO ESTERNA
1
2
3
4
5
1. Usa un cavo audio 1/8 (3.5 mm) (non incluso) per connettere
la presa cuffie di una sorgente audio esterna alla presa
Aux in sulla tua unità.
2. Premi
per accedere alla modalità AUX IN.
6
3. Usa i comandi sul tuo dispositivo connesso per ascoltare
musica.
7
8
9
10
11
SPECIFICHE
Alimentazione
Adattatore
AC/DC 12 V, 2.0 A
Potenza audio in uscita
2 x 10 W RMS
Potenza Porta USB in uscita
5 V, 1 A
Batteria di back-up
CR2025
(solo di back-up)
1.
Volume sù; Aumenta un valore nella modalità
Bluetooth
Versione 4.0
impostazioni.
2.
Volume giù; Diminuisce un valore nella modalità
L x L x H
200 x 89 x 72,9 mm
impostazioni;
(7,9 x 3,5 x 2,9 in)
3.
Imposta la sveglia; Attiva/Cancella la sveglia;
4.
Attiva modalità sincronizzazione Bluetooth;
Peso
628 g (1,4 lb)
Passa da Bluetooth a Aux in modalità audio.
5.
Passa da ora a calendario nella modalità
PRECAUZIONI
visualizzazione; Imposta ora/calendario.
6. SNOOZE Attiva la funzione Snooze allarme sveglia,
• Usare batterie nuove della misura e tipologia richiesta. Non
Regola la retroilluminazione.
utilizzare combinazioni di batterie vecchie e nuove o di tipi
7. Presa Jack DC 12 V, 2.0 A Connettore per l' adattatore AC/DC.
diversi.
8. Porta USB 5V, 1A per ricaricare dispositivi smart e/o
• Non smaltire le batterie vecchie nei rifiuti urbani
eseguire l' aggiornamento firmware.
indifferenziati. È necessario un trattamento speciale per la
9. Aux in Connettore per sorgenti audio esterne.
raccolta di questo tipo di rifiuti.
10. RESET Riporta alle impostazioni predefinite di fabbrica.
11. Scomparto batteria di back-up.
• Se non si intende utilizzare l'orologio per un lungo periodo,
rimuovi le batterie. Queste possono perdere elementi
chimici che potrebbero danneggiare le parti elettroniche.
SCHERMO LCD
• Non sottoporre il prodotto a forza eccessiva, urti, polvere,
temperatura o umidità.
• Non immergere l'unità in acqua. Se si versa del liquido sul
prodotto, asciugarlo immediatamente con un panno morbido
e privo di lanugine.
B
• Non pulire l'unità con materiali abrasivi, corrosivi o
contenenti alcool, in quanto possono causare danni.
• Non manomettere i componenti interni dell'unità. Questo
invalida la garanzia.
A
• Le immagini del manuale possono differire dalla realtà.
A. Display ora / calendario.
• Al momento dello smaltimento del prodotto, conferirlo ai
B. Display secondi / giorno della settimanay.
centri di raccolta specifici.
Simbolo
Descrizione
• Il contenuto di questo manuale non può essere riprodotto
senza il permesso del produttore.
Indicatore batteria scarica
NOTA
Le specifiche tecniche del prodotto e il contenuto del
Indicatore sveglia
manuale per l'utente sono soggette a modifiche senza
preavviso.
Icona Bluetooth
NOTA
Caratteristiche e accessori non disponibili in tutti i
paesi. Per ulteriori informazioni, rivolgersi al proprio
Aux in
rivenditore. Si prega di visitare il sito
http://global.oregonscientific.com/customerSupport.php
per scaricare una versione elettronica del manuale.
ALIMENTA IL TUO OROLOGIO
INFORMAZIONI SU OREGON SCIENTIFIC
INSTALLA-ZIONE BATTERIA
Il dispositivo viene con un accompagnamento batteria
Per ulteriori informazioni sui prodotti Oregon Scientific, visitate
il nostro sito web www.oregonscientific.it.
installata. Rimuovere la linguetta di plastica prima di usare
l'orologio. Sostituisci la batteria quando appare
.
Per richiedere informazioni, contattate il nostro Servizio Clienti
all'indirizzo info@oregonscientific.it.
1. Svita la vite e rimuovi la copertura dello scomparto batteria.
2. Inserisci una nuova batteria CR2025 3 V, polo positivo (+)
Oregon Scientific Global Distribution Limited si riserva il
in su, e riposiziona la copertura dello scomparto batteria.
diritto di interpretare e definire eventuali contenuti, termini
3. Premi RESET e riposiziona il coperchio.
e disposizioni contenuti in questo manuale per l'utente
e di modificarli, a sua esclusiva discrezione, in qualsiasi
NOTA
momento e senza preavviso. Nella misura in cui risultassero
• Tieni la batteria del tipo a bottone lontano dalla portata dei
incongruenze tra la versione in inglese e quelle in altre lingue,
bambini. Inghiottire una pila a bottone può essere fatale.
farà fede la versione in inglese.
CONNETTI ADATTATORE ENERGIA
DICHIARAZIONE DI CONFORMITA'UE
Connetti l'adattatore di energia AC/DC, incluso, alla presa jack
Con la presente il fabbricante, IDT Technology Limited,
DC 12 V, 2.0 A nel retro dell'unità e inseriscilo poi ad una presa
dichiara che questo tipo di apparecchiatura Orologio
di corrente standard.
Musicale Bluetooth (Modello: CIR600) è conforme alla
NOTA
direttiva 2014/53/UE. Il testo completo della Dichiarazione
di Conformità UE è disponibile al seguente indirizzo
• La batteria è esclusivamente ad uso di back-up. Connetti
internet : www.oregonscientific.com.
sempre l'unità alla sorgente di rete elettrica attraverso
l'adattatore di energia.
• Solo quando l'orologio è connesso alla sorgente di energia
AC, può caricare il tuo dispositivo smart via tramite la porta
USB.
• Accertati che l'adattatore non sia ostruito e che sia
PAESI CONFORMI ALLA DIRETTIVA RED
facilmente accessibile all'unità.
T utti I Paesi UE, Svizzera CH
• Per disconnettersi completamente dall'energia, scollega
e Norvegia
N
l'adattatore dalla rete principale.
INFORMAZIONE AGLI UTENTI
IMPOSTA L'ORA DELL'OROLOGIO
Ai sensi dell'art.26 del Decreto Legislativo 14
1. Premi e mantieni premuto
per 3 secondi per accedere
marzo 2014, n. 49 "Attuazione della Direttiva
alla modalità impostazione ora data, lingua.
2012/19/UE sui rifiuti di apparecchiature elettriche
2. Premi
o
ripetutamente per regolare le impostazioni;
ed elettroniche (RAEE)" ed ai sensi dell'art.22 del
premi e mantieni premuto
o
per impostazione veloce.
Decreto Legislativo 188 del 20 novembre 2008 "Attuazione
della direttiva 2013/56/EU concernente pile, accumulatori
3. Premi
per confermare e passare all'impostazione
e relativi rifiuti ".
successiva.
Il simbolo del cassonetto barrato riportato sull'apparecchiatura
• L'ordine di impostazioni è Formato ora 12/24 > Ora > Minuto
o sulla sua confezione indica che il prodotto alla fine della
> Anno > Formato calendario (MG/GM) > Mese > Giorno >
propria vita utile deve essere raccolto separatamente dagli
lingua per i giorni della settimana.
altri rifiuti per permetterne un adeguato trattamento e riciclo.
• Completa ogni passo in 60 secondi altrimenti il dispositivo
Si ricorda che le pile/accumulatori devono essere rimosse
uscirà dalla modalità impostazioni.
dall'apparecchiatura prima che questa sia conferita come
• Le opzioni lingua sono Inglese (EN), Tedesco (GER),
rifiuto. Per rimuovere le pile / accumulatori fare riferimento alle
Francese (FR), Italiano (IT) e spagnolo (SP).
specifiche indicazioni riportate nel manuale d'uso.
L'utente
dovrà,
pertanto,
conferire
gratuitamente
SVEGLIA
l'apparecchiatura e la pila giunta a fine vita agli idonei centri
comunali di raccoltadifferenziata dei rifiuti elettrici ed elettronici,
IMPOSTA LE SVEGLIE
oppure riconsegnarle al rivenditore secondo le seguenti
1. Premi e mantieni premuto
per 2 secondi per accedere
modalità:
alla modalità impostazione sveglia. I numeri dell'ora
• sia pile portatili sia apparecchiature di piccole dimensioni,
lampeggeranno.
ovvero con almeno un lato esterno non superiore a 25 cm,
2. Premi
o
ripetutamente per regolare le impostazioni;
è prevista la consegna gratuita senza obbligo di acquisto
premi e mantien
o
per impostazione veloce.
presso i negozi con una superficie di vendita delle
apparecchiature elettriche ed elettroniche superiore ai 400
3. Premi
per confermare e passare all'impostazione
mq. Per negozi con dimensioni inferiori, tale modalità è
successiva.
facoltativa.
• per apparecchiature con dimensioni superiori a 25 cm, è
ATTIVARE/DISATTIVARE LE SVEGLIE
prevista la consegna in tutti i punti di vendita in modalità 1
contro 1, ovvero la consegna al rivenditore potrà avvenire
Premi
a seconda dell'opzione desiderata:
solo all'atto dell'acquisto di un nuovo prodotto equivalente, in
ragione di uno a uno.
Sveglia accesa /
Premere
n.
Operazione
spenta
L'adeguata raccolta differenziata per l'avvio successivo
di volte
dell'apparecchiatura e delle pile/accumulatori dismessi al
Sveglia 1
riciclaggio, al trattamento e allo smaltimento ambientalmente
1
Imposta Sveglia 1
accesa
compatibile contribuisce ad evitare possibili effetti negativi
sull'ambiente e sulla salute e favorisce il reimpiego e/o riciclo
Sveglia 2
dei materiali di cui essi sono composti.
2
Imposta Sveglia 2
accesa
Lo smaltimento abusivo di apparecchiature, pile ed accumulatori
da parte dell'utente comporta l'applicazione delle sanzioni di
Entrambe sveglie
Imposta Sveglia
3
cui alla corrente normativa di legge.
accese
1 e 2
Entrambe sveglie
Spegni Sveglia
4
spente
1 e 2
Premi
e
contemporaneamente per rivedere l'orario
Sveglia 1.
Premi
e
contemporaneamente per rivedere l'orario
Sveglia 2.
RIPETI/BLOCCA LA SVEGLIA
• Premi SNOOZE per posticipare la sveglia di 8 minuti.
L'indicatore sveglia lampeggerà.
• Premi
per annullare la funzione Snooze durante il suo
stato attivo.
• Quando la sveglia suona, premi qualsiasi tasto ad
esclusione di SNOOZE per bloccare la sveglia. La sveglia
si riattiverà alla prossima sveglia programmata a meno che
non venga disattivata.
RETROILLUMINAZIONE
Il tasto Snooze oltre che agire sulle sveglie,
permette di regolare la luminosità dello schermo:
normale
medio
bassa
APPARIEMENT BLUETOOTH
1. Activez le Bluetooth sur votre appareil intelligent.
2. Open the Bluetooth pairing list on your smart device and
select to connect CIR600. The Bluetooth icon displays
steady.
Horloge de musique Bluetooth
3. If pairing failure, press and hold
on the unit for 2 seconds
Modèle: CIR600
to enter the Bluetooth pairing mode. The Bluetooth icon
flashes and re-pair.
Manuel utilisateur
REMARQUE
FR
• Si l'appareil n'est pas connecté à un appareil dans les 5
Nous vous remercions d'avoir choisi l'horloge de musique
minutes, le Bluetooth
s'éteindra automatiquement.
Bluetooth Oregon Scientific
TM
(CIR600).
• Pour déconnecter l'appareil de votre périphérique intelligent,
déconnectez-le dans le menu Bluetooth de votre appareil.
REMARQUE
Gardez ce manuel à portée de main lorsque
vous utilisez votre nouveau produit. Il contient des instructions
• La technologie sans fil Bluetooth fonctionne dans une plage
pratiques étape par étape, ainsi que des spécifications tech-
de 10 mètres (33 ft) et varie en cas d'obstacles physiques,
niques et des avertissements que vous devriez connaître.
comme un mur épais entre votre appareil intelligent et
CIR600.
CONTENU DU COLIS
ÉCOUTER LA MUSIQUE
• Unité principale x 1
• Pile CR2025 x 1
1. Appuyez sur
pour sélectionner BT ou Aux dans le menu
• Adaptateur secteur AC/DC x 1
Musique.
• Manuel utilisateur x 1
2. Appuyez sur
ou
pour contrôler le volume sonore, le
volume maximum est de 16.
VUE D'ENSEMBLE
3. Appuyez et maintenez enfoncée la touche
pendant 3
UNITÉ PRINCIPALE
secondes pour couper le son, le volume sera 0.
1
2
3
4
5
ÉCOUTER UNE SOURCE AUDIO ExTERIEURE
1. Utilisez un câble audio 1/8 (3,5 mm) (non fourni) pour
connecter la prise casque audio de la source audio à la
prise Aux in de votre appareil.
6
2. Appuyez sur
pour accéder au mode AUX IN.
3. Utilisez les commandes de votre appareil connecté pour
jouer.
7
8
9
10
11
SPÉCIFICATIONS
Adaptateur secteur AC/DC
Puissance d'entrée
12 V - 2.0 A
Puissance de sortie
2 x 10 W RMS
Port de sortie de charge
5 V - 1 A
USB
CR2025
Pile
1.
Volume haut ; Augmenter la valeur en mode réglage.
(pour source de secours)
2.
Volume bas ; Diminuer la valeur en mode réglage;
Bluetooth
Version 4.0
3.
Régler l'alarme ; Activer/annuler l'alarme;
4.
Activer le mode d'appariement Bluetooth ;
200 x 8 x 72,9 mm
L x l x h
Basculer entre Bluetooth et Aux en mode audio.
(7,9 x 3,5 x 2,9 in)
5.
Basculer le mode d'affichage entre l'heure et le
calendrier ; Définir l'heure / le calendrier.
Poids
628g (1,4 lb)
6. SNOOZE Répète l'alarme, Variateur.
7. Prise DC 12 V - 2.0 A Connecter l'adaptateur AC/DC.
PRÉCAUTIONS
8. Port USB 5 V - 1 A Chargez un appareil intelligent ;
Mise à jour du firmware.
• Utiliser uniquement des piles neuves du type et de la taille
requise. Ne pas mélanger des piles anciennes et des piles
9. Aux in Connexion à une source audio externe.
neuves, ou différentes sortes de piles.
10. RESET Remet tous les paramètres aux valeurs par défaut.
11. Compartiment de la pile : pour une source d'alimentation
• Ne pas jeter les piles usagées avec les déchets communs.
de secours.
Jeter les piles dans les bacs de collecte destinés au
recyclage des piles usagées.
AFFICHAGE LCD
• Enlever les piles si vous n'utilisez pas le produit durant
une longue période. Les piles peuvent libérer des produits
chimiques qui peuvent endommager les composants
électroniques.
•
Ne pas soumettre le produit à une force excessive, au
choc, à la poussière, aux changements de température ou
B
à l'humidité.
• Ne pas immerger le produit dans l'eau. Si vous renversez
du liquide sur l'appareil, séchez-le immédiatement avec un
tissu doux.
A
• Ne pas nettoyer l'appareil avec des matériaux corrosifs ou
A. Affichage de l'heure / du calendrier
abrasifs.
B. Affichage de la seconde / du jour de la semaine.
• Ne pas trafiquer les composants internes. Cela invalidera
votre garantie.
Symbole
Description
• Les images de ce manuel peuvent différer de l'aspect réel
Indicateur de batterie
du produit.
faible
• Lorsque vous désirez vous débarrasser de ce produit,
Indicateur d'alarme
assurez-vous qu'il soit collecté séparément pour un
traitement adapté.
Icône Bluetooth
• Le contenu du présent manuel ne peut être reproduit sans
la permission du fabriquant.
Aux in
REMARQUE
Les caractéristiques
techniques
de
ce
produit et le contenu de ce manuel peuvent être soumis à
modifications sans préavis.
ALIMENTER VOTRE HORLOGE
REMARQUE
Caractéristiques et accessoires ne seront pas
INSTALLER LA PILE
valables pour tous les pays. Pour plus d'information, contacter
Le produit vient avec des batteries de secours installés.
le détaillant le plus proche. Pour télécharger une version
Retirez la languette en plastique avant d'utiliser le produit.
électronique de ce mode d'emploi, veuillez visiter
http://global.oregonscientific.com/customerSupport.php.
Remplacez la batterie lorsque
s'affiche.
1. Dévisser le couvercle du compartiment de la pile.
À PROPOS D'OREGON SCIENTIFIC
2. Insérez une nouvelle pile CR2025 de 3 V, partie positive
(+) vers le haut et remettez le couvercle du compartiment
Pour plus d'informations sur les produits Oregon Scientific
de la pile.
France, rendez-vous sur notre site www.oregonscientific.fr.
3. Appuyez sur RESET.
Besoin de plus d'informations? Contactez notre service client
REMARQUE
expert à info@oregonscientific.fr.
• Maintenez la pile bouton loin des enfants. L'ingestion d'une
Oregon Scientific Global Distribution Limited se réserve
pile bouton peut être fatale.
le droit d'interpréter tout contenu, termes et provisions du
présent manuel de l'utilisateur et de les amender à sa seule
BRANCHEZ L'ADAPTATEUR
discrétion, n'importe quand et sans avis préalable. Dans la
Connectez l'adaptateur secteur AC/DC fourni à la prise
mesure où des incohérences sont constatées entre la version
DC 12 V - 2.0 A à l'arrière de l'appareil et branchez-le dans
anglaise et les versions traduites en langues étrangères, la
une prise standard.
version anglaise prévaudra.
REMARQUE
EU – DÉCLARATION DE CONFORMITÉ
• La batterie ne sert qu'à une utilisation de secours.
Le fabricant, IDT Technology Limited, déclare que le
Connectez toujours l'unité à la source du réseau électrique
type d'équipement radio Horloge de musique Bluetooth
via un adaptateur secteur.
(Modèle: CIR600) est conforme à la directive 2014/53/UE.
• Lorsque l'horloge est connectée à une source d'alimentation
Le texte intégral de la déclaration de conformité de l'UE
secteur, elle peut charger votre appareil intelligent via le
est disponible à l'adresse Internet suivante:
port USB.
www.oregonscientific.com.
• Assurez-vous que l'adaptateur n'est pas obstrué et qu'il est
facilement accessible à l'appareil.
• Pour vous déconnecter complètement de l'alimentation,
débranchez l'adaptateur du secteur.
PAYS CONCERNÉS RED
RÉGLER L'HEURE DE D'HORLOGE
To us les pays Européens, la Suisse CH
et la Norvège
N
1. Appuyez et maintenez enfoncé la touche
pendant
3 secondes pour accéder au mode réglage de l'horloge.
INFORMATIONS AUx USAGERS
2. Appuyez sur
ou
plusieurs fois pour ajuster les
réglages ; Appuyez et maintenez enfoncé
ou
pour
Aux termes des Directives européennes 2011/65/EU
un réglage rapide.
et 2012/19/EU, relatives à la réduction de
3. Appuyez sur
pour confirmer et passer au prochain
l'utilisation de substances dangereuses dans
réglage.
les appareils électriques et électroniques et à
l'élimination des déchets.
• L'ordre de réglage est : Format 12/24 heures > Heure >
Minute > Année > Format du calendrier (MJ/JM) > Mois >
Le symbole représentant une poubelle barrée reporté sur
Jour > Langue du jour de la semaine
l'appareil indique que le produit doit être collecté séparément
des autres déchets à la fin de sa propre vie.
• Compléter chaque étape en 60 secondes ou l'appareil quit-
tera le mode de réglage de l'horloge.
L'usager devra done remettre l'appareil, lorsqu'il ne l'utilisera
plus, à des centres adaptés de collecte sélective pour les
• Les options de langue sont l'anglais (EN), l'allemand
déchets électroniques et électrotechniques, ou bien il devra
(GER), le français (FR), l'italien (IT) et l'espagnol (SP).
le rapporter au revendeur au moment de l'achat d'un nouvel
appareil de type équivalent, en raison d'un contre un.
ALARME
La collecte sélective adéquate pour la transmission
RÉGLAGE DES ALARMES
successive de l'appareil qui n'est plus utilisé au recyclage,
au traitement ou à l'élimination compatible au niveau
1. Appuyez et maintenez enfoncé la touche
pendant
environnemental, contribue à éviter les effets négatifs
2 secondes pour accéder au mode de réglage de l'alarme.
possibles sur l'environnement et sur la santé et favorise le
Les chiffres de l'heure clignotent.
recyclage des matériaux dont l'appareil est composé.
2. Appuyez sur
ou
plusieurs fois pour ajuster les
L'élimination illégale du produit par l'usager est passible de
réglages ; Appuyez et maintenez enfoncé
ou
pour
l'application de sanctions selon les lois en vigueur.
un réglage rapide.
3. Appuyez sur
pour confirmer et passer au prochain
réglage.
ACTIVATION / DÉACTIVATION DE L'ALARME
Appuyez sur
de façon adéquate pour l'option souhaitée:
Temps
Alarme activée
Fonctionnement
d'appui
/ désactivée
Alarme 1
1
Définir l'alarme 1
activée
Alarme 2
2
Définir l'alarme 2
activée
Définir les alarmes
Alarmes
3
activée
1 et 2
Alarmes
Désactive les
4
désactivées
alarmes 1 et 2
Appuyez sur
et
ensemble pour modifier l'heure de
l'Alarme 1.
Appuyez sur
et
ensemble pour modifier l'heure de
l'Alarme 2.
REPETITION / ARRET DE L'ALARME
• Appuyez sur SNOOZE pour arrêter l'alarme pendant
8 minutes. L'indicateur d'alarme clignote.
• Appuyez sur
pour annuler la fonction de répétition
lorsque la répétition est active.
• Lorsque l'alarme retentit, appuyez sur n'importe quelle
touche sauf SNOOZE pour arrêter l'alarme. L'alarme se
réactivera à la prochaine occurrence programmée, à moins
qu'elle ne soit désactivée.
VARIATEUR
Éteignez toutes les alarmes,
Appuyez sur SNOOZE pour régler la luminosité de l'affichage:
normal
moyen
faible
BLUETOOTH-KOPPLUNG
1. Schalten Sie Bluetooth auf Ihrem Smartphone ein.
2. Öffnen Sie die Bluetooth-Kopplungs-Liste auf Ihrem
Smartphone und wählen Sie CIR600 zum verbinden. Das
Bluetooth-Symbol leuchtet konstant.
Bluetooth-Musikuhr
3. Falls es zu einem Kopplungsfehler kommt, halten Sie
am Gerät 2 Sekunden lang gedrückt, um den Bluetooth-
Modell: CIR600
Pairing-Modus aufzurufen. Das Bluetooth-Symbol
blinkt
und versucht die Kopplung erneut.
Bedienungsanleitung
HINWEIS
DE
• Wenn das Gerät nicht innerhalb von 5 Minuten mit einem
Vielen Dank für die Wahl der Oregon Scientific™ Bluetooth-
Musikuhr (CIR600).
Gerät verbunden ist, schaltet sich das Bluetooth
automatisch aus.
HINWEIS
Bitte bewahren Sie diese Bedienungsanleitung
• Um das Gerät von Ihrem Smartphone zu trennen, trennen
in Greifweite auf, wenn Sie Ihr neues Produkt verwenden.
Sie es im Bluetooth-Menü Ihres Geräts.
Sie enthält praktische Schritt-für-Schritt-Anleitungen sowie
technische Einzelheiten und Warnungen, die Sie kennen sollten.
• Die drahtlose Bluetooth-Technologie arbeitet innerhalb von
10 Metern (33 ft) und variiert, wenn es physische Hindernisse
gibt, wie etwa eine dicke Wand zwischen Ihrem
PACKUNGSINHALT
Smart-Gerät und dem CIR600.
• Hauptgerät x 1
• CR2025 Batterie x 1
MUSIK HÖREN
• AC/DC Netzteil x 1
1. Drücken Sie
, um BT oder Aux unter Musik auszuwählen.
• Bedienungsanleitung x 1
2. Drücken Sie
oder
, um die Lautstärke anzupassen.
ÜBERBLICK
Die maximale Lautstärke beträgt 16.
3. Halten Sie
3 Sekunden lang gedrückt, um auf stumm zu
HAUPTGERÄT
schalten, die Lautstärke beträgt 0.
1
2
3
4
5
EINE ExTERNE AUDIOQUELLE HÖREN
1. Verwenden Sie ein 1/8 (3,5 mm) Audiokabel (nicht
mitgeliefert), um die Kopfhörerbuchse der Audioquelle mit
der Aux In-Buchse am Gerät zu verbinden.
6
2. Drücken Sie
, um den AUX IN-Modus aufzurufen.
3. Verwenden Sie die Bedienelemente Ihres
angeschlossenen Geräts, um zu spielen.
7
8
9
10
11
SPEZIFIKATIONEN
Eingangsleistung
12 V, 2.0 A AC/DC Netzteil
Ausgangsleistung
2 x 10 W RMS
USB-Ladeausgang
5 V, 1 A
CR2025
Batterie
(als Reserve-Quelle)
1.
Lautstärke erhöhen; Erhöhen Sie einen Wert im
Bluetooth
Version 4.0
Einstellmodus.
2.
Lautstärke verringern; Verringern Sie einen Wert im
200 x 8 x 72,9 mm
L x W x H
(7,9 x 3,5 x 2,9 in)
Einstellmodus;
3.
Alarmfunktionstaste: Aktivieren / Deaktivieren Sie
Gewicht
628 g (1,4 lb)
den Alarm;
4.
Bluetooth-Kopplungsmodus aktivieren; Schalten Sie
zwischen Bluetooth und Aux im Audiomodus um.
VORSICHTSMASSNAHMEN
5.
Umschalten des Anzeigemodus zwischen Uhrzeit und
• Verwenden Sie nur neue Batterien gemäß angegebener
Kalender; Stellen Sie die Uhrzeit / den Kalender ein.
Größe und Typen. Vermischen Sie nicht alte und neue
6. SNOOZE Den Alarm auf Schlummern setzen, Dimmer.
Batterien, vermeiden Sie unterschiedliche Batterietypen.
7. DC 12 V, 2.0 A Buchsenstecker AC / DC Adapter anschließen.
• Batterien gehören nicht in den Hausmüll. Gebrauchte
8. 5 V, 1A USB-Anschluss Smart-Gerät aufladen;
Firmware Update.
Batterien
müssen
zur
fachgerechten
Entsorgung
9. Aux in Verbinden mit externer Audioquelle.
abgegeben werden.
10. RESET Stellt alle Einstellungen auf die Werkseinstellungen
• Wenn Sie die Gerät für eine längere Zeit nicht benutzen,
zurück.
müssen die Batterien aus dem Batteriefach entfernt
11. Batteriefach: für Reserve-Stromquelle.
werden. Chemische Flüssigkeiten, die aus den Batterien
austreten, führen zu Schaden an den elektronischen Teilen.
LCD BILDSCHIRM
• Setzen Sie das Gerät keiner extremen Gewalteinwirkung
und keinen Stößen aus, und halten Sie es von übermäßigem
Staub, Hitze oder Feuchtigkeit fern.
• Tauchen Sie das Gerät niemals in Wasser. Falls Sie eine
Flüssigkeit über das Gerät verschütten, trocknen Sie es
sofort mit einem weichen, faserfreien Tuch.
B
• Reinigen Sie das Gerät keinesfalls mit scheuernden oder
ätzenden Mitteln.
• Machen Sie sich nicht an den internen Komponenten des
A
Geräts zu schaffen, da dies zu einem Verlust der Garantie
führen kann.
A. Uhrzeit- / Kalenderanzeige.
• Die in dieser Anleitung dargestellten Abbildungen können
B. Sekunden-/ Wochentagsanzeige.
sich vom Original unterscheiden.
Symbol
Beschreibung
• Entsorgen Sie das Produkt nicht im allgemeinen Hausmüll,
sondern ausschließlich in den dafür vorgesehenen,
Batteriestandanzeige
kommunalen Sammelstellen, die Sie bei Ihrer Gemeinde
erfragen können.
Alarmanzeige
• Der Inhalt dieser Anleitung darf ohne Genehmigung des
Herstellers nicht vervielfältigt werden.
Bluetooth-Symbol
HINWEIS
Die technischen Daten für dieses Produkt
Aux in
und der Inhalt der Bedienungsanleitung können ohne
Benachrichtigung geändert werden.
HINWEIS
Eigenschaften und Zubehör nicht in allen Ländern
NEHMEN SIE IHRE UHR IN BETRIEB
verfügbar.
Weitere Informationen erhalten Sie von Ihrem
BATTERIE INSTALLIEREN
Fachhändler vor Ort. Bitte besuchen Sie unsere Internetseite
http://global.oregonscientific.com/customerSupport.php,
Das produkt wird mit einem backup - batterie installiert.
um eine elektronische Version dieser Bedienungsanleitung
Entfernen sie die kunststoff - tab, bevor sie das produkt.
herunter zu laden.
Tauschen Sie die Batterie aus, wenn
ngezeigt wird.
ÜBER OREGON SCIENTIFIC
1. Schrauben Sie den Batteriefachdeckel ab.
2. Setzen Sie eine neue CR2025 3 V Batterie ein, mit der
Besuchen Sie unsere Website www.oregonscientific.de, um
positiven (+) Seite nach oben und schließen Sie die Bat-
mehr über die Produkte von Oregon Scientific zu erfahren.
teriefachabdeckung.
Für etwaige Anfragen kontaktieren Sie bitte unseren
3. Drücken Sie RESET.
Kundendienst unter info@oregonscientific.de.
HINWEIS
Oregon Scientific Global Distribution Limited behält sich das
• Halten Sie die Knopfzellen-Batterie von Kindern fern.
Recht vor, die Inhalte, Bedingungen und Bestimmungen
Das Schlucken einer Knopfzellenbatterie kann tödlich sein.
in
dieser
Bedienungsanleitung
zu
interpretieren
und
auszulegen, und diese jederzeit nach eigenem Ermessen
ohne
vorherige Ankündigung
abzuändern.
Soweit
es
NETZTEIL ANSCHLIESSEN
irgendwelche Unterschiede zwischen der englischen Version
Verbinden Sie das mitgelieferte AC/DC Netzteil mit der
und den Versionen in anderen Sprachen gibt, ist die englische
Buchse DC 12 V, 2.0 A auf der Rückseite des Gerätes und
Version maßgebend.
stecken Sie es in eine Steckdose.
EU-KONFORMITÄTSERKLÄRUNG
HINWEIS
Hiermit erklärt der Hersteller, IDT Technology Limited,
• Die Batterie dient nur als Back-Up-Reserve. Schließen Sie
dass
der
Funkausrüstungs-Typ
Bluetooth-Musikuhr
das Gerät immer über das Netzteil an die Stromnetzquelle an.
(Modell: CIR600) In Übereinstimmung mit 2014/53/EU ist.
Den vollständigen Wortlaut der EU-Konformitätserklärung
• Wenn die Uhr an die Wechselstromquelle angeschlossen ist,
finden Sie unter folgender Internetadresse:
kann sie Ihr Smartphone über den USB-Anschluss aufladen.
www.oregonscientific.com.
• Vergewissern Sie sich, dass der Adapter nicht blockiert und
dem Gerät leicht zugänglich ist.
• Um das Gerät vollständig vom Netz zu trennen, ziehen Sie
den Netzstecker aus der Steckdose.
EINSTELLUNG DER UHRZEIT
KONFORM IN FOLGENDEN L Ä NDERN
1. Halten Sie
3 Sekunden lang gedrückt, um den
Alle Länder der EU, Schweiz CH
Uhrzeit-Einstellmodus aufzurufen.
und Norwegen N
2. Drücken Sie wiederholt
oder
, um die Einstellungen
anzupassen. Drücken und halten Sie
oder
, um die
INFORMATIONEN FÜR DIE BENUTZER
Einstellung schnell vorzunehmen.
Gemäß den Europäischen Richtlinien 2011/65/EU
3. Drücken Sie
zur Bestätigung und wechseln Sie zur
und
2012/19/EU
über
die
Reduzierung
der
nächsten Einstellung.
Verwendung gefährlicher Stoffe in elektrischen
und
elektronischen
Geräten,
sowie
die
• Die Einstellungsreihenfolge ist im 12/24-Stunden Format
Abfallentsorgung.
> Stunde> Minute> Jahr> Kalenderformat (MD / DM)
> Monat> Tag> Wochentag Sprache.
Das Symbol der durchgestrichenen Mülltonne auf dem Gerät
besagt, dass es am Ende seiner Verwendungszeit getrennt
• Beenden Sie jeden Schritt innerhalb von 60 Sekunden,
von anderen Abfällen entsorgt werden muss.
sonst beendet das Gerät den Uhrzeit-Einstellungsmodus.
Der Benutzer muss daher das Gerät nach Beendigung seiner
• Die Sprachoptionen sind Englisch (EN), Deutsch (GER),
Französisch (FR), Italienisch (IT) und Spanisch (SP).
Verwendungsdauer zu geeigneten Sammelstellen für die
getrennte
Abfallentsorgung
von
elektrischen
und
elektronischen Geräten bringen oder es dem Endverkäufer
ALARM
beim Kauf eines neuen Geräts von ähnlicher Art im Verhältnis
ALARME EINSTELLEN
eins zu eins übergeben.
Die angemessene Abfalltrennung und die darauf folgende
1. Halten Sie
2 Sekunden lang gedrückt, um den
Verbringung des aufgelassenen Geräts in den Recyclingkreislauf
Alarmeinstellungsmodus
aufzurufen.
Die
Ziffern
der
zur umweltverträglichen Verwertung und Entsorgung tragen
Uhrzeitanzeige blinken.
dazu bei, mögliche negative Auswirkungen auf die Umwelt
2. Drücken Sie wiederholt
oder
, um die Einstellungen
und die Gesundheit zu vermeiden und sie begünsti-gen das
Recycling von Materialien, aus denen das Gerät besteht.
anzupassen. Drücken und halten Sie
oder
, um die
Einstellung schnell vorzunehmen.
Die rechtswidrige Entsorgung des Produktes veranlässt die
Verwendung der geltenden Verwaltungssanktionen.
3. Drücken Sie
zur Bestätigung und wechseln Sie zur
nächsten Einstellung.
AKTIVIEREN / DEAKTIVIEREN DES ALARMS
Drücken Sie
entsprechend der gewünschten Option:
Zeit drücken
Alarm an / aus
Operation
1
Alarm 1
an
Alarm 1 einstellen
2
Alarm 2 einstellen
Alarm 2
an
Beide Alarme
Alarm 1 und 2
3
an
einstellen
Alarm 1 und 2
4
Beide Alarme aus
ausschalten
Drücken Sie
und
gleichzeitig, um die Zeit von Alarm 1
zu überprüfen.
Drücken Sie
und
gleichzeitig, um die Zeit von Alarm 2
zu überprüfen.
SNOOZE / STOP DEN ALARM
• Drücken Sie SNOOZE, um den Alarm für 8 Minuten zu
stoppen. Die Alarmanzeige blinkt.
• Drücken Sie
, um die Snooze-Funktion während des
Snooze-Status abzubrechen.
• Wenn der Alarm ertönt, drücken Sie eine beliebige Taste
außer SNOOZE, um den Alarm zu stoppen. Der Alarm
reaktiviert die nächste geplante Alarmzeit, wenn sie nicht
deaktiviert ist.
DIMMER
TSchalten Sie alle Alarme aus,drücken Sie SNOOZE um die:
normal
mittel
gedimmt
Bildschirmhelligkeit einzustellen.
SINTONIZAR CON EL BLUETOOTH
1. Active el Bluetooth en su dispositivo inteligente.
2. Abra la lista de emparejamiento de Bluetooth en su dispositivo
inteligente y seleccione conectarse a CIR600. El icono
Bluetooth se visualizará sin parpadeos.
Reloj Despertador con
3. Si el emparejamiento falla, pulse y mantenga pulsado
Bluetooth
durante 2 segundos el botón
en la unidad principal. El
icono Bluetooth
parpadeará y se volverá a sincronizar.
Modelo: CIR600
NOTA
Manual De Usuario
• Si la unidad se mantiene sin conexión durante 5 minutos,
el Bluetooth
se desconectará automáticamente.
ES
• Para desconectar la unidad de su dispositivo inteligente,
Gracias por elegir el Reloj Musical Bluetooth (CIR600) de
hágalo desde el menú Bluetooth de su dispositivo.
Oregon Scientific
TM
.
• La tecnología inalámbrica Bluetooth opera en un radio
de 10 metros (33 pies) y se verá afectada por obstáculos
NOTA
Mantenga este manual a mano durante el uso de su
físicos, como muros macizos situados entre su dispositivo
nuevo producto. Contiene instrucciones prácticas paso por
inteligente y el CIR600.
paso, así como especificaciones técnicas y advertencias que
debe conocer.
ESCUCHAR MúSICA
CONTENIDO DE LA CAJA
1. Pulse
para seleccionar escuchar música a través de
• 1 x Unidad principal
Bluetooth o de la Conexión auxiliar.
• 1 x Pila CR2025
2. Pulse
o
para controlar el volumen, el volumen
• 1 x Adaptador de corriente CA/CD
máximo es 16.
• 1 x Manual de usuario
3. Mantenga pulsado
para silenciar, el volumen será
equivalente a 0.
RESUMEN
ESCUCHAR UNA FUENTE DE AUDIO ExTERNA
UNIDAD PRINCIPAL
1. Use un cable de audio de 1/8 (3,5 mm) (no incluido) para
1
2
3
4
5
conectar la salida de auriculares de un reproductor de
audio a la Aux in de su unidad.
2. Pulse
para entrar en el modo AUX IN.
3. Reproduzca la música usando los botones del dispositivo
conectado.
6
ESPECIFICACIONES
7
8
9
10
11
Adaptador de 12 V,
Entrada de energía
2.0 A CA/CD
Salida de energía
2 x 10 W RMS
Puerto de carga USB
5 V, 1 A
CR2025
Pila
(como fuente auxiliar)
Bluetooth
Versión 4.0
200 x 8 x 72,9 mm
1.
Subir volumen. Aumentar el valor en el modo
L x A x A
configuración.
(7,9 x 3,5 x 2,9 pulgadas)
2.
Bajar volumen. Disminuir el valor en el modo configuración;
Peso
628 g (1,4 libras)
3.
Ajuste de alarma. Activar/Cancelar la alarma.
4.
Activar el modo de emparejamiento de Bluetooth. Alternar
PRECAUCIÓN
entre Bluetooth y entrada auxiliar en el modo audio;
5.
Alternar el modo de visualización entre hora y
• Use sólo pilas nuevas del tamaño y tipo requeridos. No
calendario. Ajuste de hora/calendario.
mezcle pilas viejas y nuevas, ni diferentes tipos de pilas.
6. SNOOZE. Pausa la repetición de la alarma.
• No tire las pilas gastadas en la basura doméstica. Es
Regular intensidad.
necesario recoger dichos residuos por separado para
7. Entrada de 12 V DC 2.0 A. Conexión para el adaptador AC/DC.
realizar un tratamiento especial posterior.
8. Puerto USB 5V, 1A. Cargar dispositivo inteligente.
Actualización del Firmware.
• Si cree que no va a utilizar el producto durante un largo
periodo de tiempo, extráigale las pilas. Las pilas pueden
9. Aux in. Conectar a un reproductor de audio externo.
derramar productos químicos que pueden dañar los
10. RESET. Restablece todos los ajustes a la configuración de
fábrica.
componentes electrónicos.
11. Compartimento de la pila para la fuente de energía auxiliar.
• No exponga el producto a fuerza extrema, descargas,
polvo, fluctuaciones de temperatura o humedad.
PANTALLA LCD
• No sumerja el dispositivo en agua. Si se vertiera líquido
en la unidad, límpiela con un paño suave y sin electricidad
estática.
• No limpie la unidad con materiales abrasivos o corrosivos.
• No manipule los componentes internos. De hacerlo se
invalidaría la garantía.
B
• Las imágenes de esta guía para el usuario pueden ser
distintas al producto en sí.
• Cuando elimine este producto, asegúrese de que no vaya a
A
parar a la basura general, sino separadamente para recibir
un tratamiento especial.
A. Visualización de Hora / Calendario.
• Los contenidos de este manual no pueden reproducirse sin
B. Visualización de Segundo / Día de la semana.
permiso del fabricante.
Símbolo
Descripción
NOTA
La ficha técnica de este producto y los contenidos
de este manual de usuario pueden experimentar cambios sin
Indicador de batería baja
previo aviso.
Indicador de Alarma
NOTA
No todas las funciones y accesorios estarán
disponibles en todos los países. Sírvase ponerse en contacto
Icono de Bluetooth
con su distribuidor local si desea más información. Por favor,
visite http://global.oregonscientific.com/customerSupport.php
Aux in
para descargar una versión electrónica del manual de usuario.
SOBRE OREGON SCIENTIFIC
ENERGíA PARA EL RELOJ
Visite nuestro sitio web www.oregonscientific.com para obtener
más información sobre los p
INSTALAR LA PILA
El producto viene con una bateria de respaldo instalado.
@
Retire la lengüeta de plástico antes de usar el producto.
Cuando
se muestre en la visualización, reemplace
la pila.
1. Desatornille la tapa del compartimento de la pila.
2. Inserte una nueva pila CR2025 3 V, con el polo positivo
(+) hacia arriba y recoloque la tapa del compartimento de
la pila.
3. Presione RESET.
NOTA
• Mantenga la pila de botón fuera del alcance de los niños.
Ingerir una batería de botón puede ser mortal.
CONECTAR EL ADAPTADOR DE CORRIENTE
Conecte el adaptador de alimentación de CA / DC suministrado
a la toma 12V DC 2.0 A ,en la parte posterior de la unidad y
conéctelo a una toma de corriente estándar.
NOTA
• La pila es para uso auxiliar, conecte siempre la unidad a la
red eléctrica a través del adaptador de corriente.
• Cuando el reloj esté conectado a la fuente de alimentación
CA, puede usarse para cargar su dispositivo inteligente a
través del puerto USB.
• Asegúrese de que nada obstruye su adaptador y que es de
fácil acceso para la unidad principal.
• Para desconectarse completamente de la fuente de
alimentación, desenchufe el adaptador de la red.
AJUSTAR LA HORA DEL RELOJ
1. Pulse y mantenga pulsado
durante 3 segundos para
entrar en el modo de ajuste del reloj
2. Pulse
o
repetidamente para ajustar la configuración
de los diferentes parámetros, mantenga presionado
o
para ajuste rápido.
3. Pulse
para confirmar y pasar al siguiente ajuste.
• El orden de configuración es: Formato 12/24 horas > Hora >
Minuto > Año > Formato de calendario (MD/DM) > Mes >
Día > Idioma del día de semana
• Finalice cada paso en menos de 60 segundos o el
dispositivo saldrá del modo de ajuste de reloj.
• Las opciones de idioma son: español (SP), inglés (EN),
alemán (GER), francés (FR), italiano (IT).
ALARMA
AJUSTE DE LAS ALARMAS
1. Pulse y mantenga pulsado
durante 2 segundos para entrar
en el modo de ajuste de alarma. Las cifras de la hora
parpadearán.
2. Pulse
o
repetidamente para ajustar la configuración
de los diferentes parámetros, mantenga presionado
o
para ajuste rápido.
3. Pulse
para confirmar y pasar al siguiente parámetro.
ACTIVAR / DESACTIVAR LA ALARMA
Pulse
para elegir la opción deseada:
Numero de
Alarma encendida/
Operación
pulsaciones
apagada
Establecer la
Alarma 1
1
encendida
Alarma 1
Establecer la
Alarma 2
2
encendida
Alarma 2
Establecer
Ambas alarmas
3
encendida
Alarma 1 y 2
Apagar la
Ambas alarmas
4
Alarma 1 y
apagadas
la 2
Pulse
y
a la vez para revisar la hora de la Alarma 1.
Pulse
y
a la vez para revisar la hora de la Alarma 2.
SNOOZE /PARAR LA ALARMA
• Pulse SNOOZE para detener la alarma durante 8 minutos.
El indicador de alarma parpadeará.
• Pulse
para cancelar la función de pausa durante el
estado de pausa.
• Cuando suene la alarma, pulse cualquier tecla salvo
SNOOZE para detener la alarma. La alarma se reactivará
en la siguiente hora programada, a no ser que se apague.
INTENSIDAD
Apagar todas las alarmas,
pulse SNOOZE para ajustar la intensidad de visualización:
normal
media
tenue
Advertisement
Table of Contents

Related Manuals for Oregon Scientific CIR600


Summary of Contents for Oregon Scientific CIR600
- Page 1 SINTONIZAR CON EL BLUETOOTH (33 ft) range and varies if there are physical obstacles, such as a thick wall in between your smart device and CIR600. 1. Accendi il Bluetooth sul tuo dispositivo smart. 1. Activez le Bluetooth sur votre appareil intelligent.
- Page 2 12 V,2.0 A AC / DC stängs Bluetooth automatiskt av. 機插孔連接至本機的Aux in插孔。 输入功率 2. Selecione a opção CIR600 que aparece na lista de 2. De Bluetooth-koppelingslijst op uw smart-apparaat openen 电源适配器 dispositivos de Bluetooth disponíveis do seu dispositivo en selecteren om de CIR600 te verbinden.
Need help?
Do you have a question about the CIR600 and is the answer not in the manual?
Questions and answers