Table of Contents
Advertisement
Advertisement
Table of Contents

Related Manuals for Work Pro LS-1

Summary of Contents for Work Pro LS-1
- Page 1 User Manual V 1.1...
- Page 2 Our Hardware and Software departments have worked hard to offer you a simple, powerful and compact lighting system. From WORK PRO we hope it meet all your expectations. Thank you very much for trusting us.
- Page 3 Thanks to its compact size, LightShark can be carried along with your tablet backpack (LS-Core) or as hand luggage (LS-1). Both devices have the same features. All devices have the LightShark software inside, allowing to be operated from any tablet, PC or smartphone…...
- Page 4 WiFi ( interferencias, inhibidores.. ) es posible conectarse directamente a los dispositivos a través de una r ed cableada a través del The LightShark software is always running inside the console (LS-Core or LS-1), puerto de conexión de red de cada dispositivo.
- Page 5 It is posible to simultaneously connect up to 3 devices to LightShark, showing different windows on each device. This allows the user to create a multi-screen system.
-
Page 6: Table Of Contents
Contents INFORMATION ...................... 8 DEVICES ....................... 9 LS-1 ........................10 LS-Core ....................... 12 Connectivity ......................13 USER INTERFACE ....................18 Palettes ....................... 18 Virtual Playback ....................28 Cuelist ......................... 30 Executors ......................32 Prog/Out ......................33 CREATING AND SAVING SHOWS ..............34 Creating a new show ................... - Page 7 Playback options ....................44 Cuelist options ....................47 USE OF EXECUTORS ..................49 Add Cuelist ......................51 Empty a box ......................51...
-
Page 8: Information
1. INFORMATION Equipson SA 2018. All rights reserved. No part of this manual, including the products and software described in it, may be reproduced, transmitted or translated into any language in any form or by any means without the express written permission of Equipson S.A. -
Page 9: Devices
2. DEVICES LightShark series range comprises two independent devices: LS-1 is a new generation of web-based lighting consoles, designed for all types of shows. It provides a simple, powerful and portable multiplatform control system. LS-Core is focused on those technicians who need the features of a complete lighting console reducing the space to the minimum. -
Page 10: Ls-1
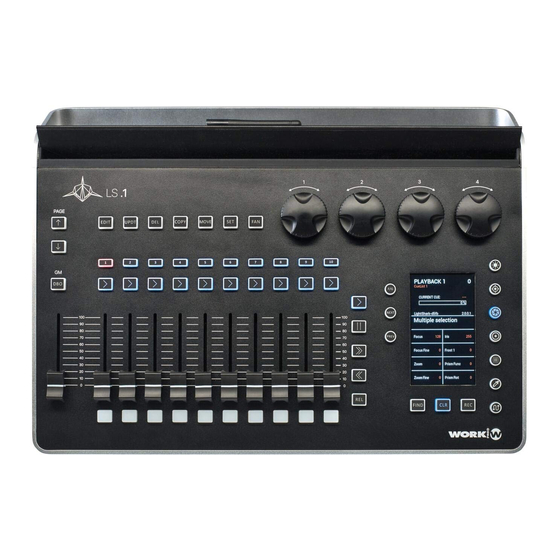
LS-1 1- Grand Master 2- Blackout 3- Page selection 4- Editor 5- Selection buttons 6- Go buttons 7- Playback Area 8- Flash buttons 9- Encoders 10- Playback control Area 11- Selection Area 12- FIND-CLEAR-REC function buttons 13- Attribute selection 14- Information display... - Page 11 1- Desk Lamp (5V) 2- DMX Out (2 Universes) (3-pin and 5-pin) 3- Ethernet port (TCP/IP, ArtNet, sACN) 4- USB for data transfer, USB for charging 5- WiFi Antenna 6- Power Switch 7- Power Socket Dimensions (Width x Height x Depth): 430 x 100 x 330 mm Weight: 3,7kg...
-
Page 12: Ls-Core
LS-Core 1- USB port for data transfer 2- Navigation buttons 3- WiFi Antenna 4- Information display 5- DMX Out (2 Universes) (5-pin) 6- Ethernet port (TCP/IP, ArtNet, sACN) 7- Power Socket Dimensions (Width x Height x Depth): 108 x 40 x 142 mm Weight: 460g... -
Page 13: Connectivity
Web Browser, LightShark features an integrated Web Server. You will only have to connect to the WiFi access point of the LS-1 or LS-Core. As an alternative, you can connect via an existing WiFi network or use the Ethernet port of the LS-1 or LS-Core for a wired connection. - Page 14 Start the Web Browser of your device and type lightshark.work in the URL field, or 192.168.42.1 The LightShark loading screen will appear and you will be redirected to the Palette window.
- Page 15 WARNING The first time you connect is important that you change the WiFi password. Go to the main menu on LightShark (on the top-left side of the screen) and click on the settings icon and select the “NETWORK” tab to proceed with the required changes. NOTE LightShark can run in full screen, hiding the navigation bar of the Web Browser, and it can be launched as any other app.
- Page 16 Press “Add”. A LightShark icon will appear in the Home screen, so you can directly access to LightShark without having to open the Web Browser.
- Page 17 Now LightShark will open in full screen mode.
-
Page 18: User Interface
3. USER INTERFACE LightShark has a simple but complete User Interface. It is possible to control all the device parameters, to record scenes and to run the shows. The interface consists of 5 different views and a main menu access: Palettes It is LightSharsk´s main view. - Page 19 2- Attribute Control Area, which is divided into 7 sections. Depending on the kind of fixture and the type of attribute it will display different information: By default each section has a view by parameters and a view of palettes:...
- Page 20 On the parameters view the user will find all the attributes for the selected type. The attributes are automatically shown in groups of 4. In case the selected section has for example 7 “BEAM” channels, you may access to the next 3 attributes by scrolling down.
- Page 21 LS-1 users may interact with the interface using the encoders and buttons, so each LS- 1 encoder controls one of the attributes displayed (the top parameter is controlled by the first encoder on the left, and so on). The information shown in this area is also shown on the LCD integrated screen of the LS-1.
- Page 23 LightShark includes an internal FX generator, so it is possible to add an effect to one or several fixtures. LightShark arranges the effects into 4 categories: Position, Colour, Beam and Intensity. Each category may have up to 9 different effects. 3-Editor Area, which allows the user to perform editing and recording functions.
- Page 24 4-Playback Area, which allows the user to play the show, run the Cuelist and control the output level. The GrandMaster is minimised by default, just press on the button to extend it and show the fader. Pressing again, it will minimise again. It is possible to add a specific level to the GrandMaster pressing for 2 seconds the value field.
- Page 25 LighShark allows to control the Playbacks using: Keyboard: a Playback can be mapped to a key on the keyborad. MIDI: in order to execute or adjust the level, any part (Fader, Encoder, Key) can be mapped from a Playback to a MIDI controller. The control area is configured to control the first 10 Playbacks, no matter which of the 3 Playback blocks is selected.
- Page 26 By holding down the value field for 2 seconds, you may give the Playback an specific value. It is possible to configure some options that determine how the Playback and the elements that form it work. The Playback priority, the way it reproduces, the control functions of the FX,...
- Page 27 To hide the Playback Options menu, you may press the top-left arrow on the panel.
-
Page 28: Virtual Playback
Virtual Playback From the “Virtual Playback” view the user may access the Playbacks. This can be very helpful when using the LS-Core or when a physical control device is not available. The LightShark interface is multi-touch, so several Playbacks may be simultaneously controlled from a tablet or any other device with this technology. - Page 29 LightShark supports up to 30 Playback pages, allowing physical and virtual faders to have different functions and behaviours depending on the page they are located. Usually a page per song is used. Using the UP and DOWN keys you may navigate through the pages. The tag showing the actual page is located between the keys.
-
Page 30: Cuelist
Cuelist LightShark has a Cue and Cuelist storage where the user may navigate through all the Cues and Cuelist stored (additional information ahead). From the Playbacks is possible to directly access the associated Cuelist double clicking on the Playback information field. - Page 31 When accessing the information of the Cue, LightShark will show the values that were recorded. To return to the Cuelist press again the arrow on the left-side.
-
Page 32: Executors
Executors The “Execute” Window is a user-configurable special window, in which the Cuelists may be added and their behaviour configured. To configure the Execute window press the “EDIT” key. -
Page 33: Prog/Out
Prog/Out From this window it is possible to see the progammer information. The devices will be sorted according to the inclusion order. The information shown in this window will be the information added to the Cue at that very moment. -
Page 34: Creating And Saving Shows
4. CREATING AND SAVING SHOWS LighShark includes a file manager to load, copy, save, delete and rename files. Creating a new show To create a new show from scratch, please access the LightShark menu from the icon on the top-right and press “NEW”. Loading an existing show To load an existing show: Access the LightShark menu through the icon on the top-right and press... -
Page 35: Adding Fixtures To A Show
5. ADDING FIXTURES TO A SHOW LightShark assigns an ID to each of the patched fixtures, allowing them to be selected through the keyboard. In addition, it gives them a name, so they can also be easily found. LightShark allows all kind of fixtures to be treated the same way. This is possible because the information is saved in a generic way, not on specific DMX values. -
Page 36: Modifying The Address On An Already Patched Fixture
screen keyboard will be displayed, where you can directly enter the universe number. Through the “Start Channel” field the user may adjust the address of the starting DMX channel where the fixture (or fixture group) will be added. Please note that the channel can be adjusted either using the + and - keys, or through the keyboard holding down on the number field. -
Page 37: Updating The Libraries
Updating the libraries Every LightShark update automatically includes the latest library version. If the user wants to update the libraries without updating LightShark, the library file can be downloaded from the LS-Cloud, and it can be copied into a USB memory stick. Then, from LightShark, follow these steps: Access the LightShark menu through the icon on the top-left, press the “File manager”... -
Page 38: Fixture Selection
6. FIXTURE SELECTION Fixture selection LightShark assigns an ID to each of the patched fixtures, so it can be selected in 3 different ways: 1-Group Window: LightShark will automatically create Auto-Groups for each of the fixtures added to the patch. This way the user will find the different fixture types grouped by model. -
Page 39: Creating Fixture Groups
Creating fixture groups LightShark allows to create fixture groups: Select the heads you wish to group in the Fixture window. Press the “REC” key and select an empty box on the Group window. Renaming fixture groups In order to identify the groups easily, LightShark allows the user to give a name to the fixture groups. -
Page 40: Recording Scenes
7. RECORDING SCENES The programmer storages all the information of the show and LightShark uses this information when recording Playbacks, Palettes, Groups… A fixture is included in the programmer when any attribute is modified. The programmer has priority on Playbacks, Cues, Cuelist and Channels. -
Page 41: Modifying Cues
4º-Select an empty Playback where the Cue is going to be stored. LightShark will assign to it the next available Cuelist ID, generating a new Cue, with the next available Cue ID. 5º-Press “CLEAR” to empty the programmer. 6º-To confirm that everything has been successfully recorded, activate the Playback. -
Page 42: Using Fx
Once a FX is selected it is possible to modify its parameters (speed, size, spread...) using the virtual sliders available on the screen (or through the encoders in the LS-1). It is possible to add several effects to a fixture (or group of fixtures) applied to different attributes. - Page 43 FX SIZE: it is the range in which the parameter may change. This is described on the appropriate terms for that parameter only, for example degrees for the position parameters, or slots for the colour parameters. It may be modified using the sliders on the screen. When a Size effect is added, its default will be 50%.
-
Page 44: Scene Playback
9. SCENE PLAYBACK The Cuelists may be configured to be played as a Chase (they are automatically played) or as a simple list of Cues. The main difference is that as a Chase, each of the Cue times are determined by the speed of the whole Chase. When a Cueslist is configured as a Cue Step, the times of each Cue are individually determined with their own delay and fade times. - Page 45 Fader Controls HTP Channels: when this function is activated, the Playback fader controls the level of all the HTP channels proportionally from 0% to 100%. This is the default option. Fader Controls LTP Channels: when this function is activated, the Playback fader controls the level of all LTP channels in the actual Cue of the Cuelist.
- Page 46 Fader UP+GO: when the fader exceeds the limit defined in the “trigger level” field, the Playback is activated and the Cuelist associated is played. If this option is deactivated the fader will not activate the Cuelist. Fader at Zero + Release: when the value of the fader is lower than the limit defined in the “trigger level”...
-
Page 47: Cuelist Options
Cuelist options It is possible to configure the way a Cuelist works from the option menu of the Cuelist. Deactivate after last Cue: when this option is activated, the Cuelist will automatically release after the last step in the Cuelist. Deactivate resets to first Cue: when this option is activated, the Cuelist associated to the Playback will always begin at the first step when is activated. - Page 48 Halt last Cue: when this option is activated, the Cuelist will stop at the last step. If the option is deactivated, the Cuelist will return to the first step once the last one is executed. Block FX from other Playbacks: when this option is activated, any channel controlled by this Playback will block the FX on those channels from other Playbacks.
-
Page 49: Use Of Executors
10. USE OF EXECUTORS From the Execute window the user can configure a custom layout to trigger the Cuelists. To add or remove Cuelists from the Execute window press the “Edit” button. The Execute window is composed of a grid of 8x8 buttons. Each of the 8 vertical columns can trigger one single Cuelist at the same time, so when selecting a Cuelist from the same column, it deselects the previous one. - Page 50 The user can modify the color of each of the buttons in the grid, so it is possible to visually appreciate each of the buttons and assign them a color depending on its characteristics. It is possible to configure each button as “Push” or as “Toggle”, being able to adjust the button behaviour according to whether we want to run a Cuelist or activate a Flash.
-
Page 51: Add Cuelist
It is possible to activate all the Cuelist of all the columns at the same time by sliding the finger horizontally. Add Cuelist The Cuelist can be copied to the execute Window following these steps: Press the “Edit” key in the Execute Window. On the left-side, select the Cuelist you want to add and press the “COPY”...
Need help?
Do you have a question about the LS-1 and is the answer not in the manual?
Questions and answers